アンチウィルスソフトの導入(Clam AntiVirus)
Clam AntiVirus をインストールします。
root@www:~# apt-get -y install clamav
root@www:~# sed -i -e "s/^NotifyClamd/#NotifyClamd/g" /etc/clamav/freshclam.conf
パターンファイルを更新します。
root@www:~# freshclam
ClamAV update process started at Sun Jun 30 23:51:01 2019
main.cvd is up to date (version: 58, sigs: 4566249, f-level: 60, builder: sigmgr)
daily.cld is up to date (version: 25496, sigs: 1606212, f-level: 63, builder: raynman)
bytecode.cvd is up to date (version: 328, sigs: 94, f-level: 63, builder: neo)
スキャンを実行して動作確認します。
root@www:~# clamscan --infected --remove --recursive /home

----------- SCAN SUMMARY -----------
Known viruses: 6163086
Engine version: 0.101.2
Scanned directories: 38
Scanned files: 23
Infected files: 0
Data scanned: 0.00 MB
Data read: 0.00 MB (ratio 0.00:1)
Time: 179.738 sec (2 m 59 s)
テスト用無害ウィルスをダウンロードします。
root@www:~# wget http://www.eicar.org/download/eicar.com
スキャンを実行して動作確認します。
root@www:~# clamscan --infected --remove --recursive ./

----------- SCAN SUMMARY -----------
Known viruses: 6163097
Engine version: 0.101.2
Scanned directories: 3
Scanned files: 10
Infected files: 1
Data scanned: 0.00 MB
Data read: 0.00 MB (ratio 0.00:1)
Time: 179.738 sec (2 m 59 s)
ファイル改竄検知システムの導入(Tripwire)
Tripwire をインストールします。
root@www:~# apt-get -y install tripwire
← →キーで「了解」を選択してEnterキーを押下します。
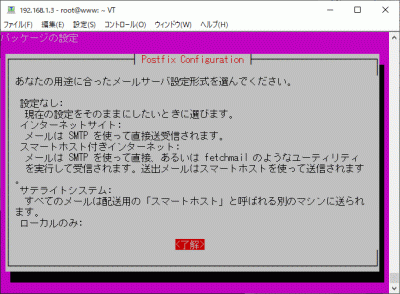
↑ ↓ キーで「設定なし」を選択し、← →キーで「了解」を選択してEnterキーを押下します。
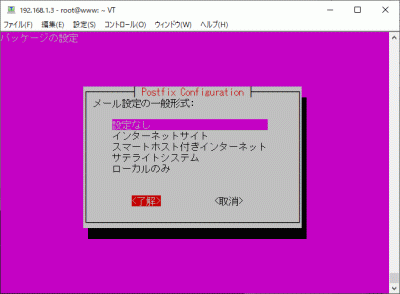
→キーで「了解」を選択し、Enterキーを押下します。
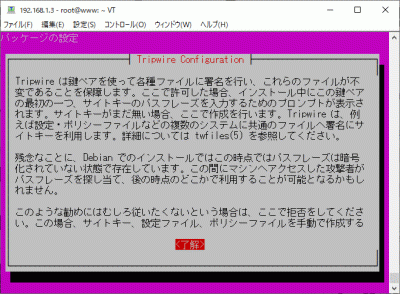
← → キーで「はい」を選択し、Enterキーを押下します。
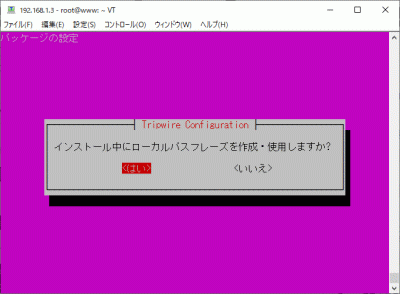
→キーで「了解」を選択し、Enterキーを押下します。
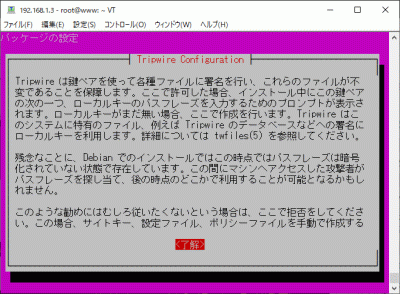
← → キーで「はい」を選択し、Enterキーを押下します。
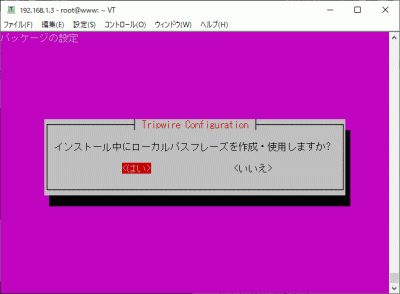
← → キーで「はい」を選択し、Enterキーを押下します。
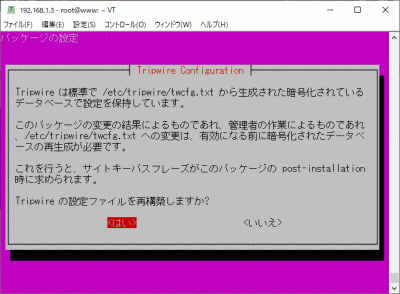
「サイトキーパスフレーズ」を入力し、↓キーで「はい」を選択し、Enterキーを押下します。
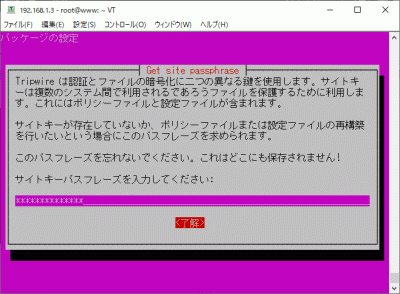
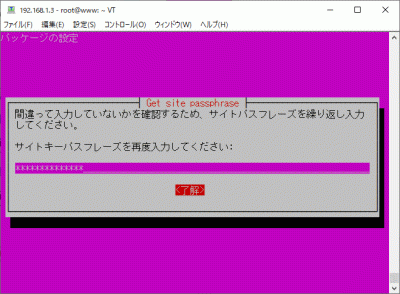
「サイトキーパスフレーズ」を再度入力し、↓キーで「はい」を選択し、Enterキーを押下します。
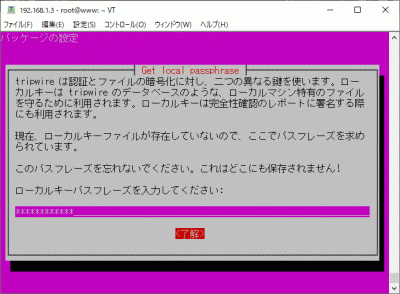
「ローカルキーパスフレーズ」を入力し、↓キーで「はい」を選択し、Enterキーを押下します。
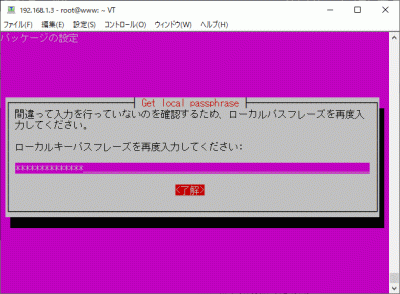
「ローカルキーパスフレーズ」を再度入力し、↓キーで「はい」を選択し、Enterキーを押下します。
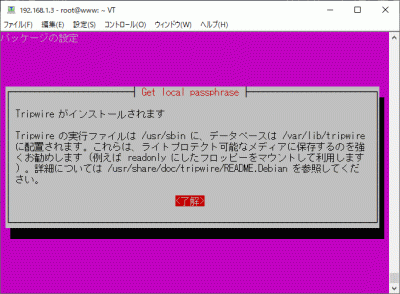
Enterキーを押下します。
「/etc/tripwire」へディレクトリを移動します。
root@www:~# cd /etc/tripwire
初期設定をします。
root@www:/etc/tripwire# vi twcfg.txt
12行目:報告レベルを最大に変更します。
REPORTLEVEL = 4
設定ファイルを生成します。
root@www:/etc/tripwire# twadmin -m F -c tw.cfg -S site.key twcfg.txt
サイトキーファイルのパスフレーズを入力します。
Please enter your site passphrase: サイトキーファイルのパスフレーズ
Wrote configuration file: /etc/tripwire/tw.cfg
ポリシーを最適化します。
root@www:/etc/tripwire# vi twpolmake.pl
行頭に「#」が自動挿入される場合は2回に分けて作成します。
#!/usr/bin/perl
# Tripwire Policy File customize tool
# ----------------------------------------------------------------
# Copyright (C) 2003 Hiroaki Izumi
# This program is free software; you can redistribute it and/or
# modify it under the terms of the GNU General Public License
# as published by the Free Software Foundation; either version 2
# of the License, or (at your option) any later version.
# This program is distributed in the hope that it will be useful,
# but WITHOUT ANY WARRANTY; without even the implied warranty of
# MERCHANTABILITY or FITNESS FOR A PARTICULAR PURPOSE. See the
# GNU General Public License for more details.
# You should have received a copy of the GNU General Public License
# along with this program; if not, write to the Free Software
# Foundation, Inc., 59 Temple Place - Suite 330, Boston, MA 02111-1307, USA.
# ----------------------------------------------------------------
# Usage:
# perl twpolmake.pl {Pol file}
# ----------------------------------------------------------------
#
#ここまでを1回目で作成して行頭に「#」の無い行を挿入して、以下を作成します。
$POLFILE=$ARGV[0];

open(POL,"$POLFILE") or die "open error: $POLFILE" ;
my($myhost,$thost) ;
my($sharp,$tpath,$cond) ;
my($INRULE) = 0 ;

while (<POL>) {
    chomp;
    if (($thost) = /^HOSTNAME\s*=\s*(.*)\s*;/) {
        $myhost = `hostname` ; chomp($myhost) ;
        if ($thost ne $myhost) {
            $_="HOSTNAME=\"$myhost\";" ;
        }
    }
    elsif ( /^{/ ) {
        $INRULE=1 ;
    }
    elsif ( /^}/ ) {
        $INRULE=0 ;
    }
    elsif ($INRULE == 1 and ($sharp,$tpath,$cond) = /^(\s*\#?\s*)(\/\S+)\b(\s+->\s+.+)$/) {
        $ret = ($sharp =~ s/\#//g) ;
        if ($tpath eq '/sbin/e2fsadm' ) {
            $cond =~ s/;\s+(tune2fs.*)$/; \#$1/ ;
        }
        if (! -s $tpath) {
            $_ = "$sharp#$tpath$cond" if ($ret == 0) ;
        }
        else {
            $_ = "$sharp$tpath$cond" ;
        }
    }
    print "$_\n" ;
}
close(POL) ;

root@www:/etc/tripwire# perl twpolmake.pl twpol.txt > twpol.txt.new
root@www:/etc/tripwire# twadmin -m P -c tw.cfg -p tw.pol -S site.key twpol.txt.new
サイトキーファイルのパスフレーズを入力します。
Please enter your site passphrase: サイトキーファイルのパスフレーズ
Wrote configuration file: /etc/tripwire/tw.pol
データベースを作成します。
root@www:/etc/tripwire# tripwire -m i -s -c tw.cfg
ローカルキーファイルのパスフレーズを入力します。
Please enter your local passphrase: ローカルキーファイルのパスフレーズ
ディレクトリを戻ります。
root@www:/etc/tripwire# cd
チェックを実行します。(定期チェックは日次でチェック実行されます。)
root@www:~# tripwire -m c -s -c /etc/tripwire/tw.cfg
Open Source Tripwire(R) 2.4.2.2 Integrity Check Report

Report generated by:          root
...
...
...
All rights reserved.
チェック結果を確認します。
root@www:~# ll /var/lib/tripwire/report
total 4
-rw-r--r-- 1 root root 1821526 6月 29 07:58 server.jp-20190629-075230.twr
-rw-r--r-- 1 root root 1830182 6月 30 06:09 server.jp-20190630-060029.twr
-rw-r--r-- 1 root root 1829590 7月 1 09:29 server.jp-20190701-092314.twr
-rw-r--r-- 1 root root 1828518 7月 1 17:27 server.jp-20190701-171400.twr
レポートを指定してデータベースを更新します。
root@www:~# tripwire -m u -a -s -c /etc/tripwire/tw.cfg -r /var/lib/tripwire/report/server.jp-20190701-171400.twr
ローカルキーファイルのパスフレーズを入力します。
Please enter your local passphrase: ローカルキーファイルのパスフレーズ
rootkit検知システム導入(RkHunter)
RKHunter をインストールします。
root@www:~# apt-get -y install rkhunter
RKHunter の設定します。
root@www:~# vi /etc/default/rkhunter
9行目:日次で実行する設定にします。
CRON_DAILY_RUN="true"
13行目:週次でデータベースを更新する設定にします。
CRON_DB_UPDATE="true"
17行目:データベース更新の際レポートメールを送信する設定にします。
DB_UPDATE_EMAIL="true"
データベースをアップデートします。
root@www:~# rkhunter --update
システムのファイル情報をアップデートすます。
root@www:~# rkhunter --propupd
チェック実行します。
root@www:~# rkhunter --check --sk
[ Rootkit Hunter version 1.4.2 ]

Checking system commands...
...
...
No warnings were found while checking the system.
SSHサーバー公開鍵認証方式接続の設定
windows PCの任意の場所に「SSH鍵」フォルダを作成し、その中に「公開鍵」フォルダ、「秘密鍵」フォルダを作成します。
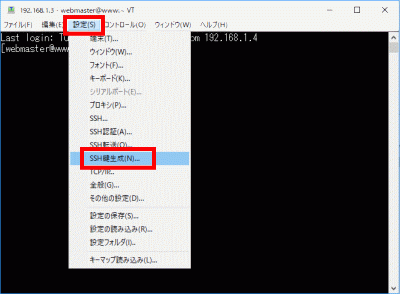
windows PCのTeraTermを起動し、「設定」→「SSH鍵生成」を選択します。
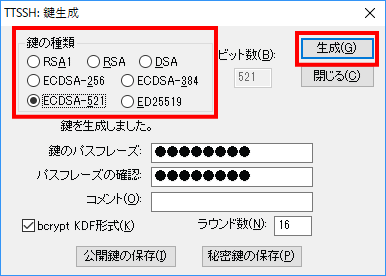
「鍵の種類」で鍵の暗号方式(例:ECDSA-521)を選択し、「生成」をクリックします。
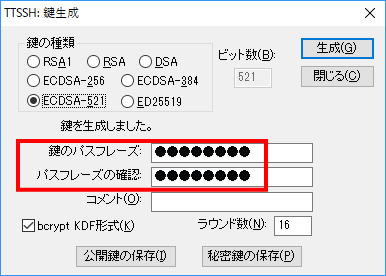
「鍵のパスフレーズ」を設定します。
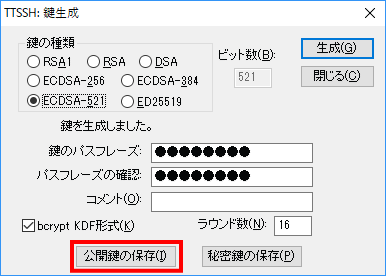
「公開鍵の保存」をクリックして、作成した「公開鍵」フォルダに保存します。(公開鍵ファイル名を「id_rsa.pub」に変更します。)
「秘密鍵の保存」をクリックして、作成した「秘密鍵」フォルダに保存します。
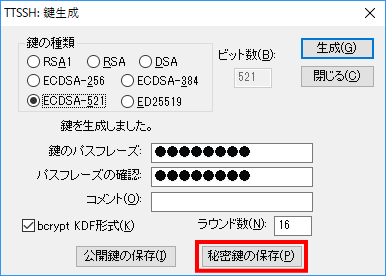
サーバーの公開鍵の作成
webmaster@www:~$ mkdir .ssh
webmaster@www:~$ chmod 700 .ssh/
webmaster@www:~$ touch .ssh/authorized_keys
webmaster@www:~$ chmod 600 .ssh/authorized_keys
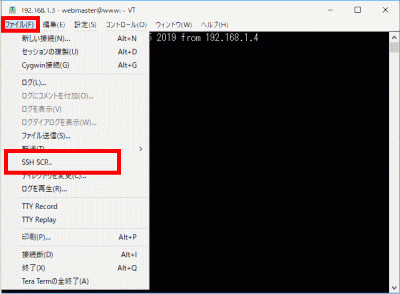
TeraTermで公開鍵を転送します。
「ファイル」→「SSH SCP…」を選択します。
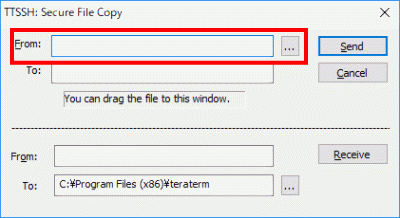
「…」をクリックして、「公開鍵」を選択します。
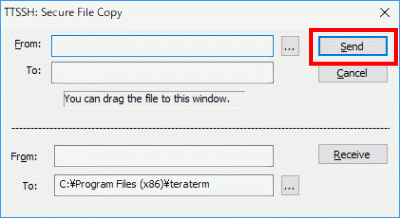
「Send」をクリックしてユーザーホームに転送ます。
公開鍵を「.ssh/」へ転記します。
webmaster@www:~$ cat id_rsa.pub >> .ssh/authorized_keys
接続テスト
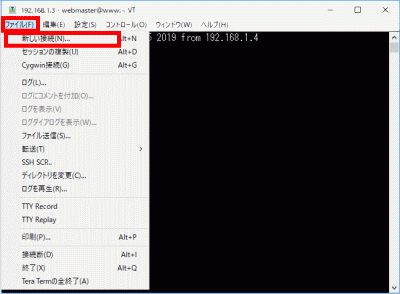
「新しい接続」を選択します。
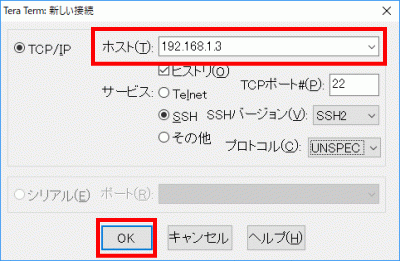
「ホスト」にIPアドレスを入力して、「OK」をクリックします。
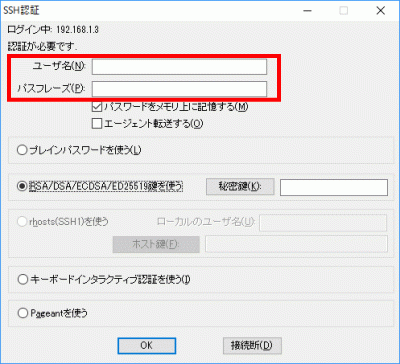
「ユーザー名」、「パスフレーズ(鍵のパスフレーズ)」を入力します。
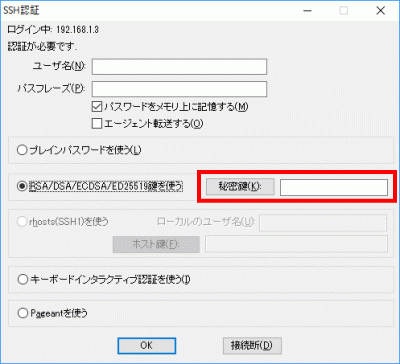
「RSA/DSA/ECDSA/ED25519鍵を使う」を選択します。
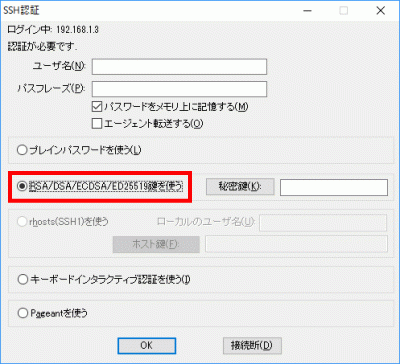
「秘密鍵」をクリックして、保存した「SSH鍵/秘密鍵/id_rsa」を選択します。
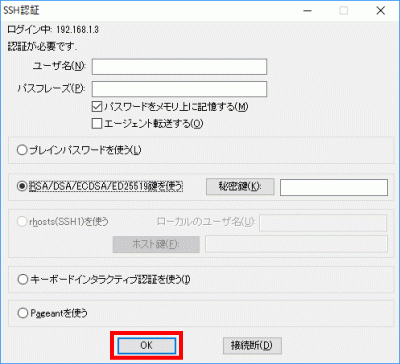
「OK」をクリックして接続を確認します。
rootへログインします。
webmaster@www:~$ su -
パスワード:
「/etc/ssh/sshd_config」を編集して、秘密鍵での認証接続
バックアップを作成します。
root@www:~# cp -p /etc/ssh/sshd_config /etc/ssh/sshd_config_bck
編集します。
root@www:~# vi /etc/ssh/sshd_config
52行目:行頭の「#」を削除してコメント解除し、「yes」→「no」に変更します。
PasswordAuthentication no
SSHを再起動します。
root@www:~# systemctl restart sshd


コメント