
s50
What is a server?
A server is simply a computer that is open to the public on the Internet.
Generally, it is used for publishing websites, blogs, etc.
There are two ways to use it, such as self-owned and rental, each of which has advantages and disadvantages.
The advantage of a home server is that there are no usage restrictions, but the disadvantages include the cost of electricity and maintenance.
The advantage of a rental server is that it can be used easily without the hassle of maintenance, but the disadvantages are the rental fee and usage restrictions such as capacity, speed, and programs.
A fixed IP address is often used to publish a server, but in the case of a general home Internet line, a dynamic IP address is used in most cases, and using a fixed IP address will incur a usage fee.
A dynamic IP address does not pose a problem when browsing the Internet from home, but since the IP address changes after a certain amount of time, when the server is made public, there will be problems with connections from the domain.
Here’s how to fix the connectivity issue and publish your server with a dynamic IP address.
s51
router settings.
Please check the router setting method on the manufacturer’s site according to your own environment.
Check the IP address/mask length in your DHCPv4 server settings.
Example: 192.168.1.1/24
Please check the setting method to determine the IP address of the web server and publish it to the outside.
Example: 192.168.1.3
Check the current global IP address in “Example”. (It will be changed after a certain amount of time.)
(If the IP address is not displayed in the example, check with “IP address detection CGI”.)
Example: ***.***.***.***
s52
Static NAT settings.
- Make the web server public. IP address:192.168.1.3
- Make the FTP server public. IP address:192.168.1.3
DHCPv4 server settings > DHCP fixed IP address settings.
- MAC address: MAC address of the server (search with the command “ip add” on the terminal)
- IP address:192.168.1.3
Static IP masquerading settings.
- Set the conversion target protocol, conversion target port, destination IP address, and destination port.
| Converted protocol | Converted port | Destination IP address | destination port | ||
|---|---|---|---|---|---|
| TCP/UDP | 53 | domain | 192.168.1.3 | 53 | domain |
| TCP/UDP | 80 | www | 192.168.1.3 | 80 | www |
| TCP/UDP | 443 | ssl | 192.168.1.3 | 443 | ssl |
| TCP | 25 | smtp | 192.168.1.3 | 25 | smtp |
| TCP | 143 | imtp | 192.168.1.3 | 143 | imtp |
| TCP | 465 | smtp | 192.168.1.3 | 465 | smtp |
| TCP | 587 | smtp | 192.168.1.3 | 587 | smtp |
| TCP | 110 | pop3 | 192.168.1.3 | 110 | pop3 |
| TCP | 993 | pop3 | 192.168.1.3 | 993 | pop3 |
| TCP/UDP | 20 | ftpdata | 192.168.1.3 | 20 | ftpdata |
| TCP/UDP | 21 | FTP | 192.168.1.3 | 21 | FTP |
s53
server body.
You can use the server even if you reuse the old PC (intel core i series or higher)
Since it operates 24 hours a day, we recommend a server specification one.
Note: Laptops are not designed for long-term use and should not be used as servers. (There is a risk of fire.)
A keyboard, mouse, and HDD are required separately.
It is recommended to install two HDDs, one for main and one for backup.
For DVD boot, a DVD drive and DVD-R are required.
For USB boot, a USB memory is required.
BIOS setting.
Please check how to start the BIOS according to your environment.
For example: It may appear on the screen immediately after booting.
| Manufacturer | control key |
|---|---|
| Fujitsu | “F2” |
| NEC | “F2” |
| Lenovo | “F1” or “F2” |
| HP | “F10” or “Esc” |
| Dell | “F2” or “F12” |
s54
- Boot Menu settings. (set boot method to DVD or USB)
- Save and exit.
s55
domain acquisition.
There are paid and free domains.
You can get a domain of your choice with a paid domain, but there are restrictions on the use of free domains.
Get a paid domain.
Register as a user with VALUE DOMAIN and log in.
Print out the password list and use it for password management.
s56Click Domain Registration.
s57Get the domain of your choice. (Registered by proxy disclosure)
(Enter “Domain” at the top of the page and click “Change” to change the characters in the sentence.)
Note: The domain name should be alphanumeric only, no symbols or info.
Note: Purchaseable amount and Value Domain Points have an expiration date, so be careful not to make extra deposits.
Go back to Control Panel.
s58Scroll down and click Search.
s59Click WHOIS.
Make sure your personal information is not exposed.
s60Click Nameservers.

s61WP-Coder title=”section_title”]”>Change the nameservers of your domain.
| name server 1 | NS1.VALUE-DOMAIN.COM |
| name server 2 | NS2.VALUE-DOMAIN.COM |
s62Click DNS/URLs.
s63Copy and paste the following into your DNS settings.
| a****.***.***.*** mx mail.linuxserver.jp. Ten |
s64Click “Dynamic DNS”.
s65Set “Password”.
s66Enable the dynamic DNS function and click “Change”.
s67It takes about 24 to 48 hours to be able to access with the domain name.
s68
Calculating iso file size.
Create installation media using a DVD or USB memory that is larger than the iso file.
s69
ImgBurn (installation DVD creator).
Download install.
Click the download link to download ImgBurn and install it on your Windows machine.
s70
Localizing into Japanese
Scroll down and click “japanese” to download.
Unzip the downloaded japanese.zip and copy japanese.lng to Program Files/ImgBurn/Languages. (If you do not have decompression software, please download and install 7-Zip, Lhaplus, etc.)
s71
How to create an installation disc.
Right-click the iso file icon and click “Create image disk with ImgBurn”.
Select “Verify” and click the create icon below. (When verification is finished, the DVD-R is automatically ejected, so insert it again to start writing.)
s72
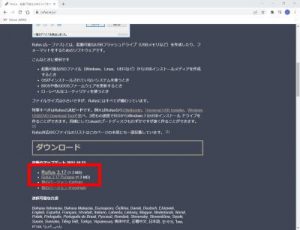
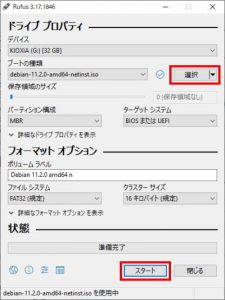
Rufus (installation USB memory creation software).
Download install.
Click the download link to download Rufus and install it on your Windows machine.
s73
How to create an installation USB memory.
Connect the USB memory to the PC, select the iso file with “Select” and click “Start”.
s74
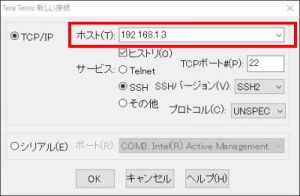
Tera Term (Terminal).
Download install.
Download and install Tera Term on your Windows machine to remotely connect to your Linux server from your Windows machine.
s75
How to use Tera Term.
Enter the IP address of the server in “Host (T):”.
s76
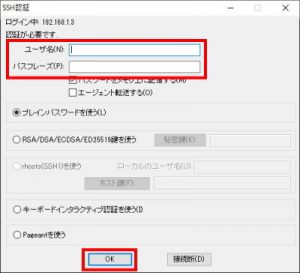
Enter the login user name in “User name (N):”, enter the password in “Passphrase (P):”, and click “OK”.
s77
A list of frequently used terminal commands.
| command | explanation | *option | ||||||||||||||||||||||||
|---|---|---|---|---|---|---|---|---|---|---|---|---|---|---|---|---|---|---|---|---|---|---|---|---|---|---|
| su- | login to root | |||||||||||||||||||||||||
| vi | File editor vi File name Editor command i Edit ESC Unedit : q Quit without saving: w Save : wq Save and quit |
|||||||||||||||||||||||||
| cds | move directory cd directory path cd only unmove |
|||||||||||||||||||||||||
| cp | copy file cp * original file path new file path |
-i interactive mode -p preserve file attributes -R copy whole -v display copied file name |
||||||||||||||||||||||||
| mv | It can also be used to move files and rename files. mv original file path new file path |
|||||||||||||||||||||||||
| rm | delete file rm * file path |
-r Delete directory and all files in directory. | ||||||||||||||||||||||||
| mkdir | create folder mkdir * folder path |
-p create nested folders at once | ||||||||||||||||||||||||
| chmod | change permissions chmod 0*** filepath |
|
||||||||||||||||||||||||
| systemctl | service operation systemctl * service name |
start Service restart restart Service restart stop Service stop reload Service reset enable Service automatic start setting disable Service automatic start cancellation |
||||||||||||||||||||||||
| netstat | Check port netstat * |
-a Display all sockets -n Display without conversion to service name -t Display only TCP information -u Display only UDP information |
||||||||||||||||||||||||
| reboot | server restart | |||||||||||||||||||||||||
| hat | Server stop |
s78
Gmail registration.
Download and install Google Chrome.
s79
Email address registration for server transmission.
Register an email address to send via Gmail as a countermeasure against OP25B on the email server.
Register an email address for forwarding emails to root.
Since a large amount of mail addressed to root accumulates on the server, register an e-mail address to transfer and manage it externally.
s80
Download and install Thunderbird.
Download and install Thunderbird to register and manage Gmail.
s81
How to register your email address.
Launch Thunderbird and click Mail.
s82
Enter your name, email address, and password, then click Continue.

s83
Click Done.
s84
Confirm your email address and click Next.
s85
Enter your password and click Next.
s86
Click Allow.
Download and install UltraVNC.
Install the GNOME Desktop as your desktop environment.
Download the UltraVNC installation file to your client PC. (There is a download link at the bottom of the top page of the UltraVNC site.)
UltraVNC UltraVNC_1_2_40_X64_Setup.exe
s88
Select 32bit, 64bit and click “DOWNLOAD”.
s89
Select “I accept the above listed conditions” and click “Download”.
s90
Double-click the downloaded “UltraVNC_***_Setup.exe” icon to install.
s91
Click “Windows Start Menu” and start “UltraVNC Viewer”.
s92
Enter the IP address of the VNC server you started earlier: Display number and click “Connect”.
s93
Enter your VNC password and click Log on.
s94
Your desktop will appear.
s95
Windows remote desktop functionality.
From the Windows Start menu, select “Accessories” → “Remote Desktop Connection” to launch the connection screen.

s96
Enter the server IP address and click “Connect”.
s97
Enter “usermame” (user name), “password” (password) and click “OK”.
s98
Your desktop will appear.