Fedora36: MAIL server settings

s50

Postfix settings.

Allow external web access.

[root@www ~]# 50_1vi /etc/httpd/conf.d/virtualhost-00-fedoraserver.jp.conf
<VirtualHost *:80>
    ServerName fedoraserver.jp
    DocumentRoot /var/www/html
    50_2ServerAlias mail.fedoraserver.jp
    RewriteEngine On
    RewriteCond %{HTTP_HOST} ^www.fedoraserver.jp
    RewriteRule ^(.*)$ http://fedoraserver.jp/$1 [R=301,L]
</VirtualHost>

s51Install Postfix.

[root@www ~]# 51_1dnf install postfix

s52Configure Postfix.

[root@www ~]# 52_1vi /etc/postfix/main.cf

s53Line 96: Add the specification of the mail server domain name.

53_1myhostname = mail.fedoraserver.jp

s54Line 103: Add the specification of the domain name.

54_1mydomain = fedoraserver.jp

s55Line 119: Add the specification of the domain name to the sender’s email address.

55_1myorigin = $mydomain

s56Line 135: Change the settings to allow receiving emails from outside.

inet_interfaces = 56_1all

s57Line 183: Change the setting to receive domain mail.

mydestination = $myhostname, localhost.$mydomain, localhost57_1, $mydomain

s58Line 439: Add the setting to set the mail storage format to Maildir format.

58_1home_mailbox = Maildir/

s59Line 593: Add the setting to hide the name of the mail server software.

59_1smtpd_banner = $myhostname ESMTP unknown

s60Add SMTP authentication settings to the last line.

60_1smtpd_sasl_auth_enable = yes

smtpd_recipient_restrictions =
    permit_mynetworks
    permit_sasl_authenticated
    reject_unauth_destination

s61Add a setting to limit the size of incoming mail to 10MB=10*1024*1024 to the last line.

61_1message_size_limit = 10485760

s62set the file.

[root@www ~]# 62_1vi /etc/postfix/master.cf

s63Line 19: Remove the “#” at the beginning of the line to uncomment it.

submission inet n    -    n    -    -    smtpd

s64Line 22: Remove the “#” at the beginning of the line to uncomment it.

 -o smtpd_sasl_auth_enable=yes

s65

SMTP authentication settings.

Install cyrus-sasl.

[root@www ~]# 65_1dnf install cyrus-sasl cyrus-sasl-plain

s66start up.

[root@www ~]# 66_1systemctl start saslauthd

s67Set auto start.

[root@www ~]# 67_1systemctl enable saslauthd

s68

Creation of Maildir format mailboxes.

Set to automatically create a Maildir format mailbox when adding a new user.

[root@www ~]# 68_1mkdir -p /etc/skel/Maildir/{new,cur,tmp}

s69Set mailbox permissions.

[root@www ~]# 69_1chmod -R 700 /etc/skel/Maildir/

s70start up.

[root@www ~]# 70_1systemctl restart postfix

s71Configure settings to create a Maildir format mailbox for the current user.

[root@www ~]# 71_1wget https://rcg.jp/perfect_maildir/perfect_maildir.pl -O /usr/local/bin/perfect_maildir.pl
[root@www ~]# 71_2chmod +x /usr/local/bin/perfect_maildir.pl

s72Install Perl’s TimeDate module required for Maildir conversion.

[root@www ~]# 72_1dnf -y install perl-TimeDate

s73Stop Postfix.

[root@www ~]# 73_1systemctl stop postfix

s74Create a Maildir bulk conversion script.

[root@www ~]# 74_1vi migrate-maildir.sh
74_2#!/bin/bash
#
#Maildir batch conversion script
#
#Mailbox => Maildir format conversion script
#http://perfectmaildir.home-dn.net/
FOLDERCONVERT=/usr/local/bin/perfect_maildir.pl
#general user list
USERLIST=`ls /home/`
#log
MIGRATELOG=/tmp/migrate-maildir.log
rm -f $MIGRATELOG
#Argument (conversion source mailbox format) check
if [ "$1" != "mbox" ] && [ "$1" != "Mailbox" ]; then
echo "Usage: migrate-maildir.sh {mbox|Mailbox}"
exit
fi
#Migrate general user mailboxes
for user in $USERLIST;
do
if [ "$1" = "mbox" ]; then
inbox="/var/spool/mail/${user}"
else
inbox="/home/${user}/Mailbox"
fi
if [ -f "${inbox}" ]; then
newdir="/home/${user}/Maildir/"
mkdir -p "$newdir"
mkdir -p "$newdir"/cur
mkdir -p "$newdir"/new
mkdir -p "$newdir"/tmp
chmod -R 700 "${newdir}"
$FOLDERCONVERT "$newdir" < "${inbox}" >> $MIGRATELOG 2>&1
chown -R ${user}. "$newdir"
find "$newdir" -type f -exec chmod 600 {} ;
fi
done
#root user mailbox migration
user="root"
if [ "$1" = "mbox" ]; then
inbox="/var/spool/mail/${user}"
else
inbox="/${user}/Mailbox"
fi
if [ -f "${inbox}" ]; then
newdir="/${user}/Maildir/"
mkdir -p "$newdir"
mkdir -p "$newdir"/cur
mkdir -p "$newdir"/new
mkdir -p "$newdir"/tmp
chmod -R 700 "${newdir}"
$FOLDERCONVERT "$newdir" < "${inbox}" >> $MIGRATELOG 2>&1
chown -R ${user}. "$newdir"
find "$newdir" -type f -exec chmod 600 {} ;
fi
[ -a $MIGRATELOG ] && cat $MIGRATELOG;rm -f $MIGRATELOG

s75Run the batch conversion script.

[root@www ~]# 75_1sh migrate-maildir.sh mbox

s76Remove the Maildir bulk conversion script.

[root@www ~]# 76_1rm -f migrate-maildir.sh

s77Remove Maildir conversion tool.

[root@www ~]# 77_1rm -f /usr/local/bin/perfect_maildir.pl

s78start up.

[root@www ~]# 78_1systemctl restart postfix

s79Change “/etc/aliases” if you want to use the webmaster user for mail.

[root@www ~]# 79_1vi /etc/aliases

s80Add # to the beginning of the line to disable forwarding.

80_1#webmaster: root

s81Reflect transfer settings.

[root@www ~]# 81_1newaliases

s82

Open TCP25 and TCP587 ports.

Open TCP25 and TCP587 ports in your router settings. (Check the setting method according to your own environment.)

Port open test.

“Host name (fedoraserver.jp)” and “Port number (25, 587)” are open.

Release confirmation site
s83

OP25B measures for mail servers.

As a countermeasure against OP25B on the mail server, set to send outgoing mail via Gmail.

Configure Postfix.

Postfixを設定します。

[root@www ~]# 83_1vi /etc/postfix/main.cf

s84Add the following to the last line.

84_1relayhost = [smtp.gmail.com]:587
smtp_use_tls = yes
smtp_sasl_auth_enable = yes
smtp_sasl_password_maps = hash:/etc/postfix/sasl_passwd
smtp_sasl_tls_security_options = noanonymous
smtp_sasl_mechanism_filter = plain

s85Set your SMTP credentials.

[root@www ~]# 85_1echo [smtp.gmail.com]:587 Gmailアドレス:Gmailパスワード > /etc/postfix/sasl_passwd

s86Change the permission so that it cannot be referred to other than root.

[root@www ~]# 86_1chmod 640 /etc/postfix/sasl_passwd

s87Create a database of SMTP authentication information.

[root@www ~]# 87_1postmap /etc/postfix/sasl_passwd

s88Restart Postfix.

[root@www ~]# 88_1systemctl reload postfix

s89

Forward mail addressed to root (using free mail).

Forward mail to root.

[root@www ~]# 89_1vi /etc/aliases

s90Append to the last line.。

# Person who should get root's mail
#root: marc
90_1root: 転送用メールアドレス

s91Reflect transfer settings.

[root@www ~]# 91_1newaliases

s92

Email sending test.

Send test mail to root.

[root@www ~]# 92_1echo test|sendmail root

s93

Email forwarding settings for Gmail.

First, configure Thunderbird’s Gmail (outgoing email) settings.

Thunderbird Gmail (outgoing mail) settings

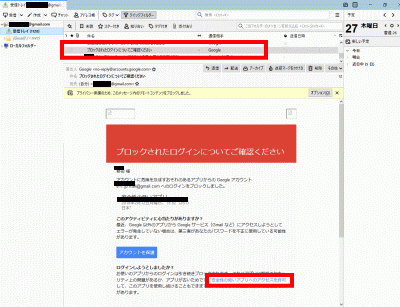
s94Launch Thunderbird, open “Check blocked logins” with your outgoing email address, and click “Allow access to less secure apps”.

Gmailのメール転送設定

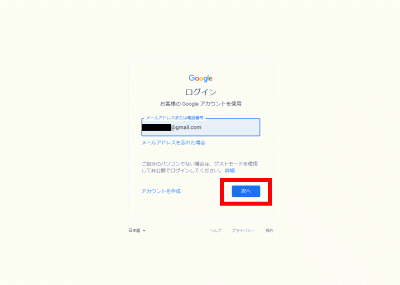
s95Log in to Gmail in your browser.

Gmailにログイン

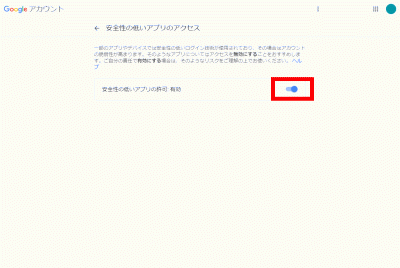
s96Right-click on the user icon in the upper right corner → “Manage Google Account” → “Security” → Enable access by “Access for less secure apps”.。
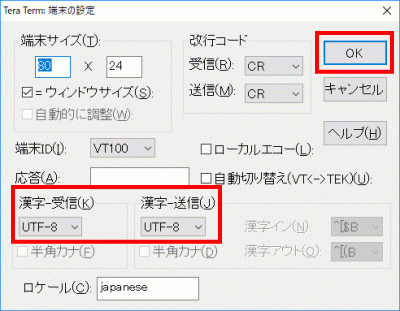
安全性の低いアプリの許可を有効
s97

Receipt confirmation of mail addressed to root.

First, set Thunderbird’s Gmail (mail for forwarding).

Thunderbird Gmail (forwarding mail) settings

s98Confirm the receipt with the forwarding email address for root of Thunderbird (Gmail).

Install Dovecot.

Install Dovecot.

[root@www ~]# 98_1dnf -y install dovecot

s99set the file.

[root@www ~]# 99_1vi /etc/dovecot/dovecot.conf

s101Line 24: Remove the “#” at the beginning of the line to uncomment it.

protocols = imap pop3 lmtp submission

s102Line 30: Remove the “#” at the beginning of the line to uncomment it and change the settings to disable IPv6.

listen = *

s103set the file.

[root@www ~]# 103_1vi /etc/dovecot/conf.d/10-mail.conf

s104Line 31: Add the setting to set the mail storage format to Maildir format.

104_1mail_location = maildir:~/Maildir

s105set the file.

[root@www ~]# 105_1vi /etc/dovecot/conf.d/10-auth.conf

s106Line 11: Add the setting to allow plaintext authentication.

106_1disable_plaintext_auth = no

s107set the file.

[root@www ~]# 107_1vi /etc/dovecot/conf.d/10-ssl.conf

s108Line 8: Change the setting to disable SSL connection.

ssl = 108_1no

s109start up.

[root@www ~]# 109_1systemctl start dovecot

s110Set autostart.

[root@www ~]# 110_1systemctl enable dovecot

s111

Open TCP110 or TCP143 port.

“Host name (fedoraserver.jp)” and “Port number (110 or 143)” are open.

Release confirmation site
s112

Adding mail users.

Add users. (User example: fedora)

[root@www ~]# 112_1useradd fedora

s113Set your password.

[root@www ~]# 113_1passwd fedora
Changing password for user fedora.
New UNIX password:
Retype new UNIX password:

s114

Edit “/etc/ssh/sshd_config” to disable authentication connection with private key.

Edit sshd_config.

[root@www ~]# 114_1vi /etc/ssh/sshd_config

s115Line 65: Change from “no” to “yes”.

PasswordAuthentication 116_1yes

s117Restart SSH.

[root@www ~]# 117_1systemctl restart sshd

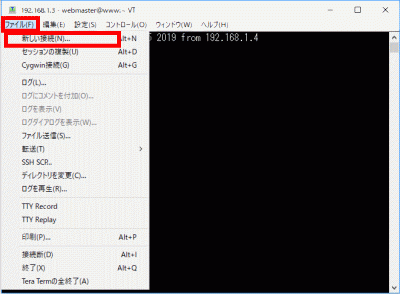
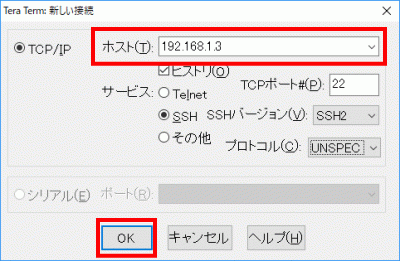
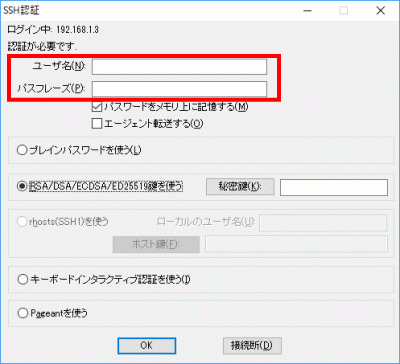
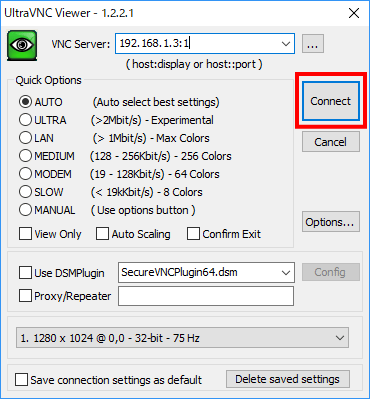
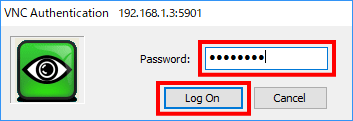
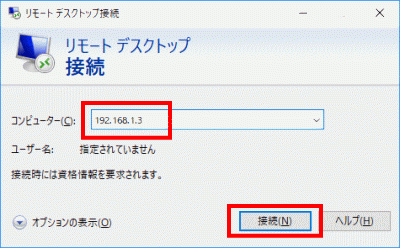
s118Make a new connection to TeraTerm with fedora.。

Set SSH server public key authentication method connection.

Setting up an SSH server public key authentication method connection
s119

Check sendmail path.

Open a file.

[root@www ~]# 119_1vi /etc/postfix/main.cf

s120Line 665: Check sendmail path.WP-Coder title=”section_end”]

sendmail_path = /usr/sbin/sendmail.postfix

s121

Email software registration.

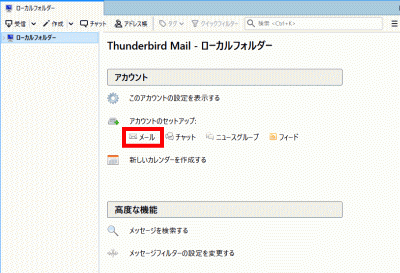
Launch Thunderbird and click Mail.

Thunderbird

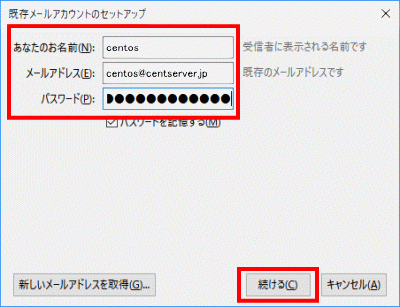
s122Your name and email address (fedora@fedoraserver.jp), enter your password, and click Continue.

メールアドレス

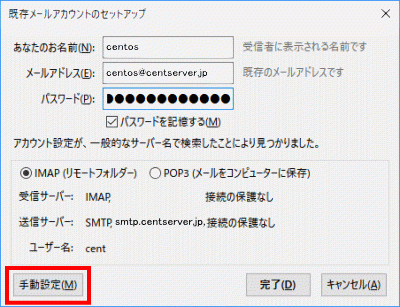
s123Click “Manual Settings”.
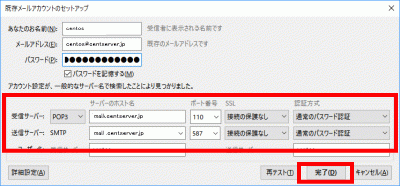
手動設定

Server hostname port number SSL Authentication method
Incoming server POP3 mail.fedoraserver.jp 110 No connection protection normal password authentication
Outgoing server SMTP mail.fedoraserver.jp 587 No connection protection normal password authentication

s124Refer to the table above to configure the settings, and then click “Finish”.

完了

s125Select “I understand the risks of connecting” and click “Finish”.

接続する上での危険性を理解しました
s126

Obtaining a server certificate.

Install Certbot.

[root@www ~]# 126_1dnf -y install certbot

s127Get a certificate.

Document root: /var/www/html/

Email address: webmasterfedoraserver.jp

Mail server name:mail.fedoraserver.jp

[root@www ~]# 127_1certbot certonly --webroot -w /var/www/html/ -m webmaster@fedoraserver.jp  -d mail.fedoraserver.jp --agree-tos

s128Configure automatic certificate renewal.

[root@www ~]# 128_1vi /etc/cron.d/letsencrypt

s129Add the following.

129_100 16 * * 2 root /usrobin/certbot renew --post-hook "service httpd restart"

s130

SSL settings.

set the file.

[root@www ~]# 130_1vi /etc/postfix/main.cf

s131Add the following to the last line.

131_1smtp_tls_security_level = may
smtpd_tls_security_level = may
smtpd_tls_cert_file = /etc/letsencrypt/live/mail.fedoraserver.jp/fullchain.pem
smtpd_tls_key_file = /etc/letsencrypt/live/mail.fedoraserver.jp/privkey.pem
smtpd_tls_session_cache_database = btree:/var/lib/postfix/smtpd_scache

tls_high_cipherlist = kEECDH:+kEECDH+SHA:kEDH:+kEDH+SHA:+kEDH+CAMELLIA:kECDH:+kECDH+SHA:kRSA:+kRSA+SHA:+kRSA+CAMELLIA:!aNULL:!eNULL:!SSLv2:!RC4:!MD5:!DES:!EXP:!SEED:!IDEA:!3DES
smtp_tls_ciphers = high
smtpd_tls_ciphers = high
smtpd_tls_mandatory_ciphers = high

smtpd_tls_mandatory_protocols=!SSLv2,!SSLv3
smtp_tls_mandatory_protocols=!SSLv2,!SSLv3
smtpd_tls_protocols=!SSLv2,!SSLv3
smtp_tls_protocols=!SSLv2,!SSLv3

s132set the file.

[root@www ~]# 132_1vi /etc/postfix/master.cf

s133Line 19: Add “#” at the beginning of the line to comment it out and disable the SUBMISSION port.

133_1#submission inet n    -    n    -    -    smtpd

s134Line 22: Add “#” at the beginning of the line to comment it out and disable SMTP authentication for the SUBMISSION port.

134_1#  -o smtpd_sasl_auth_enable=yes

s135Line 33: Remove the “#” at the beginning of the line to uncomment and enable SMTPS.

smtps    inet n    -    n    -    -    smtpd

s136Line 35: Remove the “#” at the beginning of the line to uncomment it and enable SMTPS.

 -o smtpd_tls_wrappermode=yes

s137Line 36: Remove the “#” at the beginning of the line to uncomment it and enable SMTPS.

 -o smtpd_sasl_auth_enable=yes

s138Line 49: Remove the “#” at the beginning of the line to uncomment and enable SMTPS.

tlsmgr    unix    -    -    n    300    1    tlsmgr

s139Restart.

[root@www ~]# 139_1systemctl restart postfix

s140

Open port TCP465.

Open TCP port 465 in your router settings. (Check the setting method according to your own environment.)

Port open test.

On the release confirmation site, enter “host name (mail.fedoraserver.jp)” and “Port number (465)” are open.

Release confirmation site
s141

Close TCP port 587.

Block TCP port 587 in your router settings. (Check the setting method according to your own environment.)

Port open test.

set the file.

[root@www ~]# 141_1vi /etc/dovecot/conf.d/10-ssl.conf

s142Line 8: Change the setting to enable SSL connection.

ssl = 142_1yes

s143Line 14: Specify server certificate + intermediate certificate.

ssl_cert = <143_1/etc/letsencrypt/live/mail.fedoraserver.jp/fullchain.pem

s144Line 15: Specify the private key.

ssl_key = <144_1/etc/letsencrypt/live/mail.fedoraserver.jp/privkey.pem

s145Restart.

[root@www ~]# 145_1systemctl restart dovecot

s146

Open port TCP995 or TCP993.

Open port TCP995 or TCP993 in your router settings. (Check the setting method according to your own environment.)

Port open test.

On the release confirmation site, enter “host name (mail.fedoraserver.jp)” and “Port number (995 or 993)” are open.

Release confirmation site
s147

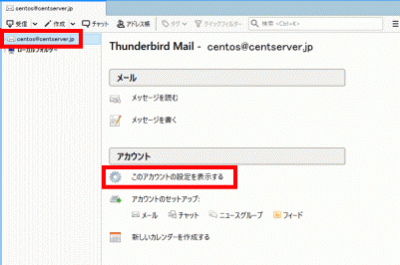
Change email settings.

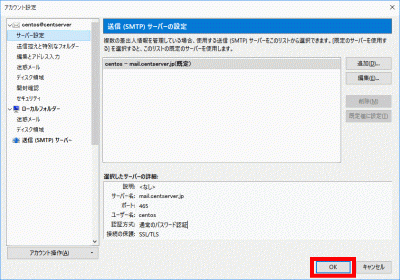
Launch Thunderbird, select your email address, and click “View settings for this account”.
このアカウントの設定を表示する
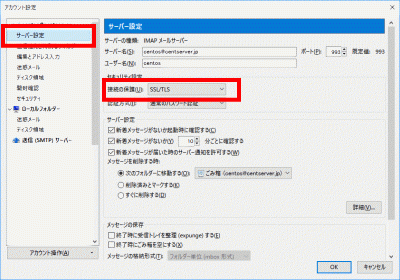
s148Click Server Settings and select SSL/TLS under Secure Connection.
サーバー設定
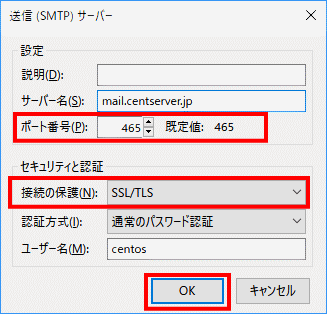
s149Click Outgoing (SMTP) Server, select your SMTP server, and click Edit.

送信(SMTP)サーバー

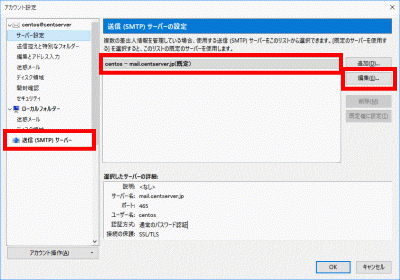
s150Enter “465” in “Port number”, select “SSL/TLS” in “Connection security”, and click “OK”.
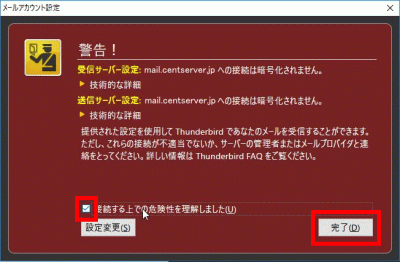
ポート番号

s154Click OK.

「OK」をクリック
s155

Cooperation with anti-virus software (Clamav + Amavisd).

Install Amavisd and Clamav Server.

[root@www ~]# 155_1dnf -y install amavisd-new clamd perl-Digest-SHA1 perl-IO-stringy

s156set the file.

[root@www ~]# 156_1vi /etc/amavisd/amavisd.conf

s157Line 23: Set the domain name.

$mydomain = 157_1'fedoraserver.jp';

s158Line 158: Remove the “#” at the beginning of the line to uncomment and set the mail server.

$myhostname = 158_1'mail.fedoraserver.jp';

s159Lines 163, 164: Remove the “#” at the beginning of the line to uncomment it.

$notify_method = 'smtp:[127.0.0.1]:10025';
$forward_method = 'smtp:[127.0.0.1]:10025';

s160set the file.

[root@www ~]# 160_1vi /etc/clamd.d/scan.conf

s161Line 8: Add “#” at the beginning of the line to make it a comment.

161_1#Example

s162Line 14: Remove the “#” at the beginning of the line to uncomment it.

LogFile /var/log/clamd.scan

s163Line 77: Remove the “#” at the beginning of the line to uncomment it.

PidFile /var/run/clamd.scan/clamd.pid

s164Line 81: Remove the “#” at the beginning of the line to uncomment it.

TemporaryDirectory /var/tmp

s165Line 96: Uncomment by removing “” at the beginning of the line.

LocalSocket /var/run/clamd.scan/clamd.sock

s166Start up.

[root@www ~]# 166_1touch /var/log/clamd.scan
[root@www ~]# 166_2chown clamscan. /var/log/clamd.scan

s167Set autostart.

[root@www ~]# 167_1systemctl enable --now clamd@scan amavisd

s168Set the file.

[root@www ~]# 168_1vi /etc/postfix/main.cf

s169Append to the last line.

169_1content_filter=smtp-amavis:[127.0.0.1]:10024

s170Set the file.

[root@www ~]# 170_1vi /etc/postfix/master.cf

s171Append to the last line.

171_1smtp-amavis unix -    -    n    -    2 smtp
    -o smtp_data_done_timeout=1200
    -o smtp_send_xforward_command=yes
    -o disable_dns_lookups=yes
127.0.0.1:10025 inet n    -    n    -    -    smtpd
    -o content_filter=
    -o local_recipient_maps=
    -o relay_recipient_maps=
    -o smtpd_restriction_classes=
    -o smtpd_client_restrictions=
    -o smtpd_helo_restrictions=
    -o smtpd_sender_restrictions=
    -o smtpd_recipient_restrictions=permit_mynetworks,reject
    -o mynetworks=127.0.0.0/8
    -o strict_rfc821_envelopes=yes
    -o smtpd_error_sleep_time=0
    -o smtpd_soft_error_limit=1001
    -o smtpd_hard_error_limit=1000

s172Restart.

[root@www ~]# 172_1systemctl restart postfix

Fedora36: FTP server settings

s50

Install vsftpd.

Install vsftpd.

[root@www ~]# 50_1dnf -y install vsftpd

s51Configure vsftpd.

[root@www ~]# 51_1vi /etc/vsftpd/vsftpd.conf

s52Line 12: Prohibit anonymous login.

anonymous_enable= 52_1NO

s53Lines 82, 83: Remove the “#” at the beginning of the line to uncomment it and allow transfer in ascii mode.

ascii_upload_enable=YES
ascii_download_enable=YES

s54Lines 100, 101: Remove the “#” at the beginning of the line to uncomment and enable chroot.

chroot_local_user=YES
chroot_list_enable=YES

s55Line 103: Remove the “#” at the beginning of the line, uncomment it, and specify the list file.

chroot_list_file=/etc/vsftpd/chroot_list

s56Line 109: Remove the “#” at the beginning of the line to uncomment it and enable directory transfer.

ls_recurse_enable=YES

s57Line 114: Change IPv4 to enabled.

listen=57_1YES

s58Line 123: Change IPv6 to disabled.

listen_ipv6=58_1NO

s59Append the local time specification to the last line.

59_1use_localtime=YES

s60Add users who are allowed to move up.

[root@www ~]# 60_1vi /etc/vsftpd/chroot_list

s61Add your username.

61_1webmaster

s62Allow writing “/var/www/html”.

[root@www ~]# 62_1chmod 0777 /var/www/html

s63start up.

[root@www ~]# 63_1systemctl start vsftpd

s64Set autostart.

[root@www ~]# 64_1systemctl enable vsftpd

s65

FTP client settings.

Check the document root owner.

Check document root owner

s66Download and install “FFFTP” and start it.

FFFTP

FFFTP

FFFTP

s67Click Connect.

接続

s68Click Connect.WP-Coder title=”section_end”]

接続

s69Click New Host.

新規ホスト

s70Decide and enter an easy-to-understand name in “Host setting name”.

ホストの設定名

s71“hostname( 192.168.1.3)”Enter the.

ホスト名

s72“username( webmaster)”Enter the.

ユーザー名

s73Enter “Password”.

パスワード

s74Click OK.

「OK」をクリック

Fedora36: Database settings

s50

Installing MariaDB.

Install MariaDB.

[root@www ~]# 50_1dnf -y install mariadb-server

s51Configure MariaDB.

[root@www ~]# 51_1vi /etc/my.cnf.d/mariadb-server.cnf

s52Add to [mysqld].

[mysqld]
52_1character-set-server=utf8

s53start up.

[root@www ~]# 53_1systemctl start mariadb

s54Set auto start.

[root@www ~]# 54_1systemctl enable mariadb

s55Initialize.

[root@www ~]# 55_1mysql_secure_installation

s56After the following is displayed, press “Enter”.

Enter current password for root (enter for none):

s57Set the root password.

Set root password? [Y/n] 57_1y
New password:
Re-enter new password:

s58Reply with ‘y’.

Remove anonymous users? [Y/n] 58_1y

s59Reply with ‘y’.

Disallow root login remotely? [Y/n] 59_1y

s60Reply with ‘y’.

Remove test database and access to it? [Y/n] 60_1y

s61Reply with ‘y’.

Reload privilege tables now? [Y/n] 61_1y

s62Connect to MariaDB as root user.

[root@www ~]# 62_1mysql -u root -p
Enter password:

s63Display the user information list.

MariaDB [(none)]> 63_1select user,host,password from mysql.user;
+------+-----------+-------------------------------------------+
| user | host      | password                                  |
+------+-----------+-------------------------------------------+
| root | localhost | ***************************************** |
| root | 127.0.0.1 | ***************************************** |
| root | ::1       | ***************************************** |
+------+-----------+-------------------------------------------+
3 rows in set (0.00 sec)

s64Display the database list.

MariaDB [(none)]> 64_1show databases;
+--------------------+
| Database |
+--------------------+
| information_schema |
| mysql |
| performance_schema |
+--------------------+
3 rows in set (0.00 sec)

s65Exit.

MariaDB [(none)]> 65_1exit

s66

Install phpMyAdmin

Install and start httpd.

httpd

s67Have PHP installed.

PHP

s68Download phpMyAdmin and unzip it.

[root@www ~]# 68_1dnf -y install phpMyAdmin php-mysqlnd php-mcrypt php-php-gettext

s69Configure phpMyAdmin.

[root@www ~]# 69_1vi /etc/httpd/conf.d/phpMyAdmin.conf

s70Line 13: Add access permission IP.

70_1Require ip 127.0.0.1 192.168.1.1/24

s71Line 19: Add access permission IP.

71_1Require ip 127.0.0.1 192.168.1.1/24

s72Restart.

[root@www ~]# 72_1systemctl restart httpd

s73Start a web browser, access the following URL, authenticate as a registered user, and log in. (You can operate MariaDB from the management screen.)

http://fedoraserver.jp/phpmyadmin/

phpmyadmin

Fedora36: Web server settings

s50

httpd installation.

Install httpd.

[root@www ~]# 50_1dnf -y install httpd

s51Remove the welcome page.

[root@www ~]# 51_1rm -f /etc/httpd/conf.d/welcome.conf

s52Configure httpd.

[root@www ~]# 52_1vi /etc/httpd/conf/httpd.conf

s53Line 100: Remove the “#” at the beginning of the line to uncomment it and specify the server name.

ServerName 53_1fedoraserver.jp:80

s54Line 156: Change.

AllowOverride 54_1All

s55Line 169: Add a file name that can be accessed only with the directory name.

DirectoryIndex index.html 55_1index.cgi index.php index.rb index.py

s56Line 321: Comment out to deal with garbled characters.

56_1#AddDefaultCharset UTF-8

s57Edit document root owner (webmaster).

[root@www ~]# 57_1chown webmaster. /var/www/html/

s58Check document root owner.

[root@www ~]# 58_1ll /var/www/
合計 0
drwxr-xr-x 2 root root 6 4月 24 22:46 cgi-bin
drwxr-xr-x 2 webmaster webmaster 6 4月 24 22:46 html

s59Set the www of the URL.

[root@www ~]# 59_1vi /etc/httpd/conf.d/virtualhost-00-fedoraserver.jp.conf

s60Unify without www.

60_1<VirtualHost *:80>
    ServerName fedoraserver.jp
    DocumentRoot /var/www/html
    RewriteEngine On
    RewriteCond %{HTTP_HOST} ^www.fedoraserver.jp
    RewriteRule ^(.*)$ http://fedoraserver.jp/$1 [R=301,L]
</VirtualHost>

s61start up.

[root@www ~]# 61_1systemctl start httpd

s62Set auto start.

[root@www ~]# 62_1systemctl enable httpd

s63Create an HTML test page.

[root@www ~]# 63_1vi /var/www/html/index.html
63_2<html>
<body>
<div style="width: 100%; font-size: 20px; font-weight: bold; text-align: center;">
Test Page
</div>
</body>
</html>

s64Start the web browser, access the page, and check the operation.

http://fedoraserver.jp

Webブラウザを起動s65

Open TCP port 80.

Open TCP port 80 in your router settings. (Check the setting method according to your own environment.)s66

Port open test

“Host name(fedoraserver.jp)” and “Port number (80)” are open.

Release confirmation site

s67

Install Perl.

Install Perl.

[root@www ~]# 67_1dnf -y install perl perl-CGI

s68Set to allow CGI execution in the “html” directory.

[root@www ~]# 68_1vi /etc/httpd/conf.d/html.conf

s69Set extensions cgi, pl, rb, py as CGI.

69_1<Directory "/var/www/html">
    Options +ExecCGI
    AddHandler cgi-script .cgi .pl .rb .py
</Directory>

s70Allow access to Perl commands in “/usr/local/bin/perl”.

[root@www ~]# 70_1ln -s /usr/bin/perl /usr/local/bin/perl

s71Check your Perl path.

[root@www ~]# 71_1whereis perl
perl: /usr/bin/perl /usr/local/bin/perl /usr/share/man/man1/perl.1.gz

s72Restart.

[root@www ~]# 72_1systemctl restart httpd

s73Create a CGI test page.

[root@www ~]# 73_1vi /var/www/html/index.cgi
72_2#!/usr/bin/perl

print "Content-type: text/htmlnn";
print "<html>n<body>n";
print "<div style="width: 100%; font-size: 20px; font-weight: bold; text-align: center;">n";
print "CGI Test Page";
print "n</div>n";
print "</body>n</html>n";

s74Set permissions.

[root@www ~]# 74_1chmod 705 /var/www/html/index.cgi

s75Start the web browser, access the page, and check the operation.

http://fedoraserver.jp/index.cgi

Webブラウザを起動s76

PHP installation.

Install PHP.

[root@www ~]# 76_1dnf -y install php php-mbstring php-pear

s77Configure PHP.

[root@www ~]# 77_1vi /etc/php.ini

s78Line 927: Remove the “;” at the beginning of the line, uncomment it, and add your own time zone.

PHP timezone list
date.timezone = 78_1"Asia/Tokyo"

s79Restart.

[root@www ~]# 79_1systemctl restart httpd

s80Create a PHP test page.

[root@www ~]# 80_1vi /var/www/html/index.php
79_2<html>
<body>
<div style="width: 100%; font-size: 20px; font-weight: bold; text-align: center;">
<?php
print "PHP Test Page";
?>
</div>
</body>
</html>

s81Start the web browser, access the page, and check the operation.

http://fedoraserver.jp/index.php

Webブラウザを起動s82

Install Ruby.

Install Ruby.

[root@www ~]# 82_1dnf -y install ruby

s83Restart.

[root@www ~]# 83_1systemctl restart httpd

s84Create a Ruby test page.

[root@www ~]# 84_1vi /var/www/html/index.rb
83_2#!/usr/bin/ruby

print "Content-type: text/htmlnn";
print "<html>n<body>n";
print "<div style="width: 100%; font-size: 20px; font-weight: bold; text-align: center;">n";
print "Ruby Test Page";
print "n</div>n";
print "</body>n</html>n";

s85Set permissions.

[root@www ~]# 85_1chmod 705 /var/www/html/index.rb

s86Start the web browser, access the page, and check the operation.

http://fedoraserver.jp/index.rb

Webブラウザを起動

Install Perl modules.

Launch CPAN.

root@www:~# 91_1perl -MCPAN -e shell

s92Enter “y” and press Enter.

Would you like to configure as much as possible automatically? [yes] 92_1y

s93Check it and click “OK” to display the installation log.

Module name explanation
All
Jcode Japanese character code conversion
Getopt::Long Process options in command line arguments
Archive::Tar Extract and create tar file (v5.10 or later)
Cwd Get current directory path
File::Basename Get File Basename and Directory Name
File::Copy Move and copy files
File::Path Creating and Deleting Multilevel Directories
File::Spec Portable handling of file names
File::Temp Create temporary files
File::Find File search
FindBin Get the path of the directory where the script resides
Encode Properly handle multibyte strings such as Japanese
utf8 Convert string in source code to internal string
Carp raise an exception from the perspective of the module caller
lib Add module search path
Time::Piece Standard module for handling date and time (core module from v5.10)
Time::Local Reverse return of localtime,gmtime
base class inheritance
Data::Dumper print the contents of the variable
Benchmark Benchmark (performance comparison)
JSON Parsing JSON data
MIME::Base64 Encode to Base64 format
MIME::QuotedPrint Encoding to quoted-printable format
Digest::MD5 Find MD5 value
Digest::SHA Find various SHA values ​​(v5.10 or later)
Storable Data serialization
Scalar::Util Utilities for scalar values
List::Util Various operations on arrays
Hash::Uti hash key limit
Sys::Hostname Get host name
Net::FTP FTP client
Net::Ping Existence check of remote host
Exporter Function export
CPAN Install modules from CPAN
Pod::Usage POD document output
Errno Constant representing the system error number
POSIX Functions defined by POSIX
Math::BigInt Big number math
Math::BigFloat Big number math
Mojolicious Web framework
Mojolicious::Plugin::AutoRoute Automatically generate routes
MIME::Lite Send email easily
Class::Accessor::Fast Creating accessors
Object::Simple Creating accessors with default values
DDP Output data
DBIx::Custom Easy database operation
MySQL::Diff Show MySQL diff
DateTime Generic handling of dates
PDL Statistical analysis
Imager Image editing
Text::CSV::Encoded Handle CSV files containing Japanese
Text::Diff Text difference confirmation
XML::Simple Simple XML parser
Validator::Custom HTML form validation
Data::Page Assisting with paging
Data::Page::Navigation Create page navigation
Module::Starter Create a template for the module
Devel::NYTProf Easy-to-use profiler
perltidy Formatting the source code
Net::Ping::External Ping command execution
IO::ScalarArray Automatic testing of standard input
IO::Capture Automatic testing of standard output and standard error outpu
FFI::Raw Call a function in a dynamic library
Math::Trig Various trigonometric functions
FFI::Platypus Feature rich FFI module
Time::Moment Fast date/time processing
CGI CGI module
CGI::Carp Write error logs to HTTPD (or other)
DBI Access various databases
strict Strict grammar check
LWP::UserAgent Access data on the web
LWP::Protocol::https Access SSL with LWP::UserAgent
Net::SSLeay Access SSL with LWP::UserAgent
Net::SSL Access SSL with LWP::UserAgent
Crypt::SSLeay Access SSL with LWP::UserAgent
Encode::Guess Determine character code
Image::ExifTool Get Exif information
Archive::Tar tar extract, create, add file
Image::Magick ImageMagick command line tools
Archive::Zip zip extract, create, add files

s94Install the module.

[root@www ~]# 94_1

s95

Install ImageMagik.

Install ImageMagick.

[root@www ~]# 95_1dnf -y install ImageMagick

s96Install perl ImageMagick.

[root@www ~]# 96_1dnf -y install ImageMagick-perl

s97

Obtaining a server certificate.

Install Certbot.

[root@www ~]# 97_1dnf -y install certbot

s98Get a certificate.

Document root: /var/www/html/

email address: webmasterfedoraserver.jp

Web server name: fedoraserver.jp

[root@www ~]# 98_1certbot certonly --webroot -w /var/www/html/ -m webmaster@fedoraserver.jp  -d fedoraserver.jp --agree-tos

s99Configure automatic certificate renewal.

[root@www ~]# 99_1vi /etc/cron.d/letsencrypt

s100Add the following.

100_100 16 * * 2 root /usr/bin/certbot renew --post-hook "service httpd restart"

s101

SSL settings.

Install SSL to enable encrypted communication.

[root@www ~]# 101_1dnf install mod_ssl

s102Configure SSL.

[root@www ~]# 102_1vi /etc/httpd/conf.d/ssl.conf

s103Line 59: Remove the “#” at the beginning of the line to uncomment it.

DocumentRoot "/var/www/html"

s104Line 75: Remove the “#” at the beginning of the line to uncomment it and change it.

SSLProtocol 104_1-All +TLSv1 +TLSv1.1 +TLSv1.2

s105Line 101: Specify the obtained certificate.

SSLCertificateFile 105_1/etc/letsencrypt/live/fedoraserver.jp/cert.pem

s106Line 109: Specify the obtained key file.

SSLCertificateKeyFile 106_1/etc/letsencrypt/live/fedoraserver.jp/privkey.pem

s107Line 118: Remove the “#” at the beginning of the line to uncomment it and specify the obtained intermediate certificate.

SSLCertificateChainFile 107_1/etc/letsencrypt/live/fedoraserver.jp/chain.pem

s108Restart.

[root@www ~]# 108_1systemctl restart httpd

s109“「https://fedoraserver.jp” operation check.

Free Monitoring Test Tools

Fedora36: DNS server settings

s50

Check interface name.

Check the interface name.

[root@www ~]# 50_1nmcli device
DEVICE TYPE STATE CONNECTION
enp2s0 ethernet 接続済み enp2s0

s51

Installing BIND.

Install BIND.

[root@www ~]# 51_1dnf -y install bind bind-utils

s52Configure BIND.

[root@www ~]# 52_1vi /etc/named.conf

//
// named.conf
//
// Provided by Red Hat bind package to configure the ISC BIND named(8) DNS
// server as a caching only nameserver (as a localhost DNS resolver only).
//
// See /usr/share/doc/bind*/sample/ for example named configuration files.
//
// See the BIND Administrator's Reference Manual (ARM) for details about the
// configuration located in /usr/share/doc/bind-{version}/Bv9ARM.html

options {
        listen-on port 53 { 52_2any; }; # change
        listen-on-v6 port 53 { 52_3none; }; #change
        directory       "/var/named";
        dump-file       "/var/named/data/cache_dump.db";
        statistics-file "/var/named/data/named_stats.txt";
        memstatistics-file "/var/named/data/named_mem_stats.txt";
        recursing-file  "/var/named/data/named.recursing";
        secroots-file   "/var/named/data/named.secroots";
        allow-query     { localhost; 52_4192.168.1.1/24; }; # Postscript
        52_5allow-transfer      { localhost; 192.168.1.1/24; }; # Postscript

        /*
         - If you are building an AUTHORITATIVE DNS server, do NOT enable recursion.
         - If you are building a RECURSIVE (caching) DNS server, you need to enable
           recursion.
         - If your recursive DNS server has a public IP address, you MUST enable access
           control to limit queries to your legitimate users. Failing to do so will
           cause your server to become part of large scale DNS amplification
           attacks. Implementing BCP38 within your network would greatly
           reduce such attack surface
        */
        recursion yes;

        dnssec-enable yes;
        dnssec-validation yes;

        /* Path to ISC DLV key */
        bindkeys-file "/etc/named.iscdlv.key";

        managed-keys-directory "/var/named/dynamic";

        pid-file "/run/named/named.pid";
        session-keyfile "/run/named/session.key";
};

logging {
        channel default_debug {
                file "data/named.run";
                severity dynamic;
        };
};

#Change everything below 
52_6view "internal" {
        match-clients {
                localhost;
                192.168.1.1/24;
        };
        zone "." IN {
                type hint;
                file "named.ca";
        };
        zone "fedoraserver.jp" IN {
                type master;
                file "fedoraserver.jp.lan";
                allow-update { none; };
        };
        zone "1.168.192.in-addr.arpa" IN {
                type master;
                file "1.168.192.db";
                allow-update { none; };
        };
include "/etc/named.rfc1912.zones";
include "/etc/named.root.key";
};

s53

Setting zone information.

Create an internal forward lookup information file.

[root@www ~]# 53_1vi /var/named/fedoraserver.jp.lan

53_2$TTL 86400
@   IN  SOA     fedoraserver.jp. root.fedoraserver.jp. (
        2014071001  ;Serial
        3600        ;Refresh
        1800        ;Retry
        604800      ;Expire
        86400       ;Minimum TTL
)
        IN  NS      fedoraserver.jp.
        IN  MX 10   fedoraserver.jp.
@       IN  A       192.168.1.3
*       IN  A       192.168.1.3

s54Create an internal reverse lookup information file.

[root@www ~]# 54_1vi /var/named/1.168.192.db

54_2$TTL 86400
@   IN  SOA     fedoraserver.jp. root.fedoraserver.jp. (
        2014071001  ;Serial
        3600        ;Refresh
        1800        ;Retry
        604800      ;Expire
        86400       ;Minimum TTL
)
        IN  NS      fedoraserver.jp.
        IN  A       255.255.255.0
3       IN  PTR     fedoraserver.jp.

s55

Open TCP/UDP port 53.

ルーターの設定で、TCP/UDP53番ポートを開放します。(設定方法はご自身の環境に合わせて調べてください。)

ポート開放テスト.

Open TCP/UDP port 53 in your router settings. (Check the setting method according to your own environment.)
Open confirmation
s56

Start BIND and check its operation.

Change network settings.

[root@www ~]# 56_1nmcli connection modify enp2s0 ipv4.dns 192.168.1.3
[root@www ~]# 56_2nmcli connection down enp2s0; nmcli connection up enp2s0

s57Boot and set autostart.

[root@www ~]# 57_1systemctl enable --now named

s58WP-Coder title=”section_title”]Check for errors.

[root@www ~]# 58_1systemctl status named

s59

If there are any errors, validate the syntax and fix the errors.

If there is an error in "192.168.1.1/24" in "/etc/named.conf", change it to "localhost;".
[root@www ~]# 59_1sudo named-checkconf

s60Check operation.

[root@www ~]# 60_1dig fedoraserver.jp

; <<>> DiG 9.9.4-RedHat-9.9.4-73.el7_6 <<>> fedoraserver.jp
;; global options: +cmd
;; Got answer:
;; ->>HEADER<<- opcode: QUERY, status: NOERROR, id: 15234
;; flags: qr aa rd ra; QUERY: 1, ANSWER: 1, AUTHORITY: 1, ADDITIONAL: 1

;; OPT PSEUDOSECTION:
; EDNS: version: 0, flags:; udp: 4096
;; QUESTION SECTION:
;fedoraserver.jp.                                IN      A

;; ANSWER SECTION:
fedoraserver.jp.                 86400   IN      A       192.168.1.3

;; AUTHORITY SECTION:
fedoraserver.jp.                 86400   IN      NS      fedoraserver.jp.

;; Query time: 18 msec
;; SERVER: 192.168.1.3#53(192.168.1.3)
;; WHEN: 水  7月 03 15:23:54 JST 2019
;; MSG SIZE  rcvd: 65


[root@www ~]# 60_2dig -x 192.168.1.3

; <<>> DiG 9.9.4-RedHat-9.9.4-73.el7_6 <<>> -x 192.168.1.3
;; Got answer:
;; ->>HEADER<<- opcode: QUERY, status: NOERROR, id: 54270
;; flags: qr aa rd ra; QUERY: 1, ANSWER: 1, AUTHORITY: 1, ADDITIONAL: 2

;; OPT PSEUDOSECTION:
; EDNS: version: 0, flags:; udp: 4096
;; QUESTION SECTION:
;3.1.168.192.in-addr.arpa.      IN      PTR

;; ANSWER SECTION:
3.1.168.192.in-addr.arpa. 86400 IN      PTR     fedoraserver.jp.

;; AUTHORITY SECTION:
1.168.192.in-addr.arpa. 86400   IN      NS      fedoraserver.jp.

;; ADDITIONAL SECTION:
fedoraserver.jp.                 86400   IN      A       192.168.1.3

;; Query time: 87 msec
;; SERVER: 192.168.1.3#53(192.168.1.3)
;; WHEN: 水  7月 03 16:13:36 JST 2019
;; MSG SIZE  rcvd: 103

s61

Move to chroot environment.

Go to the chroot environment.

[root@www ~]# 61_1dnf -y install bind-chroot
[root@www ~]# 61_2mkdir /var/named/chroot/usr/lib64/named
[root@www ~]# 61_3/usr/libexec/setup-named-chroot.sh /var/named/chroot on 
[root@www ~]# 61_4systemctl disable --now named
[root@www ~]# 61_5systemctl enable --now named-chroot
Created symlink /etc/systemd/system/multi-user.target.wants/named-chroot.service → /usr/lib/systemd/system/named-chroot.service.
[root@www ~]# 61_6ll /var/named/chroot/etc 
合計 688
-rw-r--r--  2 root root     292  4月  1 21:27 localtime
drwxr-x---  2 root named      6  1月 30 02:23 named
-rw-r-----  1 root named   2340  6月  1 08:23 named.conf
-rw-r--r--  1 root named   3923  1月 30 02:23 named.iscdlv.key
-rw-r-----  1 root named    931  6月 21  2007 named.rfc1912.zones
-rw-r--r--  1 root named   1587  5月 22  2017 named.root.key
drwxr-x---  3 root named     25  6月  1 08:33 pki
-rw-r--r--. 1 root root    6545 10月 31  2018 protocols
-rw-r-----  1 root named    100  6月  1 08:27 rndc.key
-rw-r--r--. 1 root root  670293  6月  7  2013 services
[root@www ~]# 61_7ll /var/named/chroot/var/named 
合計 24
-rw-r--r-- 1 root  root   288  6月  1 08:27 1.168.192.db
drwxr-x--- 7 root  named   61  6月  1 08:33 chroot
drwxrwx--- 2 named named  127  6月 30 05:51 data
drwxrwx--- 2 named named  166  7月  3 22:32 dynamic
-rw-r----- 1 root  named 2277  6月  1 08:38 named.ca
-rw-r----- 1 root  named  152 12月 15  2009 named.empty
-rw-r----- 1 root  named  152  6月 21  2007 named.localhost
-rw-r----- 1 root  named  168 12月 15  2009 named.loopback
-rw-r--r-- 1 root  root   317  6月  1 08:24 rcg.jp.lan
drwxrwx--- 2 named named    6  1月 30 02:23 slaves

s62

Change the DNS setting of the PC in the home network.

Right-click the Windows Start menu and click Network Connections.

ネットワーク接続

s63Click “Network and Sharing Center”.

ネットワークと共有センター

s64WP-Coder title=”section_title”]Click “Local Area Connection”.

ローカルエリア接続

s65Click Properties.

プロパティ

s66Select “Internet Protocol Version 4 (TCP/IPv4)” and click “Properties”.

インターネットプロトコルバージョン4

s67Select “Use the following DNS server addresses” and set “Preferred DNS server” to ” 192.168.1.3, “Alternate DNS Server” to ” 192.168.1.1, and click OK.


s68

Second DNS verification.

Allow the server to connect to the internet.

Open a file.

[root@www ~]# 68_1vi /etc/resolv.conf

s69Append to the last line.

69_1nameserver 192.168.1.1

s70Create a new interface configuration file.

[root@www ~]# 70_1vi /etc/sysconfig/network-scripts/ifcfg-enp2s0
70_2TYPE=Ethernet
PROXY_METHOD=none
BROWSER_ONLY=no
BOOTPROTO=none
DEFROUTE=yes
IPV4_FAILURE_FATAL=yes
IPV6INIT=yes
IPV6_AUTOCONF=yes
IPV6_DEFROUTE=yes
IPV6_FAILURE_FATAL=no
IPV6_ADDR_GEN_MODE=stable-privacy
NAME=enp2s0
DEVICE=enp2s0
ONBOOT=yes
IPADDR=192.168.1.3
PREFIX=24
GATEWAY=192.168.1.1
DNS1=192.168.1.3
IPV6_PRIVACY=no
DNS2=192.168.1.1
CONNECTION_METERED=yes

s71Restart.

[root@www ~]# 71_1reboot

Fedora36: Domain settings

s50

Install DiCE.

Install the wget and glibc packages.

(If you cannot use DiCE, please see here.Common Settings: Domain Settings

[root@www ~]# 50_1dnf -y install wget
[root@www ~]# 50_2dnf -y install glibc

s51Download DiCE and unzip it.

[root@www ~]# 51_1cd /usr/local/bin
[root@www bin]# 51_2wget https://rcg.jp/download/DiCE.tar.gz
[root@www bin]# 51_3tar xzvf DiCE.tar.gz
[root@www bin]# 51_4rm -f DiCE.tar.gz
[root@www bin]# 51_5cd

s52

DiCE settings.

Install the library.

[root@www ~]# 52_1dnf install ld-linux.so.2

s53Reply with ‘y’.

Is this ok [y/d/N]: 53_1y

s54

Change the character code to “EUC-JP”.

Select “Setup” → “Terminal”.

「設定」→「端末」を選択

s55Change “Kanji(receive)” and “Kanji(transmit)” to EUC and click “OK”.

「漢字-受信」、「漢字-送信」をEUCに変更し、「OK」をクリック

s56Setup.

[root@www ~]# 56_1setarch `uname -m` /usr/local/bin/DiCE/diced
=-=-=- DiCE DynamicDNS Client -=-=-=
Version 0.19 for Japanese
Copyright(c) 2001 sarad

:56_2setup
IPアドレスの検出方法を指定してください s57Please specify how to detect the IP address
(0) 自動検出 Auto detect
(1) ローカルのネットワークアダプタから検出  Detected from local network adapter
(2) 外部のスクリプトから検出 Detection from an external script
<現在:0> <Current: 0>
(N)変更しない Do not change  (P)戻る Return
>57_12
-------------------------------------------------
スクリプトのURLを入力してください s58Enter script URL
<現在:> <Current: No>
(N)変更しない Do not change (P)戻る Return
>58_1http://dyn.value-domain.com/cgi-bin/dyn.fcg?
-------------------------------------------------
プライベートIPアドレスも検出対象ですか? s59Are private IP addresses also subject to detection? (Y/N)
<現在:いいえ> <Current: No>
(P)戻る Return
>59_1N
-------------------------------------------------
IPアドレスの検出をテストしますか? s60Do you want to test IP address detection? (Y/N)
(P)戻る
>60_1Y
検出IPアドレス>***.***.***.*** 
s61Click here to check if the above detection IP address is not displayed.Confirm IP address
-------------------------------------------------
IPアドレスの検出をテストしますか? s62Do you want to test IP address detection?(Y/N) 
(P)戻る 
>62_1N
-------------------------------------------------
IPアドレスをチェックする間隔を指定してください(分) s63Specify the interval for checking IP addresses (minutes)
設定可能範囲は5分以上です The settable range is 5 minutes or more.
<現在:60> <Current: 60>
(N)変更しない Do not change  (P)戻る Return
>63_15
=================================================
DNSサーバーの負荷を軽減するために頻繁なDNS更新を防ぐ必要があります 
前回の更新から一定時間DNS更新処理を行わないように保護時間を設定して
ください(分) 設定可能範囲は10分から1440分です
s64Frequent DNS updates should be prevented to reduce load on DNS servers 
Set the protection time to prevent DNS update processing for a certain period of time from the last update (minutes) 
The configurable range is 10 minutes to 1440 minutes.
<現在:60> <Current: 60>
(N)変更しない Do not change  (P)戻る Return
>64_110
=================================================
設定を保存しますか? s65Save settings? (Y/N)
(P)戻る
>65_1Y
設定を保存しました s66I saved the setting
=================================================

s67

Added DiCE events.

Set according to the domain (VALUE DOMAIN).

:67_1add
新しくイベントを追加します

DynamicDNSサービス名を入力してください 
"?"で対応しているサービスを一覧表示します
 s68Add new event

Enter the DynamicDNS service name
List supported services with "?"
(P)戻る Return
>?
           ZENNO.COM            livedoor            MyDNS.JP
              pcc.jp              JPN.ch             MyIP.US
              @nifty         StaticCling            MyServer
             ddns.ca                 p2p      did.expoze.com
              Dynamx          WebReactor               unicc
               Earth              DNS2Go              instat
              Now.nu           dynDNS.it          onamae.com
                DION                 ODN         RegisterFly
                 DHS          Netservers                todd
                 USA                 cjb              Dyn.ee
             BIGLOBE                dnip             3domain
             miniDNS           my-domain            ZoneEdit
                ZiVE                  yi                ysdn
              theBBS            SelfHOsT              ddo.jp
               No-IP             nicolas                eNom
           CyberGate            EveryDNS           Microtech
            ieServer          HAMMERNODE             GetmyIP
               Dynup                Dynu                dyns
              DynDSL            DynDNSdk              dyndns
               DtDNS                dnsQ                 dhs
             DDNS.nu            cheapnet            changeIP
            ARTofDNS         68_1VALUEDOMAIN                 ODS
              JSPEED               IPDYN            DnsTokyo
=================================================
新しくイベントを追加します 

ホスト名を入力してください
s69Add new event

Please enter a host name
(P)戻る Return
>69_1VALUEDOMAIN
=================================================
ドメイン名を入力してください
"?"でドメイン一覧を表示します
s70Please enter your domain name
Display domain list with "?"
(P)戻る
>Domain name
=================================================
ホスト名を入力してください s71Please enter a host name
(P)戻る Return
>71_1*
=================================================
ログインユーザ名を入力してください s72Please enter your login username
(P)戻る Return
>
=================================================
ログインパスワードを入力してください s73Please enter your login password
(P)戻る Return
>Login password
=================================================
登録するIPアドレスを入力してください 
空白にすると現在のIPアドレスを自動検出します
s74Please enter the IP address to register
Leave blank to auto detect current IP address
(P)戻る Return
>
=================================================
このイベントに題名を付けてください s75Please give this event a title
(P)戻る Return
>75_1VALUEDOMAIN-75_1ドメイン名

このイベントを実行するスケジュールを設定します 
------------------------------------------------- 
実行する頻度を指定してください (番号入力) 
s76Set a schedule to run this event
-------------------------------------------------
Specify how often to run (enter number)
(0)1回のみ Only once (1)1日1回 Once a day (2)1週間に1回 Once a week (3)1ヵ月に1回 Once a month
(4)その他の周期 Other cycles (5)IPアドレス変化時 When IP address changes (6)起動時 Startup
(P)戻る Return
>76_14
-------------------------------------------------
実行する周期を指定してください s77Please specify the cycle to run
<現在:9> <Current: 9>
(0)3分毎 Every 3 minutes   (1)5分毎 Every 5 minutes   (2)10分毎 Every 10 minutes  (3)30分毎 Every 30 minutes
(4)1時間毎 Every hour (5)2時間毎 Every 2 hours (6)6時間毎 Every 6 hours (7)12時間毎 Every 12 hours
(8)24時間毎 Every 24 hours (9)7日毎 Every 7 days (10)14日毎 Every 14 days (11)21日毎 Every 21 days
(12)28日毎 Every 28 days (13)35日毎 Every 35 days (14)56日毎 Every 56 days (15)84日毎 Every 84 days
(N)変更しない Do not change (P)戻る Return
>77_10
=================================================
=================================================
このイベントを有効にしますか? s78Enable this event? (Y/N)
(イベントの有効/無効は"EN/DIS"コマンドで切替えられます) (Event enable/disable can be switched by "EN/DIS" command)
>78_1Y
=================================================
イベントを保存しますか?  s79Save event? (Y/N)
>79_1Y
イベント"VALUE-DOMAIN-server.jp"を保存しました Saved event "VALUE-DOMAIN-server.jp"
=================================================
:

s80Activate transfer and exit.

:80_1ex 0
+ 4/8 17:00 にVALUEDOMAIN-server.jpが実行されました VALUEDOMAIN-server.jp was executed on 4/8 17:00
  IPアドレスを更新しました Updated IP address
:80_2quit

s81Change “Kanji(receive)” and “Kanji(transmit)” to UTF-8 and click “OK”.

「漢字-受信」、「漢字-送信」をUTF-8に変更し、「OK」をクリック

その他の方法

IPアドレス更新スクリプトを作成します。

[root@www ~]# vi /usr/local/bin/update_ip_script.sh
#!/bin/bash

# Store your domain, password, hostname, and current IP address in variables
DOMAIN=${1}
PASS=${2}
HOST=${3}

# Store URLs and values in variables
IPINFO_URL="http://ipinfo.io/ip"
VD_UPDATE_BASE_URL="http://dyn.value-domain.com/cgi-bin/dyn.fcg"
NS_SERVER="ns1.value-domain.com"  # Store the DNS server address

DOMAIN_LOG="d"
PASS_LOG="p"
HOST_LOG="h"
CURRENTIP_LOG="i"

if [ "${HOST}" = "" ]; then
    FQDN=${DOMAIN}
else
    FQDN="${HOST}.${DOMAIN}"
fi

# Error Messages
ERROR_MSG_VDIP="Error detecting IP address configured in VALUE-DOMAIN settings"
ERROR_MSG_CURRENTIP="Error detecting current IP address"
UPDATE_SUCCESS_MSG="IP address update successful"
UPDATE_ERROR_MSG="IP address update error"
EMAIL_SUBJECT="IP address update error"

# Obtain IP address configured in VALUE-DOMAIN settings
IPGETLOG=`host ${FQDN} ${NS_SERVER} 2>&1`
VDIP=`echo "${IPGETLOG}" | grep "has address" | awk '{ print $NF }' | egrep ^[0-9]+\.[0-9]+\.[0-9]+\.[0-9]+$`
if [ $? -ne 0 ]; then
    echo "${FQDN} ${ERROR_MSG_VDIP}" | logger -t $(basename $0)
    echo ${IPGETLOG} | logger -t $(basename $0)
    exit
fi

# Obtain current IP address
IPGETLOG=`curl "${IPINFO_URL}" 2>&1`
echo "${IPGETLOG}" | egrep ^[0-9]+\.[0-9]+\.[0-9]+\.[0-9]+$ > /dev/null 2>&1
if [ $? -eq 0 ]; then
    CURRENTIP=`echo "${IPGETLOG}" | tail -n 1 | awk '{ print $NF }'`
else
    echo "${DOMAIN} ${ERROR_MSG_CURRENTIP}" | logger -t $(basename $0)
    echo "${IPGETLOG}" | logger -t $(basename $0)
    exit
fi

# Create URL query parameters
QUERY_PARAMS="${DOMAIN_LOG}=${DOMAIN}&${PASS_LOG}=${PASS}&${HOST_LOG}=${HOST}&${CURRENTIP_LOG}=${CURRENTIP}"

# Combine with the base URL for VALUE-DOMAIN update
VD_UPDATE_URL="${VD_UPDATE_BASE_URL}?${QUERY_PARAMS}"

# Update VALUE-DOMAIN configured IP address
# (Only if VALUE-DOMAIN configured IP address is different from current IP address)
if [ "${VDIP}" != "${CURRENTIP}" ]; then
    IPUPDATE=`wget -q -O - "${VD_UPDATE_URL}"`
    echo ${IPUPDATE} | grep -q OK
    if [ $? -eq 0 ]; then
        echo "${FQDN} ${UPDATE_SUCCESS_MSG} ${VDIP} to ${CURRENTIP}" | logger -t $(basename $0)
    else
        echo "${FQDN} ${UPDATE_ERROR_MSG}" | logger -t $(basename $0)
        echo ${IPUPDATE} | logger -t $(basename $0)
        (
        echo ${UPDATE_ERROR_MSG}
        echo ${IPUPDATE}
        ) | mail -s "${SCRIPT##*/}${EMAIL_SUBJECT}" root
        exit 1
    fi
fi
exit

IPアドレス更新スクリプトへ実行権限付加します。

[root@www ~]# chmod +x /usr/local/bin/update_ip_script.sh

IPアドレス更新スクリプトを実行します。

[root@www ~]# /usr/local/bin/update_ip_script.sh ドメイン パスワード "*"

IPアドレス更新スクリプトを定期自動実行ファイルを作成します。(3分毎に実行します。)

[root@www ~]# vi /etc/cron.d/ddns-update
*/3 * * * * root /usr/local/bin/update_ip_script.sh ドメイン パスワード "*"

Fedora36: security measures

smm50

Installed anti-virus software (Clam AntiVirus).

Install Clam AntiVirus.

[root@www ~]# 50_1dnf -y install clamav clamav-update

s51Configure Clam AntiVirus.

[root@www ~]# 51_1vi /etc/freshclam.conf

s52Line 8: Add “#” at the beginning of the line to make it a comment.

52_1#Example

s53Update pattern files.

[root@www ~]# 53_1freshclam

ClamAV update process started at Sun Jun 30 23:51:01 2019
main.cvd is up to date (version: 58, sigs: 4566249, f-level: 60, builder: sigmgr)
daily.cld is up to date (version: 25496, sigs: 1606212, f-level: 63, builder: raynman)
bytecode.cvd is up to date (version: 328, sigs: 94, f-level: 63, builder: neo)

s54Run a scan to make sure it works.

[root@www ~]# 54_1clamscan --infected --remove --recursive /home

----------- SCAN SUMMARY -----------
Known viruses: 6163086
Engine version: 0.101.2
Scanned directories: 38
Scanned files: 23
Infected files: 0
Data scanned: 0.00 MB
Data read: 0.00 MB (ratio 0.00:1)
Time: 179.738 sec (2 m 59 s)

s55Download a test harmless virus.

[root@www ~]# 55_1wget http://www.eicar.org/download/eicar.com

s56Run a scan to make sure it works.

[root@www ~]# 56_1clamscan --infected --remove --recursive .

----------- SCAN SUMMARY -----------
Known viruses: 6163097
Engine version: 0.101.2
Scanned directories: 3
Scanned files: 10
Infected files: 1
Data scanned: 0.00 MB
Data read: 0.00 MB (ratio 0.00:1)
Time: 179.738 sec (2 m 59 s)

s57

Introduced a file tampering detection system (Tripwire).

Install Tripwire.

[root@www ~]# 57_1dnf -y install tripwire

s58Initialize Tripwire.

[root@www ~]# 58_1tripwire-setup-keyfiles

s59Set a passphrase for the site key file.

Enter the site keyfile passphrase: Site key file passphrase (alphanumeric)
Verify the site keyfile passphrase: Site key file passphrase (alphanumeric)

s60Sets the passphrase for the local keyfile.

Enter the local keyfile passphrase: Local key file passphrase (alphanumeric)
Verify the local keyfile passphrase: Local key file passphrase (alphanumeric)

s61Enter the passphrase for the site key file.

Please enter your site passphrase: Site key file passphrase

s62Enter the passphrase for the site key file.

Please enter your site passphrase: Site key file passphrase

s63Change the directory to “/etc/tripwire”.

[root@www ~]# 63_1cd /etc/tripwire

s64Make initial settings.

[root@www tripwire]# 64_1vi twcfg.txt

s65Line 12: Change the reporting level to maximum.

REPORTLEVEL = 65_14

s66Generate a configuration file.

[root@www tripwire]# 66_1twadmin -m F -c tw.cfg -S site.key twcfg.txt

s67Enter the passphrase for the site key file.

Please enter your site passphrase: Site key file passphrase
Wrote configuration file: /etc/tripwire/tw.cfg

s68Optimize your policy.

[root@www tripwire]# 68_1vi twpolmake.pl

s69If “#” is automatically inserted at the beginning of the line, create it in two steps.

69_1#!/usr/bin/perl
69_2# Tripwire Policy File customize tool
# ----------------------------------------------------------------
# Copyright (C) 2003 Hiroaki Izumi
# This program is free software; you can redistribute it and/or
# modify it under the terms of the GNU General Public License
# as published by the Free Software Foundation; either version 2
# of the License, or (at your option) any later version.
# This program is distributed in the hope that it will be useful,
# but WITHOUT ANY WARRANTY; without even the implied warranty of
# MERCHANTABILITY or FITNESS FOR A PARTICULAR PURPOSE. See the
# GNU General Public License for more details.
# You should have received a copy of the GNU General Public License
# along with this program; if not, write to the Free Software
# Foundation, Inc., 59 Temple Place - Suite 330, Boston, MA 02111-1307, USA.
# ----------------------------------------------------------------
# Usage:
# perl twpolmake.pl {Pol file}
# ----------------------------------------------------------------
#
#Create a line without "#" at the beginning of the line, and do the following.
69_3$POLFILE=$ARGV[0];

open(POL,"$POLFILE") or die "open error: $POLFILE" ;
my($myhost,$thost) ;
my($sharp,$tpath,$cond) ;
my($INRULE) = 0 ;

while (<POL>) {
    chomp;
    if (($thost) = /^HOSTNAMEs*=s*(.*)s*;/) {
        $myhost = `hostname` ; chomp($myhost) ;
        if ($thost ne $myhost) {
            $_="HOSTNAME="$myhost";" ;
        }
    }
    elsif ( /^{/ ) {
        $INRULE=1 ;
    }
    elsif ( /^}/ ) {
        $INRULE=0 ;
    }
    elsif ($INRULE == 1 and ($sharp,$tpath,$cond) = /^(s*#?s*)(/S+)b(s+->s+.+)$/) {
        $ret = ($sharp =~ s/#//g) ;
        if ($tpath eq '/sbin/e2fsadm' ) {
            $cond =~ s/;s+(tune2fs.*)$/; #$1/ ;
        }
        if (! -s $tpath) {
            $_ = "$sharp#$tpath$cond" if ($ret == 0) ;
        }
        else {
            $_ = "$sharp$tpath$cond" ;
        }
    }
    print "$_n" ;
}
close(POL) ;

[root@www tripwire]# 69_4perl twpolmake.pl twpol.txt > twpol.txt.new
[root@www tripwire]# 69_5twadmin -m P -c tw.cfg -p tw.pol -S site.key twpol.txt.new

s71Enter the passphrase for the site key file.

Please enter your site passphrase: Passphrase for your site key file
Wrote configuration file: /etc/tripwire/tw.pol

s72Create a database.

[root@www tripwire]# 72_1tripwire -m i -s -c tw.cfg

s73Enter the passphrase for the local key file.

Please enter your local passphrase: Local key file passphrase 

s74Move directory.

[root@www tripwire]# 74_1cd

s75Run the check. (Regular checks are performed daily.)

[root@www ~]# 75_1tripwire -m c -s -c /etc/tripwire/tw.cfg
Open Source Tripwire(R) 2.4.2.2 Integrity Check Report

Report generated by:          root
...
...
...
All rights reserved.

s76Confirm the check result.

[root@www ~]# 76_1ll /var/lib/tripwire/report
total 4
-rw-r--r-- 1 root root 1821526 6月 29 07:58 server.jp-20190629-075230.twr
-rw-r--r-- 1 root root 1830182 6月 30 06:09 server.jp-20190630-060029.twr
-rw-r--r-- 1 root root 1829590 7月 1 09:29 server.jp-20190701-092314.twr
-rw-r--r-- 1 root root 1828518 7月 1 17:27 server.jp-20190701-171400.twr

s77Specifies a report to update the database.

[root@www ~]# 77_1tripwire -m u -a -s -c /etc/tripwire/tw.cfg -r /var/lib/tripwire/report/server.jp-20190701-171400.twr

s78Enter the passphrase for the local key file.

Please enter your local passphrase: Local key file passphrase

s79

Rootkit detection system introduced (RkHunter).

Install RKHunter.

[root@www ~]# 79_1dnf -y install rkhunter

s80Set up RKHunter.

[root@www ~]# 80_1vi /etc/sysconfig/rkhunter

s81Set the destination to send the report and scan mode.

81_1#Destination to send the report to
MAILTO=root@localhost
#Scan mode
DIAG_SCAN=no

s82Update the database.

[root@www ~]# 82_1rkhunter --update

s83Update system file information.

[root@www ~]# 83_1rkhunter --propupd

s84Run check.

[root@www ~]# 84_1rkhunter --check --sk
[ Rootkit Hunter version 1.4.2 ]

Checking system commands...
...
...
No warnings were found while checking the system.

s85

Settings for SSH server public key authentication method connections.

Create a public key for the server.

Start TeraTerm, log in as a user, and create public and private keys.

[webmaster@www ~]$ 85_1ssh-keygen -t ecdsa

s86Press “Enter”.

Generating public/private ecdsa key pair.
Enter file in which to save the key (/home/webmaster/.ssh/id_ecdsa):

s87Set “Passphrase”.

Enter passphrase (empty for no passphrase):Passphrase
Enter same passphrase again:Passphrase

s88Transfer the public key to “.ssh/”.

[webmaster@www ~]$ 88_1mv ~/.ssh/id_ecdsa.pub ~/.ssh/authorized_keys

s89Configure your login settings.

[webmaster@www ~]$ 89_1chmod 700 .ssh/

s90Log in as root and transfer the private key to “/samba/share”.

[root@www ~]# 90_1mv /home/webmaster/.ssh/id_ecdsa /samba/share
[root@www ~]# 90_2chmod 777 /samba/share/id_ecdsa

s91Save the “id_ecdsa” file from the Samba shortcut on the client PC to any location (SSH key/private key/).

Connection test.

Select “New Connection”.

新しい接続

s92Enter the IP address in “Host” and click “OK”.

IPアドレス

s93Enter “Username” and “Passphrase (key passphrase)”.

「ユーザー名」、「パスフレーズ(鍵のパスフレーズ)」を入力

s94Select “Use RSA/DSA/ECDSA/ED25519 key”.

RSA/DSA/ECDSA/ED25519鍵を使う

s95Click “Private Key” and select the saved “SSH Key/Private Key/id_ecdsa”.

SSH鍵/秘密鍵/id_rsa

s96Click OK to confirm the connection.

「OK」をクリックして接続を確認

s97Log in to root.

[webmaster@www ~]$ 97_1su -
Password:

s98

Authenticated connection with private key.

Create a backup.

[root@www ~]# 98_1cp -p /etc/ssh/sshd_config /etc/ssh/sshd_config_bck

s99Edit.

[root@www ~]# 99_1vi /etc/ssh/sshd_config

s100Line 65: Change “yes” to “no”.

PasswordAuthentication 100_1no

s101Restart SSH.

[root@www ~]# 101_1systemctl restart sshd

Fedora36: NTP server settings (Chrony)

s50

NTP server settings (Chrony)

Install Chrony and synchronize time.

[root@www ~]# 50_1dnf -y install chrony

s51Configure Chrony.

[root@www ~]# 51_1vi /etc/chrony.conf

s52Line 3: Add “#” at the beginning of the line to uncomment it, and add the NTP server for time synchronization.

52_1#pool 2.centos.pool.ntp.org iburst
52_2pool ntp.nict.jp iburst

s53Line 24: Add network.

53_1allow 192.168.1.1/24

s54Set autostart.

[root@www ~]# 54_1systemctl enable --now chronyd

s55Check operation.

[root@www ~]# 55_1chronyc sources
210 Number of sources = 4
MS Name/IP address Stratum Poll Reach LastRx Last sample
===============================================================================
^- ec2-13-230-38-136.ap-nor> 2 10 377 299 +3241us[+3241us] +/- 38ms
^* ntp-a2.nict.go.jp 1 10 377 478 +371us[ +563us] +/- 11ms
^- ntp-5.jonlight.com 2 10 377 236 +460us[ +460us] +/- 40ms
^- 122x215x240x51.ap122.ftt> 2 10 377 298 -957us[ -957us] +/- 40ms

Fedora36: File server settings

s50

Install samba.

Install samba.

[root@www ~]# 50_1dnf install samba samba-client samba-common -y

s51

Initial configuration of samba.

Back up samba configuration files.

[root@www ~]# 51_1mv /etc/samba/smb.conf /etc/samba/smb.conf.bk

s52Configure samba.

[root@www ~]# 52_1vi /etc/samba/smb.conf

s53Create a file.

53_1[global]
workgroup = WORKGROUP
server string = Samba Server %v
netbios name = fedora
security = user
map to guest = bad user
dns proxy = no
ntlm auth = yes
#==========================================================
[Share]
#Shared folder
path = /samba/share/
#Whether or not it is displayed in My Network
browsable = yes
#write permission
writable = yes
#Allow guest users to login
guest ok = yes
#Read permission
read only = no
#File attributes
force create mode = 0777
#Directory attributes
force directory mode = 0777

s60Create a shared folder.

root@www:~# mkdir /samba
root@www:~# mkdir /samba/share
root@www:~# 60_21chown nobody:nobody /samba/share
root@www:~# 60_22chmod 0777 /samba/share

s61Start automatically.

[root@www ~]# 61_1systemctl enable --now smb.service
[root@www ~]# 61_2systemctl enable --now nmb.service

s62Restart.

[root@www ~]# 62_1reboot

s63Restart the client Windows PC, open “Network” → “centos” → “Share” and confirm that writing is possible. (If “Network” → “centos” is not displayed, right-click anywhere on the desktop to create a new folder, right-click the new folder to create a shortcut, and right-click the shortcut to Open the properties and change the link destination to “\centos” to connect.)

WindowsPC

Fedora36: Desktop Preferences

s50

Desktop environment installation.

Install a desktop environment.

[root@www ~]# 50_1dnf -y group install "Basic Desktop" GNOME

s51Start Desktop. (Since the terminal may freeze after setting, please open the terminal again and proceed with the setting.)

[root@www ~]# 51_1startx

s52Make login settings.

[root@www ~]# 52_1systemctl set-default graphical.target
[root@www ~]# 52_2systemctl set-default
[root@www ~]# 52_3ll /etc/systemd/system/default.target

s53Restart.

[root@www ~]# 53_1reboot

s54Note: Install either VNC server or Xrdp server. If both are installed, it may not be displayed. Xrdp server is recommended.s55

Setting up a VNC server.

Install a VNC server.

root@www:~# 55_1dnf -y install tigervnc-server

s56Log in as the user for whom you want to set the VNC connection, and set a password (up to 8 alphanumeric characters) on the VNC server.

root@www:~# 56_1vncpasswd
Password:
Verify:
Would you like to enter a view-only password (y/n)? 56_2n

s57Create a VNC server configuration file.

root@www:~# 57_1vi ~/.vnc/config
57_2session=gnome
securitytypes=vncauth,tlsvnc
geometry=800x600

s58Make the VNC server available with root privileges.

root@www:~# 58_1vi /etc/tigervnc/vncserver.users
# TigerVNC User assignment
#
# This file assigns users to specific VNC display numbers.
# The syntax is <display>=<username>. E.g.:
#
# :2=andrew
# :3=lisa
58_2:1=root
:2=webmaster

s59Start a VNC server.

root@www:~# 59_1systemctl enable --now vncserver@:1 vncserver@:2

s60Restart

root@www:~# 60_1reboot

s61Download UltraVNC_1_2_40_X64_Setup.exe of UltraVNC to the client PC. (There is a download link at the bottom of the page.)

UltraVNC

UltraVNC_1_2_40_X64_Setup.exe

UltraVNCをダウンロード

s62Select 32bit, 64bit and click “DOWNLOAD”.

23bit、64bitを選択して「DOWNLOAD」

s63Select “I accept the above listed conditions” and click “Download”.

「I accept the above listed conditions」を選択して「Download」

s64Double-click the downloaded “UltraVNC_***_Setup.exe” icon to install.

UltraVNC_***_Setup.exe

s65Click “Windows Start Menu” and start “UltraVNC Viewer”.

Windowsスタートメニュー

s66Enter the IP address of the VNC server you started earlier: Display number and click “Connect”.

VNCサーバーのIPアドレス:ディスプレイ番号を入力

s67Enter your VNC password and click Log on.

VNCパスワードを入力

s68Your desktop will appear.


s69

Xrdp server settings.

Install and configure the Xrdp server so that you can connect using the Windows remote desktop function.

[root@www ~]# 69_1dnf -y install xrdp tigervnc-server

s70Set autostart.

[root@www ~]# 70_1systemctl enable --now xrdp

s71From the Windows Start menu, select “Accessories” → “Remote Desktop Connection” to launch the connection screen.

スタートメニュー

s72Enter the server IP address and click “Connect”.

サーバーIPアドレスを入力し「接続」をクリック

s73Enter “usermame” (user name), “password” (password) and click “OK”.

s74Your desktop will appear.


s75

Japanese environment settings.

Install the Japanese environment package.

[root@www ~]# 75_1dnf -y install ibus-kkc vlgothic-*

s76Sets the system character set.

[root@www ~]# 76_1localectl set-locale LANG=ja_JP.UTF-8
[root@www ~]# 76_2source /etc/locale.conf

s77Check your settings.

[root@www ~]# 77_1echo $LANG
ja_JP.UTF-8