
s50
Check interface name.
Check the interface name.
[root@www ~]# 50_1nmcli device
DEVICE TYPE STATE CONNECTION
enp2s0 ethernet 接続済み enp2s0
s51
Installing BIND.
Install BIND.
[root@www ~]# 51_1dnf -y install bind bind-utils
s52Configure BIND.
[root@www ~]# 52_1vi /etc/named.conf

//
// named.conf
//
// Provided by Red Hat bind package to configure the ISC BIND named(8) DNS
// server as a caching only nameserver (as a localhost DNS resolver only).
//
// See /usr/share/doc/bind*/sample/ for example named configuration files.
//
// See the BIND Administrator's Reference Manual (ARM) for details about the
// configuration located in /usr/share/doc/bind-{version}/Bv9ARM.html

options {
        listen-on port 53 { 52_2any; }; # change
        listen-on-v6 port 53 { 52_3none; }; #change
        directory       "/var/named";
        dump-file       "/var/named/data/cache_dump.db";
        statistics-file "/var/named/data/named_stats.txt";
        memstatistics-file "/var/named/data/named_mem_stats.txt";
        recursing-file  "/var/named/data/named.recursing";
        secroots-file   "/var/named/data/named.secroots";
        allow-query     { localhost; 52_4192.168.1.1/24; }; # Postscript
        52_5allow-transfer      { localhost; 192.168.1.1/24; }; # Postscript

        /*
         - If you are building an AUTHORITATIVE DNS server, do NOT enable recursion.
         - If you are building a RECURSIVE (caching) DNS server, you need to enable
           recursion.
         - If your recursive DNS server has a public IP address, you MUST enable access
           control to limit queries to your legitimate users. Failing to do so will
           cause your server to become part of large scale DNS amplification
           attacks. Implementing BCP38 within your network would greatly
           reduce such attack surface
        */
        recursion yes;

        dnssec-enable yes;
        dnssec-validation yes;

        /* Path to ISC DLV key */
        bindkeys-file "/etc/named.iscdlv.key";

        managed-keys-directory "/var/named/dynamic";

        pid-file "/run/named/named.pid";
        session-keyfile "/run/named/session.key";
};

logging {
        channel default_debug {
                file "data/named.run";
                severity dynamic;
        };
};

#Change everything below
52_6view "internal" {
        match-clients {
                localhost;
                192.168.1.1/24;
        };
        zone "." IN {
                type hint;
                file "named.ca";
        };
        zone "fedoraserver.jp" IN {
                type master;
                file "fedoraserver.jp.lan";
                allow-update { none; };
        };
        zone "1.168.192.in-addr.arpa" IN {
                type master;
                file "1.168.192.db";
                allow-update { none; };
        };
include "/etc/named.rfc1912.zones";
include "/etc/named.root.key";
};
s53
Setting zone information.
Create an internal forward lookup information file.
[root@www ~]# 53_1vi /var/named/fedoraserver.jp.lan

53_2$TTL 86400
@   IN  SOA     fedoraserver.jp. root.fedoraserver.jp. (
        2014071001  ;Serial
        3600        ;Refresh
        1800        ;Retry
        604800      ;Expire
        86400       ;Minimum TTL
)
        IN  NS      fedoraserver.jp.
        IN  MX 10   fedoraserver.jp.
@       IN  A       192.168.1.3
*       IN  A       192.168.1.3
s54Create an internal reverse lookup information file.
[root@www ~]# 54_1vi /var/named/1.168.192.db

54_2$TTL 86400
@   IN  SOA     fedoraserver.jp. root.fedoraserver.jp. (
        2014071001  ;Serial
        3600        ;Refresh
        1800        ;Retry
        604800      ;Expire
        86400       ;Minimum TTL
)
        IN  NS      fedoraserver.jp.
        IN  A       255.255.255.0
3       IN  PTR     fedoraserver.jp.
s55
Open TCP/UDP port 53.
ルーターの設定で、TCP/UDP53番ポートを開放します。(設定方法はご自身の環境に合わせて調べてください。)
ポート開放テスト.
Open TCP/UDP port 53 in your router settings. (Check the setting method according to your own environment.)
Open confirmation
s56
Start BIND and check its operation.
Change network settings.
[root@www ~]# 56_1nmcli connection modify enp2s0 ipv4.dns 192.168.1.3
[root@www ~]# 56_2nmcli connection down enp2s0; nmcli connection up enp2s0
s57Boot and set autostart.
[root@www ~]# 57_1systemctl enable --now named
s58WP-Coder title=”section_title”]Check for errors.
[root@www ~]# 58_1systemctl status named
s59
If there are any errors, validate the syntax and fix the errors.
If there is an error in "192.168.1.1/24" in "/etc/named.conf", change it to "localhost;".
[root@www ~]# 59_1sudo named-checkconf
s60Check operation.
[root@www ~]# 60_1dig fedoraserver.jp

; <<>> DiG 9.9.4-RedHat-9.9.4-73.el7_6 <<>> fedoraserver.jp
;; global options: +cmd
;; Got answer:
;; ->>HEADER<<- opcode: QUERY, status: NOERROR, id: 15234
;; flags: qr aa rd ra; QUERY: 1, ANSWER: 1, AUTHORITY: 1, ADDITIONAL: 1

;; OPT PSEUDOSECTION:
; EDNS: version: 0, flags:; udp: 4096
;; QUESTION SECTION:
;fedoraserver.jp.                                IN      A

;; ANSWER SECTION:
fedoraserver.jp.                 86400   IN      A       192.168.1.3

;; AUTHORITY SECTION:
fedoraserver.jp.                 86400   IN      NS      fedoraserver.jp.

;; Query time: 18 msec
;; SERVER: 192.168.1.3#53(192.168.1.3)
;; WHEN: 水  7月 03 15:23:54 JST 2019
;; MSG SIZE  rcvd: 65


[root@www ~]# 60_2dig -x 192.168.1.3

; <<>> DiG 9.9.4-RedHat-9.9.4-73.el7_6 <<>> -x 192.168.1.3
;; Got answer:
;; ->>HEADER<<- opcode: QUERY, status: NOERROR, id: 54270
;; flags: qr aa rd ra; QUERY: 1, ANSWER: 1, AUTHORITY: 1, ADDITIONAL: 2

;; OPT PSEUDOSECTION:
; EDNS: version: 0, flags:; udp: 4096
;; QUESTION SECTION:
;3.1.168.192.in-addr.arpa.      IN      PTR

;; ANSWER SECTION:
3.1.168.192.in-addr.arpa. 86400 IN      PTR     fedoraserver.jp.

;; AUTHORITY SECTION:
1.168.192.in-addr.arpa. 86400   IN      NS      fedoraserver.jp.

;; ADDITIONAL SECTION:
fedoraserver.jp.                 86400   IN      A       192.168.1.3

;; Query time: 87 msec
;; SERVER: 192.168.1.3#53(192.168.1.3)
;; WHEN: 水  7月 03 16:13:36 JST 2019
;; MSG SIZE  rcvd: 103
s61
Move to chroot environment.
Go to the chroot environment.
[root@www ~]# 61_1dnf -y install bind-chroot
[root@www ~]# 61_2mkdir /var/named/chroot/usr/lib64/named
[root@www ~]# 61_3/usr/libexec/setup-named-chroot.sh /var/named/chroot on
[root@www ~]# 61_4systemctl disable --now named
[root@www ~]# 61_5systemctl enable --now named-chroot
Created symlink /etc/systemd/system/multi-user.target.wants/named-chroot.service → /usr/lib/systemd/system/named-chroot.service.
[root@www ~]# 61_6ll /var/named/chroot/etc
合計 688
-rw-r--r--  2 root root     292  4月  1 21:27 localtime
drwxr-x---  2 root named      6  1月 30 02:23 named
-rw-r-----  1 root named   2340  6月  1 08:23 named.conf
-rw-r--r--  1 root named   3923  1月 30 02:23 named.iscdlv.key
-rw-r-----  1 root named    931  6月 21  2007 named.rfc1912.zones
-rw-r--r--  1 root named   1587  5月 22  2017 named.root.key
drwxr-x---  3 root named     25  6月  1 08:33 pki
-rw-r--r--. 1 root root    6545 10月 31  2018 protocols
-rw-r-----  1 root named    100  6月  1 08:27 rndc.key
-rw-r--r--. 1 root root  670293  6月  7  2013 services
[root@www ~]# 61_7ll /var/named/chroot/var/named
合計 24
-rw-r--r-- 1 root  root   288  6月  1 08:27 1.168.192.db
drwxr-x--- 7 root  named   61  6月  1 08:33 chroot
drwxrwx--- 2 named named  127  6月 30 05:51 data
drwxrwx--- 2 named named  166  7月  3 22:32 dynamic
-rw-r----- 1 root  named 2277  6月  1 08:38 named.ca
-rw-r----- 1 root  named  152 12月 15  2009 named.empty
-rw-r----- 1 root  named  152  6月 21  2007 named.localhost
-rw-r----- 1 root  named  168 12月 15  2009 named.loopback
-rw-r--r-- 1 root  root   317  6月  1 08:24 rcg.jp.lan
drwxrwx--- 2 named named    6  1月 30 02:23 slaves
s62
Change the DNS setting of the PC in the home network.
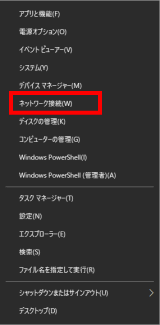
Right-click the Windows Start menu and click Network Connections.
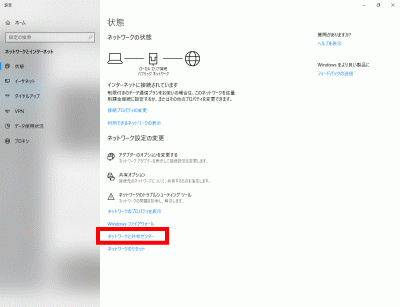
s63Click “Network and Sharing Center”.
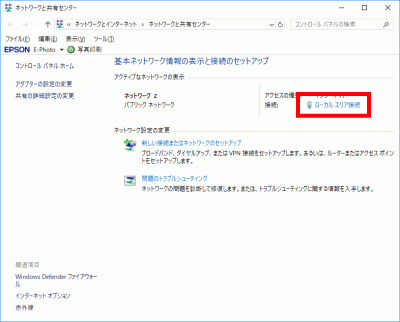
s64WP-Coder title=”section_title”]Click “Local Area Connection”.
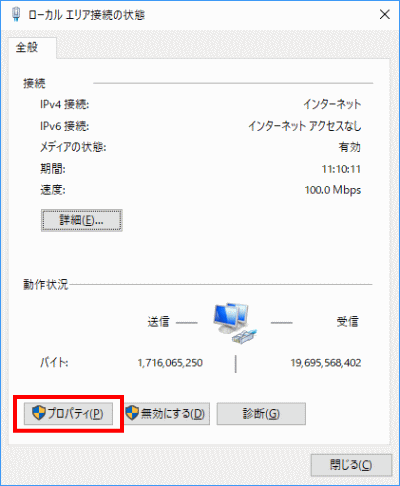
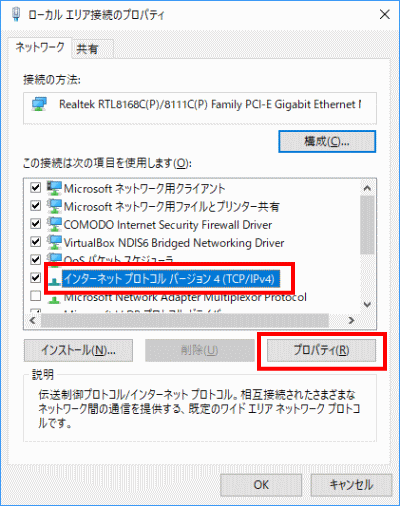
s65Click Properties.
s66Select “Internet Protocol Version 4 (TCP/IPv4)” and click “Properties”.
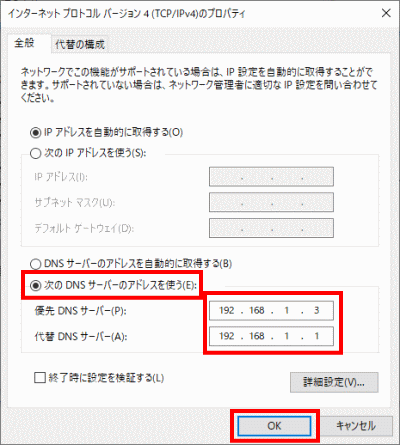
s67Select “Use the following DNS server addresses” and set “Preferred DNS server” to ” 192.168.1.3, “Alternate DNS Server” to ” 192.168.1.1, and click OK.
s68
Second DNS verification.
Allow the server to connect to the internet.
Open a file.
[root@www ~]# 68_1vi /etc/resolv.conf
s69Append to the last line.
69_1nameserver 192.168.1.1
s70Create a new interface configuration file.
[root@www ~]# 70_1vi /etc/sysconfig/network-scripts/ifcfg-enp2s0
70_2TYPE=Ethernet
PROXY_METHOD=none
BROWSER_ONLY=no
BOOTPROTO=none
DEFROUTE=yes
IPV4_FAILURE_FATAL=yes
IPV6INIT=yes
IPV6_AUTOCONF=yes
IPV6_DEFROUTE=yes
IPV6_FAILURE_FATAL=no
IPV6_ADDR_GEN_MODE=stable-privacy
NAME=enp2s0
DEVICE=enp2s0
ONBOOT=yes
IPADDR=192.168.1.3
PREFIX=24
GATEWAY=192.168.1.1
DNS1=192.168.1.3
IPV6_PRIVACY=no
DNS2=192.168.1.1
CONNECTION_METERED=yes
s71Restart.
[root@www ~]# 71_1reboot