起動不能をインストールDVDで復旧
起動不能をインストールDVDで復旧します。
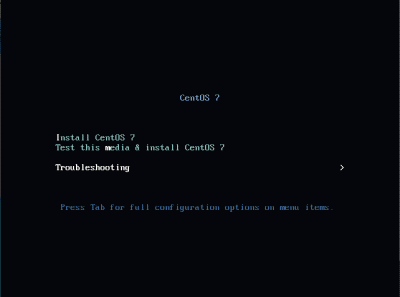
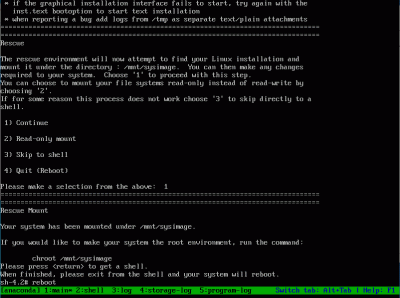
インストールDVDを投入して起動後、「Troubleshooting」を選択し「Enter」キーを押下します。
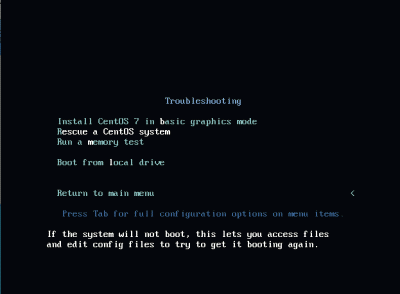
「Rescue a CentOS system」を選択し「Enter」キーを押下します。
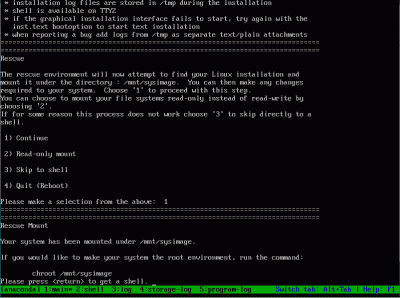
「1」(continue)を入力し「Enter」キーを押下します。

「Enter」キーを押下します。
インストールDVDを取り出して、「reboot」と入力して、「Enter」キーを押下します。
起動を確認します。
Linuxサーバー、WordPress、Androidの情報やゲーム、DIYなど色々な情報をご紹介致します。
起動不能をインストールDVDで復旧します。
インストールDVDを投入して起動後、「Troubleshooting」を選択し「Enter」キーを押下します。
「Rescue a CentOS system」を選択し「Enter」キーを押下します。
「1」(continue)を入力し「Enter」キーを押下します。
「Enter」キーを押下します。
インストールDVDを取り出して、「reboot」と入力して、「Enter」キーを押下します。
起動を確認します。
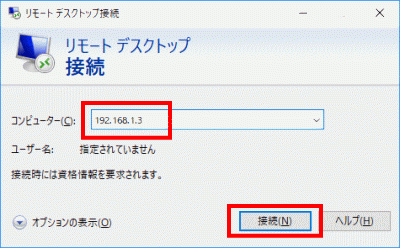
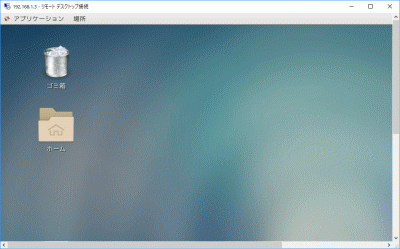
Windows スタートメニューから「アクセサリ」→「リモートデスクトップ接続」 を選択して接続画面を起動します。

サーバーIPアドレスを入力し「接続」をクリックします。
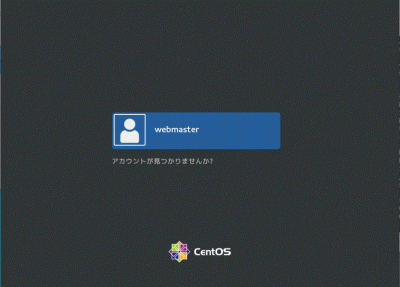
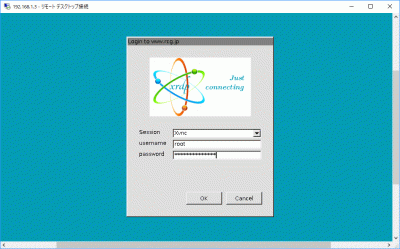
「root」(ユーザー名)、「password」(パスワード)を入力し「OK」をクリックします。
ディスクトップが表示されます。
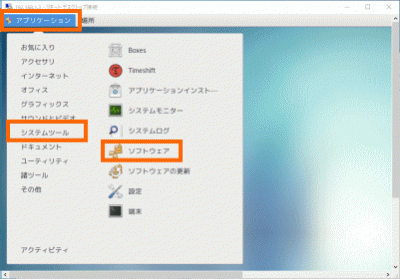
「アプリケーション」→「システムツール」→「ソフトウェア」をクリックします。
「gparted」を入力し「Enter」キーを押下します。
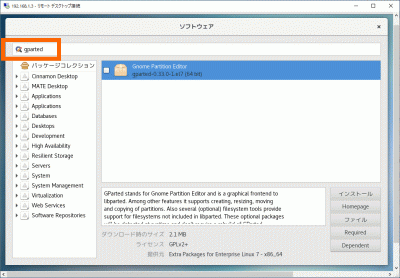
「gparted」をチェックして「インストール」をクリックします。
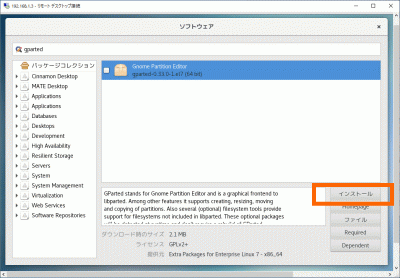
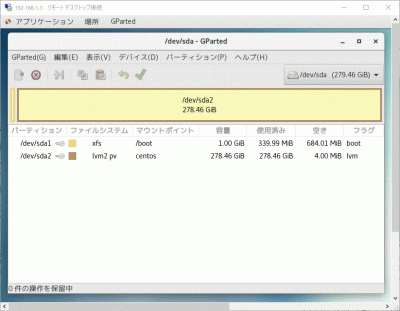
パーテーション操作は「アプリケーション」→「システムツール」→「Gparted」をクリックします。
Webサーバー、PHPの設定をします。
データベースの設定をします。
MariaDBへrootでログインします。
[root@www ~]# mysql -u root -p
Enter password:
Welcome to the MariaDB monitor.  Commands end with ; or \g.
Your MariaDB connection id is 3
Server version: 5.5.60-MariaDB MariaDB Server

Copyright (c) 2000, 2018, Oracle, MariaDB Corporation Ab and others.

Type 'help;' or '\h' for help. Type '\c' to clear the current input statement.
wordpressでデータベースを作成します。
MariaDB [(none)]> create database wordpress;
wordpress_userでユーザーを作成します。
MariaDB [(none)]> grant all privileges on wordpress.* to wordpress_user@localhost identified by 'パスワード';
ログアウトします。
MariaDB [(none)]> exit
php-mysqlをインストールします。
[root@www ~]# yum -y install php-mysql
「/var/www/html」ディレクトリ下へ移動します。
[root@www ~]# cd /var/www/html
WordPressをダウンロードします。
[root@www ~]# wget https://ja.wordpress.org/wordpress-4.9.8-ja.tar.gz
WordPressを解凍します。
[root@www ~]# tar xvzf wordpress-4.9.8-ja.tar.gz
ディレクトリを戻ります。
[root@www ~]# cd
WordPressディレクトリ所有者をApache実行ユーザーへ変更します。
[root@www ~]# chown -R apache:apache /var/www/html/wordpress/
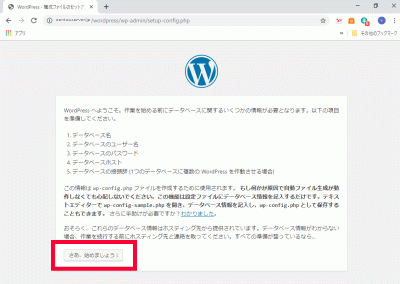
https://centserver.jp/wordpress/へアクセスし、「さあ、始めましょう!」をクリックします。
「データベース名(wordpress)」、「ユーザー名(wordpress_user)」、「パスワード(パスワード)」、「データベースの接頭辞(wp_wordpress_)」を入力し、「送信」をクリックします。

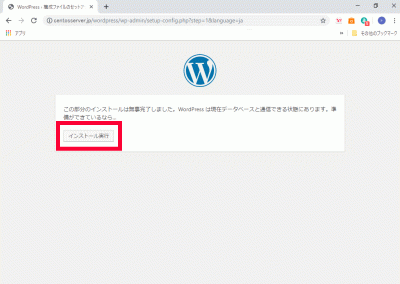
「インストール実行」をクリックします。
WordPress用Apache設定ファイルを作成します。
[root@www ~]# echo Alias /wordpress /var/www/html/wordpress > /etc/httpd/conf.d/wordpress.conf
再起動します。
[root@www ~]# systemctl reload httpd
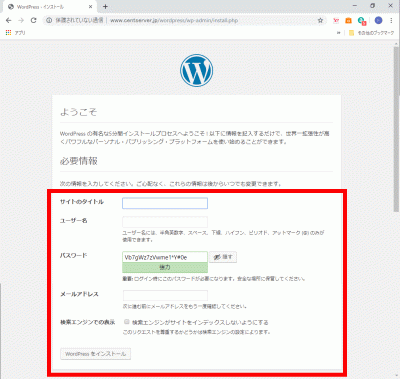
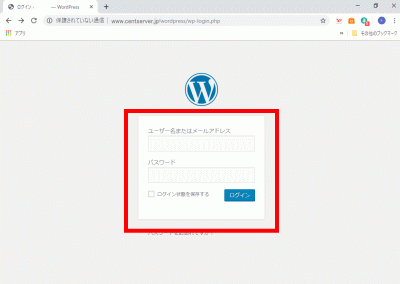
https://centserver.jp/wordpress/へアクセスし、「サイトのタイトル」、「ユーザー名」、「パスワード」、「メールアドレス」を入力して「WordPressをインストール」をクリックします。
「ユーザー名」、「パスワード」を入力して「ログイン」をクリックし、サイト管理へログインします。
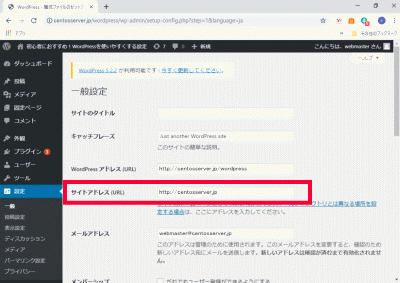
管理画面で「設定」→「一般」を開き、「サイトアドレス(URL)」に「https://centserver.jp」を設定します。
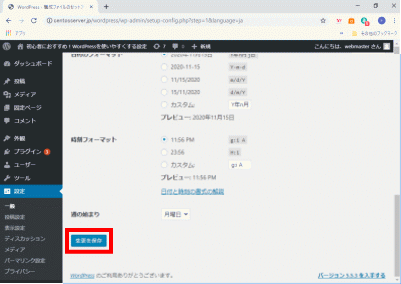
「変更を保存」をクリックします。
「/var/www/html/wordpress/index.php」をコピーして、「/var/www/html/index.php」に貼り付けます。
[root@www ~]# cp /var/www/html/wordpress/index.php /var/www/html/index.php
「/var/www/html/index.php」を設定します。
[root@www ~]# vi /var/www/html/index.php
17行目:「/wordpress」を追記します。
require( dirname( __FILE__ ) . '/wordpress/wp-blog-header.php' );
「.htaccess」を設定します。
[root@www ~]# vi /var/www/html/.htaccess
# BEGIN WordPress
<IfModule mod_rewrite.c>
    RewriteEngine On
    RewriteBase /
    RewriteRule ^index\.php$ - [L]
    RewriteCond %{REQUEST_FILENAME} !-f
    RewriteCond %{REQUEST_FILENAME} !-d
    RewriteRule . /index.php [L]
</IfModule>
# END WordPress
s50
BIOSの起動方法はご自身の環境に合わせてお調べください。
例:起動直後に画面に表示される場合があります。
| メーカー | 操作キー |
|---|---|
| 富士通 | 「F2」 |
| NEC | 「F2」 |
| Lenovo | 「F1」または「F2」 |
| HP | 「F10」または「Esc」 |
| Dell | 「F2」 または「F12」 |
s51停電があったとき、電源が復旧したらサーバが起動するようにBIOSを設定します。
BIOSの設定方法はご自身の環境に合わせてお調べください。
| メーカー | 操作手順 |
|---|---|
| 富士通 | 「Power」→「Power Failure Recovery」 →「Always On」 |
| NEC | 「Boot」→「After Power Failure」→「Power On」 |
| Lenovo | 「Config」→「Power」→「 Power on with AC attached」 |
| HP | 「Power」→「After Power Failure」→「Power On」 |
| Dell | 「SystemSecurity」→「AC Power Recovary」 |
複数ドメイン用ディレクトリを作成します。
[root@www ~]# mkdir /var/www/html/virtual.jp
パーミッションを設定します。
[root@www ~]# chmod 777 /var/www/html/virtual.jp
複数ドメイン用設定ファイルを作成します。
[root@www ~]# vi /etc/httpd/conf.d/virtualhost-virtual.jp.conf
<VirtualHost *:80>
    ServerName virtual.jp
    DocumentRoot /var/www/html/virtual.jp
    RewriteEngine On
    RewriteCond %{HTTP_HOST} ^www\.virtual\.jp
    RewriteRule ^(.*)$ http://virtual.jp/$1 [R=301,L]
    ErrorLog logs/virtual.jp-error_log
    CustomLog logs/virtual.jp-access_log combined env=!no_log
</VirtualHost>
再起動します。
[root@www ~]# systemctl restart httpd
テストページを作成します。
[root@www ~]# echo test >> /var/www/html/virtual.jp/index.html
Free Monitoring Test Toolsで「http://virtual.jp」の作動確認をします。
サーバー証明書を取得します。
[root@www ~]# certbot certonly --webroot -w /var/www/html/virtual.jp -m webmaster@centserver.jp -d virtual.jp --agree-tos
メインドメイン設定を表示します。
[root@www ~]# vi /etc/httpd/conf.d/virtualhost-00-centserver.jp.conf
行番号を非表示にします。
:set nonumber
<VirtualHost *:443>~</VirtualHost>をコピーしてメモ帳などに貼り付け、複数ドメインを設定します。
<VirtualHost *:443>

# General setup for the virtual host, inherited from global configuration
DocumentRoot "/var/www/html/virtual.jp"
ServerName virtual.jp:443

# Use separate log files for the SSL virtual host; note that LogLevel
# is not inherited from httpd.conf.
ErrorLog logs/ssl_error_log
TransferLog logs/ssl_access_log
LogLevel warn

#   SSL Engine Switch:
#   Enable/Disable SSL for this virtual host.
SSLEngine on

#   SSL Protocol support:
# List the enable protocol levels with which clients will be able to
# connect.  Disable SSLv2 access by default:
SSLProtocol -All +TLSv1 +TLSv1.1 +TLSv1.2

#   SSL Cipher Suite:
#   List the ciphers that the client is permitted to negotiate.
#   See the mod_ssl documentation for a complete list.
SSLCipherSuite HIGH:3DES:!aNULL:!MD5:!SEED:!IDEA

#   Speed-optimized SSL Cipher configuration:
#   If speed is your main concern (on busy HTTPS servers e.g.),
#   you might want to force clients to specific, performance
#   optimized ciphers. In this case, prepend those ciphers
#   to the SSLCipherSuite list, and enable SSLHonorCipherOrder.
#   Caveat: by giving precedence to RC4-SHA and AES128-SHA
#   (as in the example below), most connections will no longer
#   have perfect forward secrecy - if the server's key is
#   compromised, captures of past or future traffic must be
#   considered compromised, too.
#SSLCipherSuite RC4-SHA:AES128-SHA:HIGH:MEDIUM:!aNULL:!MD5
#SSLHonorCipherOrder on

#   Server Certificate:
# Point SSLCertificateFile at a PEM encoded certificate.  If
# the certificate is encrypted, then you will be prompted for a
# pass phrase.  Note that a kill -HUP will prompt again.  A new
# certificate can be generated using the genkey(1) command.
SSLCertificateFile /etc/letsencrypt/live/virtual.jp/cert.pem

#   Server Private Key:
#   If the key is not combined with the certificate, use this
#   directive to point at the key file.  Keep in mind that if
#   you've both a RSA and a DSA private key you can configure
#   both in parallel (to also allow the use of DSA ciphers, etc.)
SSLCertificateKeyFile /etc/letsencrypt/live/virtual.jp/privkey.pem

#   Server Certificate Chain:
#   Point SSLCertificateChainFile at a file containing the
#   concatenation of PEM encoded CA certificates which form the
#   certificate chain for the server certificate. Alternatively
#   the referenced file can be the same as SSLCertificateFile
#   when the CA certificates are directly appended to the server
#   certificate for convinience.
SSLCertificateChainFile /etc/letsencrypt/live/virtual.jp/chain.pem

#   Certificate Authority (CA):
#   Set the CA certificate verification path where to find CA
#   certificates for client authentication or alternatively one
#   huge file containing all of them (file must be PEM encoded)
#SSLCACertificateFile /etc/pki/tls/certs/ca-bundle.crt

#   Client Authentication (Type):
#   Client certificate verification type and depth.  Types are
#   none, optional, require and optional_no_ca.  Depth is a
#   number which specifies how deeply to verify the certificate
#   issuer chain before deciding the certificate is not valid.
#SSLVerifyClient require
#SSLVerifyDepth  10

#   Access Control:
#   With SSLRequire you can do per-directory access control based
#   on arbitrary complex boolean expressions containing server
#   variable checks and other lookup directives.  The syntax is a
#   mixture between C and Perl.  See the mod_ssl documentation
#   for more details.
#<Location />
#SSLRequire (    %{SSL_CIPHER} !~ m/^(EXP|NULL)/ \
#            and %{SSL_CLIENT_S_DN_O} eq "Snake Oil, Ltd." \
#            and %{SSL_CLIENT_S_DN_OU} in {"Staff", "CA", "Dev"} \
#            and %{TIME_WDAY} >= 1 and %{TIME_WDAY} <= 5 \
#            and %{TIME_HOUR} >= 8 and %{TIME_HOUR} <= 20       ) \
#           or %{REMOTE_ADDR} =~ m/^192\.76\.162\.[0-9]+$/
#</Location>

#   SSL Engine Options:
#   Set various options for the SSL engine.
#   o FakeBasicAuth:
#     Translate the client X.509 into a Basic Authorisation.  This means that
#     the standard Auth/DBMAuth methods can be used for access control.  The
#     user name is the `one line' version of the client's X.509 certificate.
#     Note that no password is obtained from the user. Every entry in the user
#     file needs this password: `xxj31ZMTZzkVA'.
#   o ExportCertData:
#     This exports two additional environment variables: SSL_CLIENT_CERT and
#     SSL_SERVER_CERT. These contain the PEM-encoded certificates of the
#     server (always existing) and the client (only existing when client
#     authentication is used). This can be used to import the certificates
#     into CGI scripts.
#   o StdEnvVars:
#     This exports the standard SSL/TLS related `SSL_*' environment variables.
#     Per default this exportation is switched off for performance reasons,
#     because the extraction step is an expensive operation and is usually
#     useless for serving static content. So one usually enables the
#     exportation for CGI and SSI requests only.
#   o StrictRequire:
#     This denies access when "SSLRequireSSL" or "SSLRequire" applied even
#     under a "Satisfy any" situation, i.e. when it applies access is denied
#     and no other module can change it.
#   o OptRenegotiate:
#     This enables optimized SSL connection renegotiation handling when SSL
#     directives are used in per-directory context.
#SSLOptions +FakeBasicAuth +ExportCertData +StrictRequire
<Files ~ "\.(cgi|shtml|phtml|php3?)$">
    SSLOptions +StdEnvVars
</Files>
<Directory "/var/www/cgi-bin">
    SSLOptions +StdEnvVars
</Directory>

#   SSL Protocol Adjustments:
#   The safe and default but still SSL/TLS standard compliant shutdown
#   approach is that mod_ssl sends the close notify alert but doesn't wait for
#   the close notify alert from client. When you need a different shutdown
#   approach you can use one of the following variables:
#   o ssl-unclean-shutdown:
#     This forces an unclean shutdown when the connection is closed, i.e. no
#     SSL close notify alert is send or allowed to received.  This violates
#     the SSL/TLS standard but is needed for some brain-dead browsers. Use
#     this when you receive I/O errors because of the standard approach where
#     mod_ssl sends the close notify alert.
#   o ssl-accurate-shutdown:
#     This forces an accurate shutdown when the connection is closed, i.e. a
#     SSL close notify alert is send and mod_ssl waits for the close notify
#     alert of the client. This is 100% SSL/TLS standard compliant, but in
#     practice often causes hanging connections with brain-dead browsers. Use
#     this only for browsers where you know that their SSL implementation
#     works correctly.
#   Notice: Most problems of broken clients are also related to the HTTP
#   keep-alive facility, so you usually additionally want to disable
#   keep-alive for those clients, too. Use variable "nokeepalive" for this.
#   Similarly, one has to force some clients to use HTTP/1.0 to workaround
#   their broken HTTP/1.1 implementation. Use variables "downgrade-1.0" and
#   "force-response-1.0" for this.
BrowserMatch "MSIE [2-5]" \
         nokeepalive ssl-unclean-shutdown \
         downgrade-1.0 force-response-1.0

#   Per-Server Logging:
#   The home of a custom SSL log file. Use this when you want a
#   compact non-error SSL logfile on a virtual host basis.
CustomLog logs/ssl_request_log \
          "%t %h %{SSL_PROTOCOL}x %{SSL_CIPHER}x \"%r\" %b"

</VirtualHost>
virtualhost-virtual.jp.confを設定します。
[root@www ~]# vi /etc/httpd/conf.d/virtualhost-virtual.jp.conf
先に保存したものを最終行に貼り付けます。
<VirtualHost *:443>

# General setup for the virtual host, inherited from global configuration
DocumentRoot "/var/www/html/virtual.jp"
ServerName virtual.jp:443

# Use separate log files for the SSL virtual host; note that LogLevel
# is not inherited from httpd.conf.
ErrorLog logs/ssl_error_log
TransferLog logs/ssl_access_log
LogLevel warn

#   SSL Engine Switch:
#   Enable/Disable SSL for this virtual host.
SSLEngine on

#   SSL Protocol support:
# List the enable protocol levels with which clients will be able to
# connect.  Disable SSLv2 access by default:
SSLProtocol -All +TLSv1 +TLSv1.1 +TLSv1.2

#   SSL Cipher Suite:
#   List the ciphers that the client is permitted to negotiate.
#   See the mod_ssl documentation for a complete list.
SSLCipherSuite HIGH:3DES:!aNULL:!MD5:!SEED:!IDEA

#   Speed-optimized SSL Cipher configuration:
#   If speed is your main concern (on busy HTTPS servers e.g.),
#   you might want to force clients to specific, performance
#   optimized ciphers. In this case, prepend those ciphers
#   to the SSLCipherSuite list, and enable SSLHonorCipherOrder.
#   Caveat: by giving precedence to RC4-SHA and AES128-SHA
#   (as in the example below), most connections will no longer
#   have perfect forward secrecy - if the server's key is
#   compromised, captures of past or future traffic must be
#   considered compromised, too.
#SSLCipherSuite RC4-SHA:AES128-SHA:HIGH:MEDIUM:!aNULL:!MD5
#SSLHonorCipherOrder on

#   Server Certificate:
# Point SSLCertificateFile at a PEM encoded certificate.  If
# the certificate is encrypted, then you will be prompted for a
# pass phrase.  Note that a kill -HUP will prompt again.  A new
# certificate can be generated using the genkey(1) command.
SSLCertificateFile /etc/letsencrypt/live/virtual.jp/cert.pem

#   Server Private Key:
#   If the key is not combined with the certificate, use this
#   directive to point at the key file.  Keep in mind that if
#   you've both a RSA and a DSA private key you can configure
#   both in parallel (to also allow the use of DSA ciphers, etc.)
SSLCertificateKeyFile /etc/letsencrypt/live/virtual.jp/privkey.pem

#   Server Certificate Chain:
#   Point SSLCertificateChainFile at a file containing the
#   concatenation of PEM encoded CA certificates which form the
#   certificate chain for the server certificate. Alternatively
#   the referenced file can be the same as SSLCertificateFile
#   when the CA certificates are directly appended to the server
#   certificate for convinience.
SSLCertificateChainFile /etc/letsencrypt/live/virtual.jp/chain.pem

#   Certificate Authority (CA):
#   Set the CA certificate verification path where to find CA
#   certificates for client authentication or alternatively one
#   huge file containing all of them (file must be PEM encoded)
#SSLCACertificateFile /etc/pki/tls/certs/ca-bundle.crt

#   Client Authentication (Type):
#   Client certificate verification type and depth.  Types are
#   none, optional, require and optional_no_ca.  Depth is a
#   number which specifies how deeply to verify the certificate
#   issuer chain before deciding the certificate is not valid.
#SSLVerifyClient require
#SSLVerifyDepth  10

#   Access Control:
#   With SSLRequire you can do per-directory access control based
#   on arbitrary complex boolean expressions containing server
#   variable checks and other lookup directives.  The syntax is a
#   mixture between C and Perl.  See the mod_ssl documentation
#   for more details.
#<Location />
#SSLRequire (    %{SSL_CIPHER} !~ m/^(EXP|NULL)/ \
#            and %{SSL_CLIENT_S_DN_O} eq "Snake Oil, Ltd." \
#            and %{SSL_CLIENT_S_DN_OU} in {"Staff", "CA", "Dev"} \
#            and %{TIME_WDAY} >= 1 and %{TIME_WDAY} <= 5 \
#            and %{TIME_HOUR} >= 8 and %{TIME_HOUR} <= 20       ) \
#           or %{REMOTE_ADDR} =~ m/^192\.76\.162\.[0-9]+$/
#</Location>

#   SSL Engine Options:
#   Set various options for the SSL engine.
#   o FakeBasicAuth:
#     Translate the client X.509 into a Basic Authorisation.  This means that
#     the standard Auth/DBMAuth methods can be used for access control.  The
#     user name is the `one line' version of the client's X.509 certificate.
#     Note that no password is obtained from the user. Every entry in the user
#     file needs this password: `xxj31ZMTZzkVA'.
#   o ExportCertData:
#     This exports two additional environment variables: SSL_CLIENT_CERT and
#     SSL_SERVER_CERT. These contain the PEM-encoded certificates of the
#     server (always existing) and the client (only existing when client
#     authentication is used). This can be used to import the certificates
#     into CGI scripts.
#   o StdEnvVars:
#     This exports the standard SSL/TLS related `SSL_*' environment variables.
#     Per default this exportation is switched off for performance reasons,
#     because the extraction step is an expensive operation and is usually
#     useless for serving static content. So one usually enables the
#     exportation for CGI and SSI requests only.
#   o StrictRequire:
#     This denies access when "SSLRequireSSL" or "SSLRequire" applied even
#     under a "Satisfy any" situation, i.e. when it applies access is denied
#     and no other module can change it.
#   o OptRenegotiate:
#     This enables optimized SSL connection renegotiation handling when SSL
#     directives are used in per-directory context.
#SSLOptions +FakeBasicAuth +ExportCertData +StrictRequire
<Files ~ "\.(cgi|shtml|phtml|php3?)$">
    SSLOptions +StdEnvVars
</Files>
<Directory "/var/www/cgi-bin">
    SSLOptions +StdEnvVars
</Directory>

#   SSL Protocol Adjustments:
#   The safe and default but still SSL/TLS standard compliant shutdown
#   approach is that mod_ssl sends the close notify alert but doesn't wait for
#   the close notify alert from client. When you need a different shutdown
#   approach you can use one of the following variables:
#   o ssl-unclean-shutdown:
#     This forces an unclean shutdown when the connection is closed, i.e. no
#     SSL close notify alert is send or allowed to received.  This violates
#     the SSL/TLS standard but is needed for some brain-dead browsers. Use
#     this when you receive I/O errors because of the standard approach where
#     mod_ssl sends the close notify alert.
#   o ssl-accurate-shutdown:
#     This forces an accurate shutdown when the connection is closed, i.e. a
#     SSL close notify alert is send and mod_ssl waits for the close notify
#     alert of the client. This is 100% SSL/TLS standard compliant, but in
#     practice often causes hanging connections with brain-dead browsers. Use
#     this only for browsers where you know that their SSL implementation
#     works correctly.
#   Notice: Most problems of broken clients are also related to the HTTP
#   keep-alive facility, so you usually additionally want to disable
#   keep-alive for those clients, too. Use variable "nokeepalive" for this.
#   Similarly, one has to force some clients to use HTTP/1.0 to workaround
#   their broken HTTP/1.1 implementation. Use variables "downgrade-1.0" and
#   "force-response-1.0" for this.
BrowserMatch "MSIE [2-5]" \
         nokeepalive ssl-unclean-shutdown \
         downgrade-1.0 force-response-1.0

#   Per-Server Logging:
#   The home of a custom SSL log file. Use this when you want a
#   compact non-error SSL logfile on a virtual host basis.
CustomLog logs/ssl_request_log \
          "%t %h %{SSL_PROTOCOL}x %{SSL_CIPHER}x \"%r\" %b"

</VirtualHost>
ホームネットワーク内でドメイン名で表示する様にBIND を設定します。
[root@www ~]# vi /etc/named.conf

//
// named.conf
//
// Provided by Red Hat bind package to configure the ISC BIND named(8) DNS
// server as a caching only nameserver (as a localhost DNS resolver only).
//
// See /usr/share/doc/bind*/sample/ for example named configuration files.
//
// See the BIND Administrator's Reference Manual (ARM) for details about the
// configuration located in /usr/share/doc/bind-{version}/Bv9ARM.html


options {
        listen-on port 53 { any; };
        listen-on-v6 port 53 { none; };
        directory       "/var/named";
        dump-file       "/var/named/data/cache_dump.db";
        statistics-file "/var/named/data/named_stats.txt";
        memstatistics-file "/var/named/data/named_mem_stats.txt";
        recursing-file  "/var/named/data/named.recursing";
        secroots-file   "/var/named/data/named.secroots";
        allow-query     { localhost; 192.168.1.1/24; };
        allow-transfer      { localhost; 192.168.1.1/24; };

        /*
         - If you are building an AUTHORITATIVE DNS server, do NOT enable recursion.
         - If you are building a RECURSIVE (caching) DNS server, you need to enable
           recursion.
         - If your recursive DNS server has a public IP address, you MUST enable access
           control to limit queries to your legitimate users. Failing to do so will
           cause your server to become part of large scale DNS amplification
           attacks. Implementing BCP38 within your network would greatly
           reduce such attack surface
        */
        recursion yes;

        dnssec-enable yes;
        dnssec-validation yes;

        /* Path to ISC DLV key */
        bindkeys-file "/etc/named.iscdlv.key";

        managed-keys-directory "/var/named/dynamic";

        pid-file "/run/named/named.pid";
        session-keyfile "/run/named/session.key";
};

logging {
        channel default_debug {
                file "data/named.run";
                severity dynamic;
        };
};

view "internal" {
        match-clients {
                localhost;
                192.168.1.1/24;
        };
        zone "." IN {
                type hint;
                file "named.ca";
        };
        zone "centserver.jp" IN {
                type master;
                file "centserver.jp.lan";
                allow-update { none; };
        };
        zone "virtual.jp" IN {
                type master;
                file "virtual.jp.lan";
                allow-update { none; };
        };
        zone "1.168.192.in-addr.arpa" IN {
                type master;
                file "1.168.192.db";
                allow-update { none; };
        };
include "/etc/named.rfc1912.zones";
include "/etc/named.root.key";
};
内部向け正引き情報ファイルを作成します。
[root@www ~]# vi /var/named/virtual.jp.lan

$TTL 86400
@   IN  SOA     virtual.jp. root.virtual.jp. (
        2014071001  ;Serial
        3600        ;Refresh
        1800        ;Retry
        604800      ;Expire
        86400       ;Minimum TTL
)
        IN  NS      virtual.jp.
        IN  MX 10   virtual.jp.
@       IN  A       192.168.1.3
*       IN  A       192.168.1.3
再起動します。
[root@www ~]# reboot
Free Monitoring Test Toolsで「https://virtual.jp」の作動確認をします。
必要なモジュールをインストールします。
[root@www ~]# yum --enablerepo=epel -y install perl-Net-SSLeay perl-Authen-PAM
Userminモジュールをインストールします。
[root@www ~]# yum -y install http://download.webmin.com/download/yum/usermin-1.770-1.noarch.rpm
miniserv.confを設定します。
[root@www ~]# vi /etc/usermin/miniserv.conf
最終行についきします。
allow=127.0.0.1 192.168.1.1/24
denyusers=root
keyfile=/etc/letsencrypt/live/centserver.jp/privkey.pem
certfile=/etc/letsencrypt/live/centserver.jp/fullchain.pem
起動します。
[root@www ~]# /etc/rc.d/init.d/usermin start
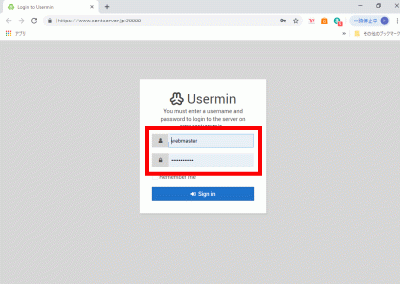
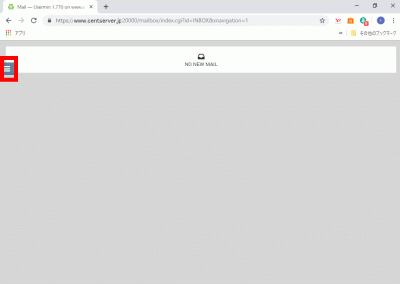
Webブラウザを起動し、「https://centserver.jp:20000/」へアクセスし、ユーザーでログインします。
クリックします。
クリックします。
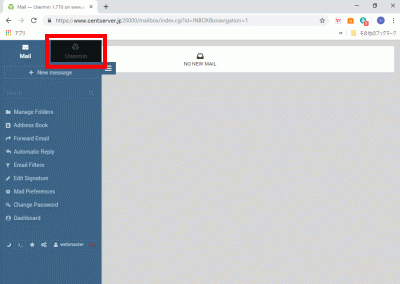
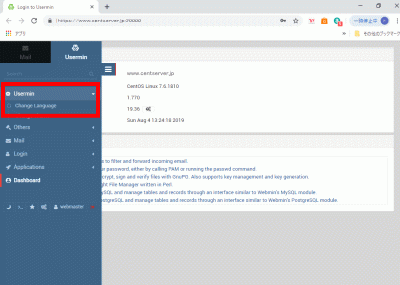
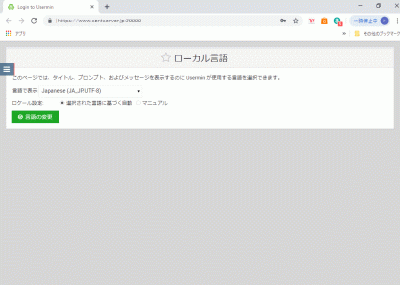
「Usermin」→「Change Language」を選択して、日本語化します。
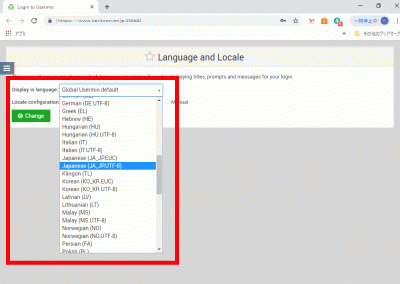
「Display in language:」→「Japanese(JA_JP,UTF-8)」を選択して、「Change」をクリックします。
「F5」キー押下して、「日本語表示」を確認します。
httpd をインストールします。
[root@www ~]# yum -y install httpd
ウェルカムページを削除します。
[root@www ~]# rm -f /etc/httpd/conf.d/welcome.conf
httpd を設定します。
[root@www ~]# vi /etc/httpd/conf/httpd.conf
95行目:行頭の「#」を削除してコメント解除し、サーバー名を指定します。
ServerName centserver.jp:80
151行目:変更します。
AllowOverride All
164行目:ディレクトリ名のみでアクセスできるファイル名を追記します。
DirectoryIndex index.html index.cgi index.php index.rb index.py
316行目:行頭に「#」を追記してコメント化し、文字化け対応します。
#AddDefaultCharset UTF-8
最終行に追記します。(gateway timeoutエラー対策)
Timeout 300
KeepAlive On
MaxKeepAliveRequests 100
KeepAliveTimeout 15
ドキュメントルート所有者を編集ユーザー(webmaster)に変更します。
[root@www ~]# chown webmaster. /var/www/html/
ドキュメントルート所有者を確認します。
[root@www ~]# ll /var/www/
合計 0
drwxr-xr-x 2 root root 6 4月 24 22:46 cgi-bin
drwxr-xr-x 2 webmaster webmaster 6 4月 24 22:46 html
URLのwwwを設定します。
[root@www ~]# vi /etc/httpd/conf.d/virtualhost-00-centserver.jp.conf
wwwなしに統一します。
<VirtualHost *:80>
    ServerName centserver.jp
    DocumentRoot /var/www/html
    RewriteEngine On
    RewriteCond %{HTTP_HOST} ^www\.centserver\.jp
    RewriteRule ^(.*)$ http://centserver.jp/$1 [R=301,L]
</VirtualHost>
起動します。
[root@www ~]# systemctl start httpd
自動起動設定します。
[root@www ~]# systemctl enable httpd
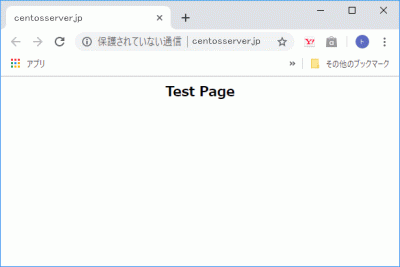
HTMLテストページを作成します。
[root@www ~]# vi /var/www/html/index.html
<html>
<body>
<div style="width: 100%; font-size: 20px; font-weight: bold; text-align: center;">
Test Page
</div>
</body>
</html>
Webブラウザを起動し、「http://centserver.jp」にアクセスし、動作確認をします。
ルーターの設定で、TCP80番ポートを開放します。(設定方法はご自身の環境に合わせて調べてください。)
こちらのサイトで「ホスト名(centserver.jp)」、「ポート番号(80)」の開放確認をします。
Perl をインストールします。
[root@www ~]# yum -y install perl perl-CGI
「html」ディレクトリで CGI の実行を許可する設定します。
[root@www ~]# vi /etc/httpd/conf.d/html.conf
拡張子 cgi、pl、rb、py を CGI として設定します。
<Directory "/var/www/html">
    Options +ExecCGI
    AddHandler cgi-script .cgi .pl .rb .py
</Directory>
「/usr/local/bin/perl」で、Perlコマンドへアクセスできるようにします。
[root@www ~]# ln -s /usr/bin/perl /usr/local/bin/perl
Perlのパスを確認します。
[root@www ~]# whereis perl
perl: /usr/bin/perl /usr/local/bin/perl /usr/share/man/man1/perl.1.gz
再起動します。
[root@www ~]# systemctl restart httpd
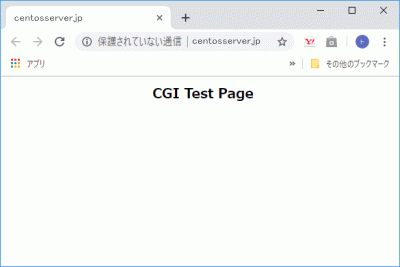
CGIテストページを作成します。
[root@www ~]# vi /var/www/html/index.cgi
#!/usr/bin/perl

print "Content-type: text/html\n\n";
print "<html>\n<body>\n";
print "<div style=\"width: 100%; font-size: 20px; font-weight: bold; text-align: center;\">\n";
print "CGI Test Page";
print "\n</div>\n";
print "</body>\n</html>\n";
パーミッションを設定します。
[root@www ~]# chmod 705 /var/www/html/index.cgi
Webブラウザを起動し、「http://centserver.jp/index.cgi」にアクセスし、動作確認をします。
PHP をインストールします。
[root@www ~]# yum -y install php php-mbstring php-pear
PHP を設定します。
[root@www ~]# vi /etc/php.ini
878行目:行頭の「;」を削除してコメント解除し、自身のタイムゾーンを追記します。
date.timezone = "Asia/Tokyo"
再起動します。
[root@www ~]# systemctl restart httpd
PHPテストページを作成します。
[root@www ~]# vi /var/www/html/index.php
<html>
<body>
<div style="width: 100%; font-size: 20px; font-weight: bold; text-align: center;">
<?php
print "PHP Test Page";
?>
</div>
</body>
</html>
Webブラウザを起動し、「http://centserver.jp/index.php」にアクセスし、動作確認をします。

Ruby をインストールします。
[root@www ~]# yum -y install ruby
再起動します。
[root@www ~]# systemctl restart httpd
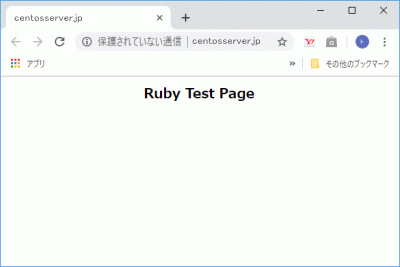
Rubyテストページを作成します。
[root@www ~]# vi /var/www/html/index.rb
#!/usr/bin/ruby

print "Content-type: text/html\n\n";
print "<html>\n<body>\n";
print "<div style=\"width: 100%; font-size: 20px; font-weight: bold; text-align: center;\">\n";
print "Ruby Test Page";
print "\n</div>\n";
print "</body>\n</html>\n";
パーミッションを設定します。
[root@www ~]# chmod 705 /var/www/html/index.rb
Webブラウザを起動し、「http://centserver.jp/index.rb」にアクセスし、動作確認をします。
Python をインストールします。
[root@www ~]# yum -y install python
再起動します。
[root@www ~]# systemctl restart httpd
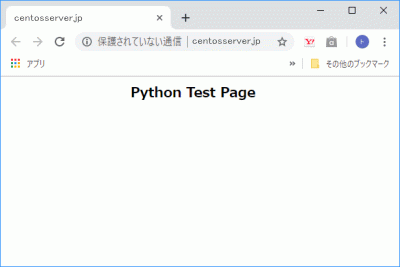
Python テストページを作成します。
[root@www ~]# vi /var/www/html/index.py
#!/usr/bin/env python

print "Content-type: text/html\n\n";
print "<html>\n<body>\n";
print "<div style=\"width: 100%; font-size: 20px; font-weight: bold; text-align: center;\">\n";
print "Python Test Page";
print "\n</div>\n";
print "</body>\n</html>\n";
パーミッションを設定します。
[root@www ~]# chmod 705 /var/www/html/index.py
Webブラウザを起動し、「http://centserver.jp/index.py」にアクセスし、動作確認をします。
チェックを入れて「OK」をクリックするとインストールログが表示されます。
モジュールをインストールします。
[root@www ~]#
ImageMagickをインストールします。
[root@www ~]# yum -y install ImageMagick
perl ImageMagickをインストールします。
[root@www ~]# yum -y install ImageMagick-perl
Certbotをインストールします。
[root@www ~]# yum --enablerepo=epel -y install certbot
証明書を取得します。
ドキュメントルート:/var/www/html/
メールアドレス:webmaster@centserver.jp
Webサーバー名:centserver.jp
[root@www ~]# certbot certonly --webroot -w /var/www/html/ -m webmaster@centserver.jp -d centserver.jp --agree-tos
証明書自動更新を設定します。
[root@www ~]# vi /etc/cron.d/letsencrypt
下記を追記します。
00 16 * * 2 root /usr/bin/certbot renew --post-hook "service httpd restart"
SSLをインストールして、暗号化通信ができるように設定します。
[root@www ~]# yum install mod_ssl
SSLを設定します。
[root@www ~]# vi /etc/httpd/conf.d/ssl.conf
59行目:行頭の「#」を削除してコメントを解除します。
DocumentRoot "/var/www/html"
75行目:変更します。
SSLProtocol -All +TLSv1 +TLSv1.1 +TLSv1.2
100行目:取得した証明書を指定します。
SSLCertificateFile /etc/letsencrypt/live/centserver.jp/cert.pem
107行目:取得した鍵ファイルを指定します。
SSLCertificateKeyFile /etc/letsencrypt/live/centserver.jp/privkey.pem
116行目:取得した中間証明書を指定します。
SSLCertificateChainFile /etc/letsencrypt/live/centserver.jp/chain.pem
再起動します。
[root@www ~]# systemctl restart httpd
Free Monitoring Test Toolsで「https://centserver.jp」の作動確認をします。
必要な パケージをインストールします。
[root@www ~]# yum -y install perl-Net-SSLeay
Webmin をインストールします。
[root@www ~]# yum -y install http://download.webmin.com/download/yum/webmin-1.770-1.noarch.rpm
miniserv.confを設定します。
[root@www ~]# vi /etc/webmin/miniserv.conf
最終行にアクセス許可するIPを追記します。
allow=127.0.0.1 192.168.1.1/24
keyfile=/etc/letsencrypt/live/centserver.jp/privkey.pem
certfile=/etc/letsencrypt/live/centserver.jp/fullchain.pem
再起動します。
[root@www ~]# /etc/rc.d/init.d/webmin restart
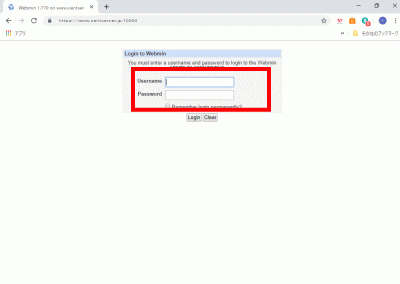
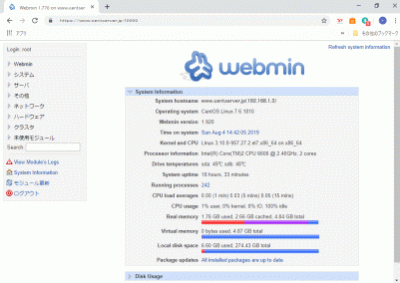
Webブラウザを起動し、「https://centserver.jp:10000/」へアクセスし, root ユーザーでログインします。
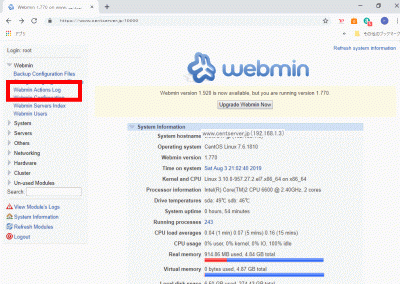
「Change Language and Theme」をクリックします。
「Personal choice ..」、Japanese(JA_JP.UTF-8)を選択して、「Make Changes」をクリックします。
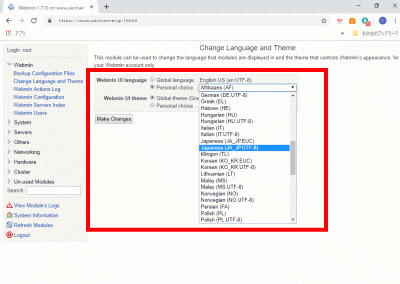
「F5」キー押下して、「日本語表示」を確認します。
Nagiosに必要なgd-develをインストールします。
[root@www ~]# yum -y install gd-devel
nagiosユーザーを作成します。
[root@www ~]# useradd -d /usr/local/nagios/ -M nagios
Nagiosをダウンロードします。
[root@www ~]# wget https://downloads.sourceforge.net/project/nagios/nagios-4.x/nagios-4.2.4/nagios-4.2.4.tar.gz
Nagiosを展開します。
[root@www ~]# tar zxvf nagios-4.2.4.tar.gz
Nagios展開先ディレクトリへ移動します。
[root@www ~]# cd nagios-4.2.4
Nagios日本語化パッチをダウンロードします。
[root@www nagios-4.2.4]# wget http://ftp.momo-i.org/pub/security/nagios/patches/nagios-jp-4.2.4.patch.gz
Nagios日本語化パッチを施行します。
[root@www nagios-4.2.4]# gzip -dc nagios-jp-4.2.4.patch.gz |patch -p1
Nagiosをインストールします。
[root@www nagios-4.2.4]# ./configure && make all && make fullinstall && make install-config
ディレクトリを抜けます。
[root@www nagios-4.2.4]# cd
Nagios展開先ディレクトリを削除します。
[root@www ~]# rm -rf nagios-4.2.4
ダウンロードしたファイルを削除します。
[root@www ~]# rm -f nagios-4.2.4.tar.gz
MySQLの監視を行なうmysql-develをインストールします。
[root@www ~]# yum -y install mysql-devel
Nagiosプラグインをダウンロードします。
[root@www ~]# wget https://nagios-plugins.org/download/nagios-plugins-2.1.4.tar.gz
Nagiosプラグインを展開します。
[root@www ~]# tar zxvf nagios-plugins-2.1.4.tar.gz
Nagiosプラグイン展開先ディレクトリへ移動します。
[root@www ~]# cd nagios-plugins-2.1.4
Nagiosプラグインをインストールします。
[root@www nagios-plugins-2.1.4]# ./configure && make && make install
ディレクトリを抜けます。
[root@www nagios-plugins-2.1.4]# cd
Nagiosプラグイン展開先ディレクトリを削除します。
[root@www ~]# rm -rf nagios-plugins-2.1.4
ダウンロードしたファイルを削除します。
[root@www ~]# rm -f nagios-plugins-2.1.4.tar.gz
nagios.cfgを設定します。
[root@www ~]# vi /usr/local/nagios/etc/nagios.cfg
51行目:行頭の「#」を削除してコメント解除し、サーバー監視設定有効化を設定します。
cfg_dir=/usr/local/nagios/etc/servers
1094行目:日付書式をYYYY-MM-DD HH:MM:SSにするを設定します。
date_format=iso8601
サーバー監視設定ファイル格納ディレクトリを作成します。
[root@www ~]# mkdir /usr/local/nagios/etc/servers
contacts.cfgを設定します。
[root@www ~]# vi /usr/local/nagios/etc/objects/contacts.cfg
34行目:管理者メールアドレスを指定を設定します。
define contact{
        contact_name                    nagiosadmin             ; Short name of user
        use                             generic-contact         ; Inherit default values from generic-contact template (defined above)
        alias                           Nagios Admin            ; Full name of user

        email                           root@localhost
        }
localhost.cfgを設定します。
[root@www ~]# vi /usr/local/nagios/etc/objects/localhost.cfg
141行目:SSH状態変化時に通知するを設定します。
define service{
        use                             local-service         ; Name of service template to use
        host_name                       localhost
        service_description             SSH
        check_command                   check_ssh
        notifications_enabled           1
        }
154行目:SSH状態変化時に通知するを設定します。
define service{
        use                             local-service         ; Name of service template to use
        host_name                       localhost
        service_description             HTTP
        check_command                   check_http
        notifications_enabled           1
        }
commands.cfgを設定します。
[root@www ~]# vi /usr/local/nagios/etc/objects/commands.cfg
29行目:nkfコマンドのメール本文文字化け対策を設定します。
# 'notify-host-by-email' command definition
define command{
        command_name    notify-host-by-email
        command_line    /usr/bin/printf "%b" "***** Nagios *****\n\nNotification Type: $NOTIFICATIONTYPE$\nHost: $HOSTNAME$\nState: $HOSTSTATE$\nAddress: $HOSTADDRESS$\nInfo: $HOSTOUTPUT$\n\nDate/Time: $LONGDATETIME$\n" | /usr/bin/nkf -j | /bin/mail -s "** $NOTIFICATIONTYPE$ Host Alert: $HOSTNAME$ is $HOSTSTATE$ **" $CONTACTEMAIL$
        }
35行目:nkfコマンドのメール本文文字化け対策を設定します。
# 'notify-service-by-email' command definition
define command{
        command_name    notify-service-by-email
        command_line    /usr/bin/printf "%b" "***** Nagios *****\n\nNotification Type: $NOTIFICATIONTYPE$\n\nService: $SERVICEDESC$\nHost: $HOSTALIAS$\nAddress: $HOSTADDRESS$\nState: $SERVICESTATE$\n\nDate/Time: $LONGDATETIME$\n\nAdditional Info:\n\n$SERVICEOUTPUT$" | /usr/bin/nkf -j | /bin/mail -s "** $NOTIFICATIONTYPE$ Service Alert: $HOSTALIAS$/$SERVICEDESC$ is $SERVICESTATE$ **" $CONTACTEMAIL$
        }
apacheユーザーをnagiosグループに所属させるを設定します。
[root@www ~]# usermod -G nagios apache
Nagios用Apache設定ファイルを設定します。
[root@www ~]# vi /etc/httpd/conf.d/nagios.conf
16行目:追記します。
<RequireAny>
17行目:行頭に「#」を追記してコメント化し、内部からのみアクセス可能にする設定をします。
# Require all granted
19行目:内部ネットワーク(192.168.1.1/24)からのみアクセス可能にする設定をします。
Require ip 192.168.1.1/24
20行目:追記します。
</RequireAny>
49行目:追記します。
<RequireAny>
50行目:行頭に「#」を追記してコメント化し、内部からのみアクセス可能にする設定をします。
# Require all granted
52行目:内部ネットワーク(192.168.1.1/24)からのみアクセス可能にする設定をします。
Require ip 192.168.1.1/24
53行目:追記します。
</RequireAny>
Webサーバー設定反映を設定します。
[root@www ~]# systemctl reload httpd
Nagios管理ユーザー(nagiosadmin)を作成します。
[root@www ~]# htpasswd -c /usr/local/nagios/etc/htpasswd.users nagiosadmin
パスワードを設定します。
New password:
Re-type new password:
Adding password for user nagiosadmin
起動します。
[root@www ~]# /etc/rc.d/init.d/nagios start
自動起動設定します。
[root@www ~]# chkconfig nagios on
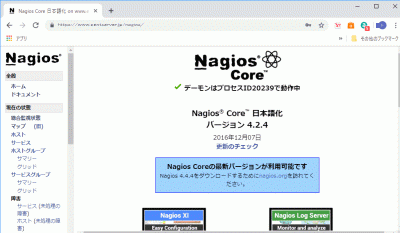
Webブラウザを起動し、「http://centserver.jp/nagios/」にアクセスし、管理ユーザー:nagiosadmin、登録済パスワードでログインして動作確認をします。