
起動不能をインストールDVDで復旧
起動不能をインストールDVDで復旧します。
インストールDVDを投入して起動後、「Troubleshooting」を選択し「Enter」キーを押下します。

「Rescue a Fedora system」を選択し「Enter」キーを押下します。

「1」(continue)を入力し「Enter」キーを押下します。

「Enter」キーを押下します。
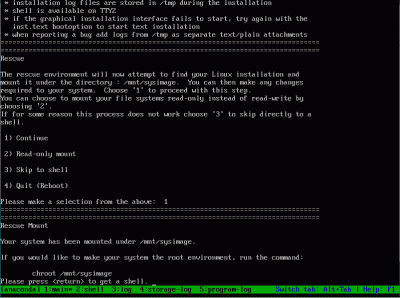
インストールDVDを取り出して、「reboot」と入力して、「Enter」キーを押下します。
起動を確認します。

Linuxサーバー、WordPress、Androidの情報やゲーム、DIYなど色々な情報をご紹介致します。
自宅サーバー、自宅ファイルサーバー、Linuxサーバー構築の初心者におすすめ!コピペ(コピー&ペースト)でできる自宅サーバーFedora34(Linux)の作り方。初心者の方でもコピー、貼付けでLinux自宅サーバーを簡単に作れるように説明しています。Webサーバー、メールサーバー、VPNサーバー、WordPressなどを設定します。
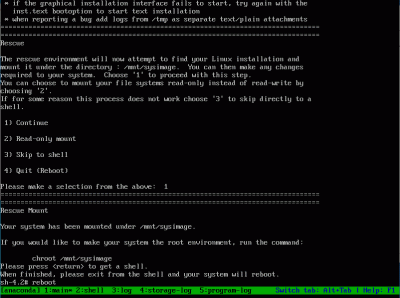
起動不能をインストールDVDで復旧します。
インストールDVDを投入して起動後、「Troubleshooting」を選択し「Enter」キーを押下します。
「Rescue a Fedora system」を選択し「Enter」キーを押下します。
「1」(continue)を入力し「Enter」キーを押下します。
「Enter」キーを押下します。
インストールDVDを取り出して、「reboot」と入力して、「Enter」キーを押下します。
起動を確認します。
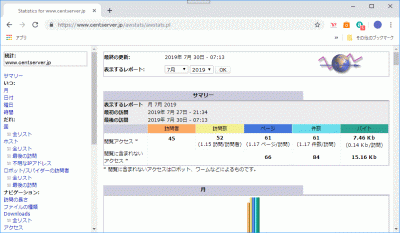
AWstatsをインストールします。
[root@www ~]# dnf -y install awstats
自動作成されているawstats.fedoraserver.jp.conf を設定します。
[root@www ~]# vi /etc/awstats/awstats.fedoraserver.jp.conf
126行目:変更します。
LogFormat=1
157行目:ホスト名を設定します。
SiteDomain="fedoraserver.jp"
172行目:除外したいドメイン名やIPアドレスを追記します。
HostAliases="localhost 127.0.0.1 REGEX[^.*fedoraserver\.jp$] REGEX[^192\.168\.1\.]"
awstats.confを設定します。
[root@www ~]# vi /etc/httpd/conf.d/awstats.conf
30行目:アクセス許可IPを追記します。
Require ip 192.168.1.1/24
再起動します。
[root@www ~]# systemctl restart httpd
1時間毎に自動更新する設定をします。
[root@www ~]# /usr/share/awstats/wwwroot/cgi-bin/awstats.pl -config=fedoraserver.jp -update
Web ブラウザを起動し、「http://fedoraserver.jp/awstats/awstats.pl」にアクセスして、作動確認します。
pflogsumm をインストールします。
[root@www ~]# dnf -y install postfix-perl-scripts
メールログのサマリーを出力します。
[root@www ~]# perl /usr/sbin/pflogsumm -d yesterday /var/log/maillog
Postfix log summaries for Jul 29

Grand Totals
------------
messages

      8   received
      8   delivered
      2   forwarded
      1   deferred  (1  deferrals)
      0   bounced
      0   rejected (0%)
      0   reject warnings
      0   held
      0   discarded (0%)

   2428k  bytes received
   2429k  bytes delivered
      3   senders
      2   sending hosts/domains
      2   recipients
      2   recipient hosts/domains


Per-Hour Traffic Summary
------------------------
    time          received  delivered   deferred    bounced     rejected
    --------------------------------------------------------------------
    0000-0100           0          0          0          0          0
    0100-0200           0          0          0          0          0
    0200-0300           0          0          0          0          0
…
root宛てにメール送信する設定をします。
[root@www ~]# crontab -e
毎日午前1時にメール送信する設定をします。
[root@www ~]# 00 01 * * * perl /usr/sbin/pflogsumm -e -d yesterday /var/log/maillog | mail -s 'Logwatch for Postfix' root
Nagiosに必要なgd-develをインストールします。
root@www:~# dnf -y install gd-devel
nagiosユーザーを作成します。
root@www:~# useradd -d /usr/local/nagios/ -M nagios
Nagiosをダウンロードします。
root@www:~# wget https://github.com/NagiosEnterprises/nagioscore/releases/download/nagios-4.4.6/nagios-4.4.6.tar.gz
Nagiosを展開します。
root@www:~# tar zxvf nagios-4.4.6.tar.gz
Nagios展開先ディレクトリへ移動します。
root@www:~# cd nagios-4.4.6
patchをインストールします。
root@www:~# dnf -y install patch
Nagios日本語化パッチをダウンロードします。
root@www:nagios-4.4.6# wget http://ftp.momo-i.org/pub/security/nagios/patches/nagios-jp-4.4.6.patch.gz
Nagios日本語化パッチを施行します。
root@www:nagios-4.4.6# gzip -dc nagios-jp-4.4.6.patch.gz |patch -p1
Nagiosをインストールします。
root@www:nagios-4.4.6# ./configure && make all && make fullinstall && make install-config
ディレクトリを抜けます。
root@www:nagios-4.4.6# cd
Nagios展開先ディレクトリを削除します。
root@www:~# rm -rf nagios-4.4.6
ダウンロードしたファイルを削除します。
root@www:~# rm -f nagios-4.4.6.tar.gz
Nagiosプラグインをダウンロードします。
root@www:~# wget https://github.com/nagios-plugins/nagios-plugins/releases/download/release-2.3.3/nagios-plugins-2.3.3.tar.gz
Nagiosプラグインを展開します。
root@www:~# tar zxvf nagios-plugins-2.3.3.tar.gz
Nagiosプラグイン展開先ディレクトリへ移動します。
root@www:~# cd nagios-plugins-2.3.3
Nagiosプラグインをインストールします。
root@www:nagios-plugins-2.3.3# ./configure && make && make install
ディレクトリを抜けます。
root@www:nagios-plugins-2.3.3# cd
Nagiosプラグイン展開先ディレクトリを削除します。
root@www:~# rm -rf nagios-plugins-2.3.3
ダウンロードしたファイルを削除します。
root@www:~# rm -f nagios-plugins-2.3.3.tar.gz
nagios.cfgを設定します。
root@www:~# vi /usr/local/nagios/etc/nagios.cfg
51行目:行頭の「#」を削除してコメント解除し、サーバー監視設定有効化の設定します。
cfg_dir=/usr/local/nagios/etc/servers
1096:行目:日付書式をYYYY-MM-DD HH:MM:SSにするを設定します。
date_format=iso8601
サーバー監視設定ファイル格納ディレクトリを作成します。
root@www:~# mkdir /usr/local/nagios/etc/servers
contacts.cfgを設定します。
root@www:~# vi /usr/local/nagios/etc/objects/contacts.cfg
32行目:管理者メールアドレスを指定を設定します。
define contact{
        contact_name                    nagiosadmin             ; Short name of user
        use                             generic-contact         ; Inherit default values from generic-contact template (defined above)
        alias                           Nagios Admin            ; Full name of user

        email                           root@localhost
        }
localhost.cfgを設定します。
root@www:~# vi /usr/local/nagios/etc/objects/localhost.cfg
144行目:SSH状態変化時に通知するを設定します。
define service{
        use                             local-service         ; Name of service template to use
        host_name                       localhost
        service_description             SSH
        check_command                   check_ssh
        notifications_enabled           1
        }
158行目:SSH状態変化時に通知するを設定します。
define service{
        use                             local-service         ; Name of service template to use
        host_name                       localhost
        service_description             HTTP
        check_command                   check_http
        notifications_enabled           1
        }
commands.cfgを設定します。
root@www:~# vi /usr/local/nagios/etc/objects/commands.cfg
29行目:nkfコマンドのメール本文文字化け対策の設定します。
# 'notify-host-by-email' command definition
define command{
        command_name    notify-host-by-email
        command_line    /usr/bin/printf "%b" "***** Nagios *****\n\nNotification Type: $NOTIFICATIONTYPE$\nHost: $HOSTNAME$\nState: $HOSTSTATE$\nAddress: $HOSTADDRESS$\nInfo: $HOSTOUTPUT$\n\nDate/Time: $LONGDATETIME$\n" | /usr/bin/nkf -j | /usr/bin/mail -s "** $NOTIFICATIONTYPE$ Host Alert: $HOSTNAME$ is $HOSTSTATE$ **" $CONTACTEMAIL$
        }
37行目:nkfコマンドのメール本文文字化け対策の設定します。
# 'notify-service-by-email' command definition
define command{
        command_name    notify-service-by-email
        command_line    /usr/bin/printf "%b" "***** Nagios *****\n\nNotification Type: $NOTIFICATIONTYPE$\n\nService: $SERVICEDESC$\nHost: $HOSTALIAS$\nAddress: $HOSTADDRESS$\nState: $SERVICESTATE$\n\nDate/Time: $LONGDATETIME$\n\nAdditional Info:\n\n$SERVICEOUTPUT$\n" | /usr/bin/nkf -j | /usr/bin/mail -s "** $NOTIFICATIONTYPE$ Service Alert: $HOSTALIAS$/$SERVICEDESC$ is $SERVICESTATE$ **" $CONTACTEMAIL$
        }
Nagios用Apache httpd設定ファイルを設定します。
root@www:~# vi /etc/httpd/conf.d/nagios.conf
16行目:追記します。
<RequireAny>
17行目:行頭に「#」を追記してコメント化し、内部からのみアクセス可能にする設定をします。
# Require all granted
19行目:内部ネットワーク(192.168.1.1/24)からのみアクセス可能にする設定をします。
Require ip 192.168.1.1/24
20行目:追記します。
</RequireAny>
49行目:追記します。
<RequireAny>
50行目:行頭に「#」を追記してコメント化し、内部からのみアクセス可能にする設定をします。
# Require all granted
52行目:内部ネットワーク(192.168.1.1/24)からのみアクセス可能にする設定をします。
Require ip 192.168.1.1/24
53行目:追記します。
</RequireAny>
Webサーバー設定反映を設定します。
root@www:~# systemctl restart httpd
Nagios管理ユーザー(nagiosadmin)を作成します。
root@www:~# htpasswd -c /usr/local/nagios/etc/htpasswd.users nagiosadmin
パスワードを設定します。
New password:
Re-type new password:
Adding password for user nagiosadmin
起動します。
root@www:~# systemctl restart nagios
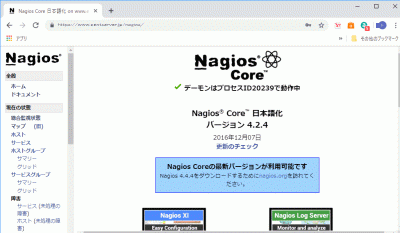
Webブラウザを起動し、「http://ubuntuserver.jp/nagios/」にアクセスし、管理ユーザー:nagiosadmin、登録済パスワードでログインして動作確認をします。
外部からWebアクセスできるようにします。
[root@www ~]# vi /etc/httpd/conf.d/virtualhost-00-fedoraserver.jp.conf
<VirtualHost *:80>
    ServerName fedoraserver.jp
    DocumentRoot /var/www/html
    ServerAlias mail.fedoraserver.jp
    RewriteEngine On
    RewriteCond %{HTTP_HOST} ^www\.fedoraserver\.jp
    RewriteRule ^(.*)$ http://fedoraserver.jp/$1 [R=301,L]
</VirtualHost>
Postfixをインストールをします。
[root@www ~]# dnf install postfix
Postfixを設定します。
[root@www ~]# vi /etc/postfix/main.cf
96行目:メールサーバードメイン名の指定を追記します。
myhostname = mail.fedoraserver.jp
103行目:ドメイン名の指定を追記します。
mydomain = fedoraserver.jp
119行目:送信元メールアドレスにドメイン名の指定を追記します。
myorigin = $mydomain
135行目:外部からのメール受信を許可する設定に変更します。
inet_interfaces = all
183行目:ドメインメールを受信する設定に変更します。
mydestination = $myhostname, localhost.$mydomain, localhost, $mydomain
439行目:メール格納形式をMaildir形式にする設定を追記します。
home_mailbox = Maildir/
593行目:メールサーバーソフト名の隠蔽化する設定を追記します。
smtpd_banner = $myhostname ESMTP unknown
SMTP認証の設定を最終行へ追加します。
smtpd_sasl_auth_enable = yes

smtpd_recipient_restrictions =
    permit_mynetworks
    permit_sasl_authenticated
    reject_unauth_destination
受信メールサイズを10MB=10*1024*1024に制限する設定を最終行へ追記します。
message_size_limit = 10485760
master.cfを設定します。
[root@www ~]# vi /etc/postfix/master.cf
17行目:行頭の「#」を削除してコメント解除します。
submission inet n - n - - smtpd
20行目:行頭の「#」を削除してコメント解除します。
-o smtpd_sasl_auth_enable=yes
cyrus-saslをインストールします。
[root@www ~]# dnf install cyrus-sasl cyrus-sasl-plain
起動します。
[root@www ~]# systemctl start saslauthd
自動起動設定します。
[root@www ~]# systemctl enable saslauthd
新規ユーザー追加時に自動でMaildir形式メールボックス作成する設定をします。
[root@www ~]# mkdir -p /etc/skel/Maildir/{new,cur,tmp}
メールボックスパーミッションを設定します。
[root@www ~]# chmod -R 700 /etc/skel/Maildir/
起動します。
[root@www ~]# systemctl restart postfix
現在のユーザーのMaildir形式メールボックス作成する設定をします。
[root@www ~]# wget https://rcg.jp/perfect_maildir/perfect_maildir.pl -O /usr/local/bin/perfect_maildir.pl
[root@www ~]# chmod +x /usr/local/bin/perfect_maildir.pl
Maildir変換に必要なPerlのTimeDateモジュールインストールします。
[root@www ~]# dnf -y install perl-TimeDate
Postfixを停止します。
[root@www ~]# systemctl stop postfix
Maildir一括変換スクリプトを作成します。
[root@www ~]# vi migrate-maildir.sh
#!/bin/bash
#
#Maildir一括変換スクリプト
#
#メールボックス=>Maildir形式変換スクリプト
#http://perfectmaildir.home-dn.net/
FOLDERCONVERT=/usr/local/bin/perfect_maildir.pl
#一般ユーザリスト
USERLIST=`ls /home/`
#ログ
MIGRATELOG=/tmp/migrate-maildir.log
rm -f $MIGRATELOG
#引数(変換元メールボックス形式)チェック
if [ "$1" != "mbox" ] && [ "$1" != "Mailbox" ]; then
echo "Usage: migrate-maildir.sh {mbox|Mailbox}"
exit
fi
#一般ユーザメールボックス移行
for user in $USERLIST;
do
if [ "$1" = "mbox" ]; then
inbox="/var/spool/mail/${user}"
else
inbox="/home/${user}/Mailbox"
fi
if [ -f "${inbox}" ]; then
newdir="/home/${user}/Maildir/"
mkdir -p "$newdir"
mkdir -p "$newdir"/cur
mkdir -p "$newdir"/new
mkdir -p "$newdir"/tmp
chmod -R 700 "${newdir}"
$FOLDERCONVERT "$newdir" < "${inbox}" >> $MIGRATELOG 2>&1
chown -R ${user}. "$newdir"
find "$newdir" -type f -exec chmod 600 {} \;
fi
done
#rootユーザメールボックス移行
user="root"
if [ "$1" = "mbox" ]; then
inbox="/var/spool/mail/${user}"
else
inbox="/${user}/Mailbox"
fi
if [ -f "${inbox}" ]; then
newdir="/${user}/Maildir/"
mkdir -p "$newdir"
mkdir -p "$newdir"/cur
mkdir -p "$newdir"/new
mkdir -p "$newdir"/tmp
chmod -R 700 "${newdir}"
$FOLDERCONVERT "$newdir" < "${inbox}" >> $MIGRATELOG 2>&1
chown -R ${user}. "$newdir"
find "$newdir" -type f -exec chmod 600 {} \;
fi
[ -a $MIGRATELOG ] && cat $MIGRATELOG;rm -f $MIGRATELOG
一括変換スクリプトを実行します。
[root@www ~]# sh migrate-maildir.sh mbox
Maildir一括変換スクリプトを削除します。
[root@www ~]# rm -f migrate-maildir.sh
Maildir変換ツールを削除します。
[root@www ~]# rm -f /usr/local/bin/perfect_maildir.pl
起動します。
[root@www ~]# systemctl restart postfix
webmasterユーザーをメール使用する場合は「/etc/aliases」を変更します。
[root@www ~]# vi /etc/aliases
行頭に#を追加して転送を無効にします。
#webmaster: root
転送設定を反映します。
[root@www ~]# newaliases
ルーターの設定で、TCP25番、TCP587番ポートを開放します。(設定方法はご自身の環境に合わせて調べてください。)
こちらのサイトで「ホスト名(fedoraserver.jp)」、「ポート番号(25,587)」の開放確認をします。
メールサーバーのOP25B対策として送信メールをGmailを経由して送信するように設定します。
Postfixを設定します。
[root@www ~]# vi /etc/postfix/main.cf
以下を最終行へ追加します。
relayhost = [smtp.gmail.com]:587
smtp_use_tls = yes
smtp_sasl_auth_enable = yes
smtp_sasl_password_maps = hash:/etc/postfix/sasl_passwd
smtp_sasl_tls_security_options = noanonymous
smtp_sasl_mechanism_filter = plain
SMTP認証情報を設定します。
[root@www ~]# echo [smtp.gmail.com]:587 Gmailアドレス:Gmailパスワード > /etc/postfix/sasl_passwd
root以外参照できないようにパーミッション変更します。
[root@www ~]# chmod 640 /etc/postfix/sasl_passwd
SMTP認証情報をデータベース化します。
[root@www ~]# postmap /etc/postfix/sasl_passwd
Postfixを再起動します。
[root@www ~]# systemctl reload postfix
root宛メールを転送します。
[root@www ~]# vi /etc/aliases
最終行に追記します。
# Person who should get root's mail
#root: marc
root: 転送用メールアドレス
転送設定を反映します。
[root@www ~]# newaliases
テストメールをroot宛に送信します。
[root@www ~]# echo test|sendmail root
先にThunderbirdへGmail(送信用メール)を設定します。
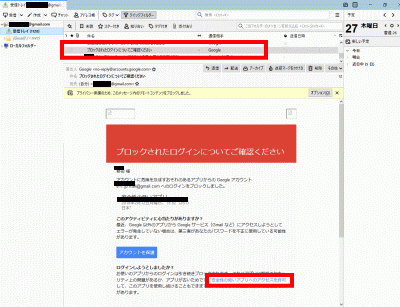
Thunderbirdを起動し、送信用メールアドレスで「ブロックされたログインについてご確認ください」を開き、「安全性の低いアプリへのアクセスを許可」をクリックします。
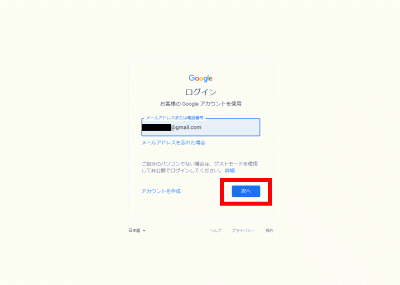
ブラウザでGmailにログインします。
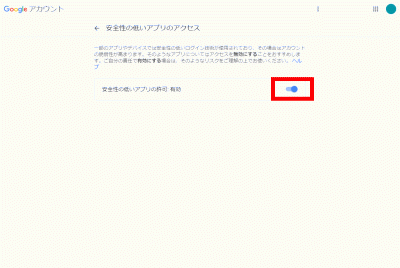
右上のユーザーアイコンを右クリック→「Googleアカウントの管理」→「セキュリティ」→「安全性の低いアプリのアクセス」でアクセスを有効にします。
先にThunderbirdへGmail(転送用メール)を設定します。
Thunderbird(Gmail)のroot宛の転送用メールアドレスで受信を確認します。
[root@www ~]# dnf -y install dovecot
dovecot.confを設定します。
[root@www ~]# vi /etc/dovecot/dovecot.conf
24行目:行頭「#」を削除してコメント解除します。
protocols = imap pop3 lmtp submission
30行目:行頭「#」を削除してコメント解除し、IPv6を無効にする設定に変更します。
listen = *
10-mail.confを設定します。
[root@www ~]# vi /etc/dovecot/conf.d/10-mail.conf
31行目:メール格納形式をMaildir形式にする設定を追記します。
mail_location = maildir:~/Maildir
10-auth.confを設定します。
[root@www ~]# vi /etc/dovecot/conf.d/10-auth.conf
11行目:プレインテキスト認証を許可する設定を追記します。
disable_plaintext_auth = no
10-ssl.confを設定します。
[root@www ~]# vi /etc/dovecot/conf.d/10-ssl.conf
8行目:SSL接続を無効にする設定に変更します。
ssl = no
起動します。
[root@www ~]# systemctl start dovecot
自動起動を設定します。
[root@www ~]# systemctl enable dovecot
ルーターの設定で、TCP110番またはTCP143番ポートを開放します。(設定方法はご自身の環境に合わせて調べてください。)
こちらのサイトで「ホスト名(fedoraserver.jp)」、「ポート番号(110または143)」の開放確認をします。
ユーザーを追加します。(ユーザー例:user)
[root@www ~]# useradd user
パスワードを設定します。
[root@www ~]# passwd user
Changing password for user user.
New UNIX password:
Retype new UNIX password:
sshd_configを編集します。
[root@www ~]# vi /etc/ssh/sshd_config
65行目:「no」→「yes」に変更します。
PasswordAuthentication yes
SSHを再起動します。
[root@www ~]# systemctl restart sshd
TeraTermにuserで新しい接続をします。
SSHサーバー公開鍵認証方式接続の設定をします。
main.cfを開きます。
[root@www ~]# vi /etc/postfix/main.cf
665行目:sendmailパスの確認します。
sendmail_path = /usr/sbin/sendmail.postfix
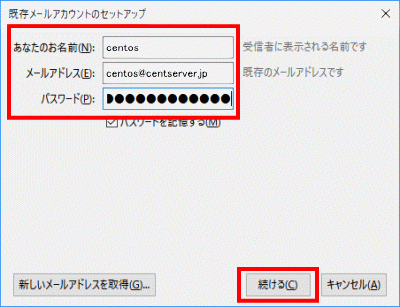
Thunderbirdを起動し、メールをクリックします。
あなたのお名前、メールアドレス(user@fedoraserver.jp)、パスワードを入力し、「続ける」をクリックします。
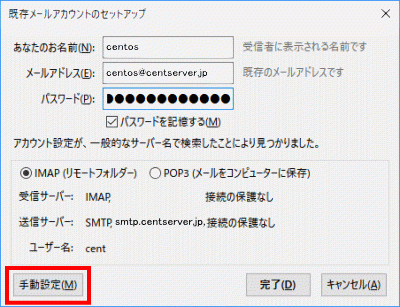
「手動設定」をクリックします。
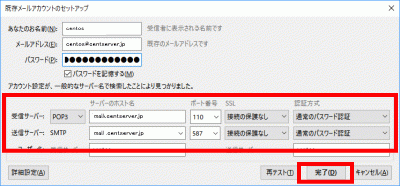
| サーバーのホスト名 | ポート番号 | SSL | 認証方式 | ||
| 受信サーバー | POP3 | mail.fedoraserver.jp | 110 | 接続の保護なし | 通常のパスワード認証 |
| 送信サーバー | SMTP | mail.fedoraserver.jp | 587 | 接続の保護なし | 通常のパスワード認証 |
上の表を参考にして設定し、「完了」をクリックします。
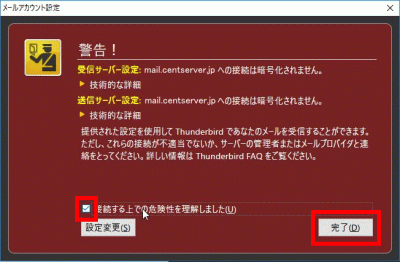
「接続する上での危険性を理解しました」を選択して「完了」をクリックします。
Certbotをインストールします。
[root@www ~]# dnf -y install certbot
証明書を取得します。
ドキュメントルート:/var/www/html/
メールアドレス:webmaster@fedoraserver.jp
メールサーバー名:mail.fedoraserver.jp
[root@www ~]# certbot certonly --webroot -w /var/www/html/ -m webmaster@fedoraserver.jp -d mail.fedoraserver.jp --agree-tos
証明書自動更新を設定します。
[root@www ~]# vi /etc/cron.d/letsencrypt
下記を追記します。
00 16 * * 2 root /usrobin/certbot renew --post-hook "service httpd restart"
main.cfを設定します。
[root@www ~]# vi /etc/postfix/main.cf
下記を最終行に追記します。
smtp_tls_security_level = may
smtpd_tls_security_level = may
smtpd_tls_cert_file = /etc/letsencrypt/live/mail.fedoraserver.jp/fullchain.pem
smtpd_tls_key_file = /etc/letsencrypt/live/mail.fedoraserver.jp/privkey.pem
smtpd_tls_session_cache_database = btree:/var/lib/postfix/smtpd_scache

tls_high_cipherlist = kEECDH:+kEECDH+SHA:kEDH:+kEDH+SHA:+kEDH+CAMELLIA:kECDH:+kECDH+SHA:kRSA:+kRSA+SHA:+kRSA+CAMELLIA:!aNULL:!eNULL:!SSLv2:!RC4:!MD5:!DES:!EXP:!SEED:!IDEA:!3DES
smtp_tls_ciphers = high
smtpd_tls_ciphers = high
smtpd_tls_mandatory_ciphers = high

smtpd_tls_mandatory_protocols=!SSLv2,!SSLv3
smtp_tls_mandatory_protocols=!SSLv2,!SSLv3
smtpd_tls_protocols=!SSLv2,!SSLv3
smtp_tls_protocols=!SSLv2,!SSLv3
master.cfを設定します。
[root@www ~]# vi /etc/postfix/master.cf
17行目:行頭に「#」を追加してコメント化し、SUBMISSIONポートを無効化します。
#submission inet n - n - - smtpd
20行目:行頭に「#」を追加してコメント化し、SUBMISSIONポートのSMTP認証を無効化します。
# -o smtpd_sasl_auth_enable=yes
29行目:行頭の「#」を削除してコメント解除し、SMTPSを有効化します。
smtps inet n - n - - smtpd
31行目:行頭の「#」を削除してコメント解除し、SMTPSを有効化します。
-o smtpd_tls_wrappermode=yes
32行目:行頭の「#」を削除してコメント解除し、SMTPSを有効化します。
-o smtpd_sasl_auth_enable=yes
45行目:行頭の「#」を削除してコメント解除し、SMTPSを有効化します。
tlsmgr unix - - n 300 1 tlsmgr
再起動します。
[root@www ~]# systemctl restart postfix
ルーターの設定で、TCP465番ポートを開放します。(設定方法はご自身の環境に合わせて調べてください。)
こちらのサイトで「ホスト名(mail.fedoraserver.jp)」、「ポート番号(465)」の開放確認をします。
ルーターの設定で、TCP587番ポートを閉鎖します。(設定方法はご自身の環境に合わせて調べてください。)
こちらのサイトで「ホスト名(mail.fedoraserver.jp)」、「ポート番号(587)」の開放されていないことを確認をします。
10-auth.confを設定します。
[root@www ~]# vi /etc/dovecot/conf.d/10-ssl.conf
8行目:SSL接続を有効にする設定に変更します。
ssl = yes
14行目:サーバー証明書+中間証明書を指定します。
ssl_cert = </etc/letsencrypt/live/mail.fedoraserver.jp/fullchain.pem
15行目:秘密鍵を指定します。
ssl_key = </etc/letsencrypt/live/mail.fedoraserver.jp/privkey.pem
再起動します。
[root@www ~]# systemctl restart dovecot
ルーターの設定で、TCP995番またはTCP993番ポートを開放します。(設定方法はご自身の環境に合わせて調べてください。)
こちらのサイトで「ホスト名(mail.fedoraserver.jp)」、「ポート番号(995または993)」の開放確認をします。
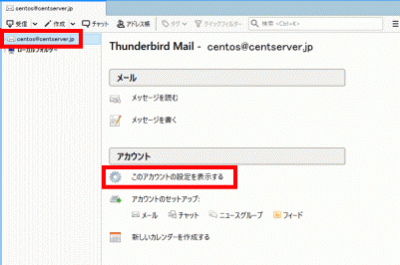
Thunderbirdを起動し、メールアドレスを選択し、「このアカウントの設定を表示する」をクリックします。
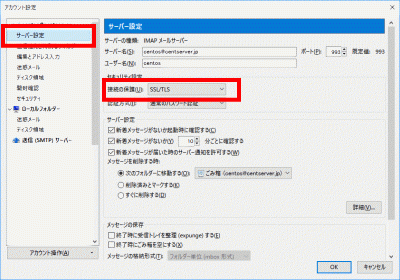
「サーバー設定」をクリックし、「接続の保護」で「SSL/TLS」を選択します。
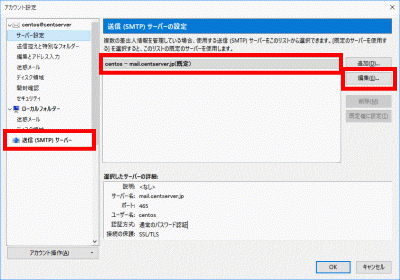
「送信(SMTP)サーバー」をクリックし、SMTPサーバーを選択して「編集」をクリックします。
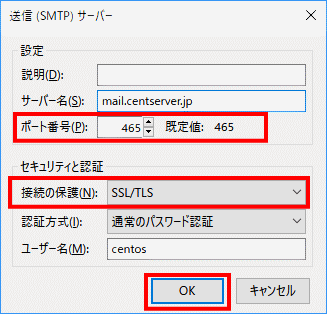
「ポート番号」に「465」を入力し、「接続の保護」で「SSL/TLS」を選択して、「OK」をクリックします。
「OK」をクリックします。
Amavisd および Clamav Server をインストールします。
[root@www ~]# dnf -y install amavisd-new clamd perl-Digest-SHA1 perl-IO-stringy
amavisd.confを設定します。
[root@www ~]# vi /etc/amavisd/amavisd.conf
23行目:ドメイン名を設定します。
$mydomain = 'fedoraserver.jp';
155行目:行頭の「#」を削除してコメント解除し、メールサーバーを設定します。
$myhostname = 'mail.fedoraserver.jp';
157、158行目:行頭の「#」を削除してコメント解除します。
$notify_method = 'smtp:[127.0.0.1]:10025';
$forward_method = 'smtp:[127.0.0.1]:10025';
scan.confを設定します。
[root@www ~]# vi /etc/clamd.d/scan.conf
8行目:行頭に「#」を追加してコメント化します。
#Example
14行目:行頭の「#」を削除してコメント解除します。
LogFile /var/log/clamd.scan
77行目:行頭の「#」を削除してコメント解除します。
PidFile /var/run/clamd.scan/clamd.pid
81行目:行頭の「#」を削除してコメント解除します。
TemporaryDirectory /var/tmp
96行目:行頭の「を」削除してコメント解除します。
LocalSocket /var/run/clamd.scan/clamd.sock
起動します。
[root@www ~]# touch /var/log/clamd.scan
[root@www ~]# chown clamscan. /var/log/clamd.scan
自動起動を設定します。
[root@www ~]# systemctl enable --now clamd@scan amavisd
main.cfの設定です。
[root@www ~]# vi /etc/postfix/main.cf
最終行に追記します。
content_filter=smtp-amavis:[127.0.0.1]:10024
master.cfの設定です。
[root@www ~]# vi /etc/postfix/master.cf
最終行に追記します。
smtp-amavis unix -    -    n    -    2 smtp
    -o smtp_data_done_timeout=1200
    -o smtp_send_xforward_command=yes
    -o disable_dns_lookups=yes
127.0.0.1:10025 inet n    -    n    -    -    smtpd
    -o content_filter=
    -o local_recipient_maps=
    -o relay_recipient_maps=
    -o smtpd_restriction_classes=
    -o smtpd_client_restrictions=
    -o smtpd_helo_restrictions=
    -o smtpd_sender_restrictions=
    -o smtpd_recipient_restrictions=permit_mynetworks,reject
    -o mynetworks=127.0.0.0/8
    -o strict_rfc821_envelopes=yes
    -o smtpd_error_sleep_time=0
    -o smtpd_soft_error_limit=1001
    -o smtpd_hard_error_limit=1000
再起動します。
[root@www ~]# systemctl restart postfix
Vsftpd をインストールします。
[root@www ~]# dnf -y install vsftpd
Vsftpd の設定します。
[root@www ~]# vi /etc/vsftpd/vsftpd.conf
12行目:匿名ログインを禁止します。
anonymous_enable= NO
83,84行目:行頭の「#」を削除してコメント解除し、アスキーモードでの転送を許可します。
ascii_upload_enable=YES
ascii_download_enable=YES
101,102行目:行頭の「#」を削除してコメント解除し、chrootを有効にします。
chroot_local_user=YES
chroot_list_enable=YES
104行目:行頭の「#」を削除しコメント解除し、リストファイルを指定します。
chroot_list_file=/etc/vsftpd/chroot_list
110行目:行頭の「#」を削除しコメント解除し、ディレクトリ転送を有効にします。
ls_recurse_enable=YES
115行目:IPv4を有効に変更します。
listen=YES
124行目:IPv6を無効に変更します。
listen_ipv6=NO
ローカルタイム指定を最終行に追記します。
use_localtime=YES
上層への移動を許可するユーザーを追加します。
[root@www ~]# vi /etc/vsftpd/chroot_list
ユーザー名を追記します。
webmaster
「/var/www/html」の書き込みを許可します。
[root@www ~]# chmod 0777 /var/www/html
起動します。
[root@www ~]# systemctl start vsftpd
自動起動を設定します。
[root@www ~]# systemctl enable vsftpd
「FFFTP」をダウンロード・インストールし、起動します。

「接続」をクリックします。
「接続」をクリックします。
「新規ホスト」をクリックします。
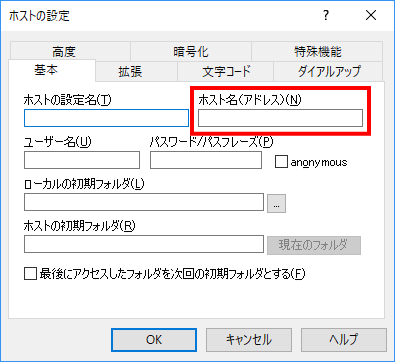
「ホストの設定名」に分かりやすい名前を決めて入力します。

「ホスト名(192.168.1.3)」を入力します。
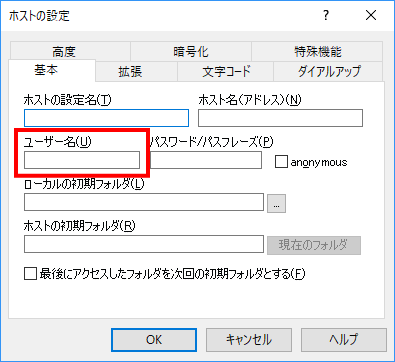
「ユーザー名(webmaster)」を入力します。
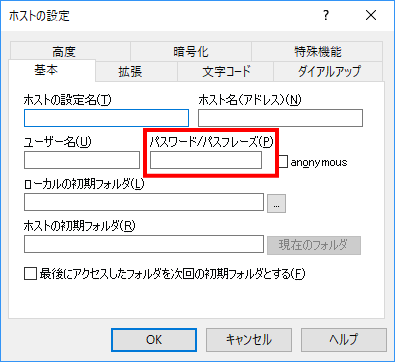
「パスワード」を入力します。
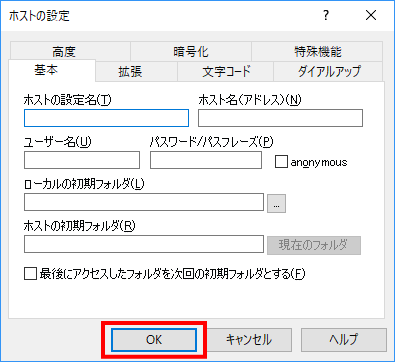
「OK」をクリックします。
httpd をインストールします。
[root@www ~]# dnf -y install httpd
ウェルカムページを削除します。
[root@www ~]# rm -f /etc/httpd/conf.d/welcome.conf
httpd の設定します。
[root@www ~]# vi /etc/httpd/conf/httpd.conf
98行目:行頭の「#」を削除してコメント解除し、サーバー名を指定します。
ServerName fedoraserver.jp:80
154行目:変更します。
AllowOverride All
167行目:ディレクトリ名のみでアクセスできるファイル名を追記します。
DirectoryIndex index.html index.cgi index.php index.rb index.py
319行目:コメントアウトして文字化け対応します。
#AddDefaultCharset UTF-8
ドキュメントルート所有者を編集ユーザー(webmaster)に変更します。
[root@www ~]# chown webmaster. /var/www/html/
ドキュメントルート所有者を確認します。
[root@www ~]# ll /var/www/
合計 0
drwxr-xr-x 2 root root 6 4月 24 22:46 cgi-bin
drwxr-xr-x 2 webmaster webmaster 6 4月 24 22:46 html
URLのwwwを設定します。
[root@www ~]# vi /etc/httpd/conf.d/virtualhost-00-fedoraserver.jp.conf
wwwなしに統一します。
<VirtualHost *:80>
    ServerName fedoraserver.jp
    DocumentRoot /var/www/html
    RewriteEngine On
    RewriteCond %{HTTP_HOST} ^www\.fedoraserver\.jp
    RewriteRule ^(.*)$ http://fedoraserver.jp/$1 [R=301,L]
</VirtualHost>
起動します。
[root@www ~]# systemctl start httpd
自動起動設定します。
[root@www ~]# systemctl enable httpd
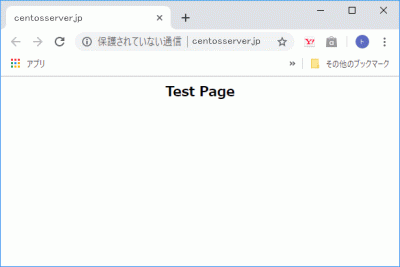
HTMLテストページを作成します。
[root@www ~]# vi /var/www/html/index.html
<html>
<body>
<div style="width: 100%; font-size: 20px; font-weight: bold; text-align: center;">
Test Page
</div>
</body>
</html>
Webブラウザを起動し、「http://fedoraserver.jp」にアクセスし、動作確認をします。
ルーターの設定で、TCP80番ポートを開放します。(設定方法はご自身の環境に合わせて調べてください。)
こちらのサイトで「ホスト名(fedoraserver.jp)」、「ポート番号(80)」の開放確認をします。
Perl をインストールします。
[root@www ~]# dnf -y install perl perl-CGI
「html」ディレクトリで CGI の実行を許可する設定します。
[root@www ~]# vi /etc/httpd/conf.d/html.conf
拡張子 cgi、pl、rb、py を CGI として設定します。
<Directory "/var/www/html">
    Options +ExecCGI
    AddHandler cgi-script .cgi .pl .rb .py
</Directory>
「/usr/local/bin/perl」で、Perlコマンドへアクセスできるようにします。
[root@www ~]# ln -s /usr/bin/perl /usr/local/bin/perl
Perlのパスを確認します。
[root@www ~]# whereis perl
perl: /usr/bin/perl /usr/local/bin/perl /usr/share/man/man1/perl.1.gz
再起動します。
[root@www ~]# systemctl restart httpd
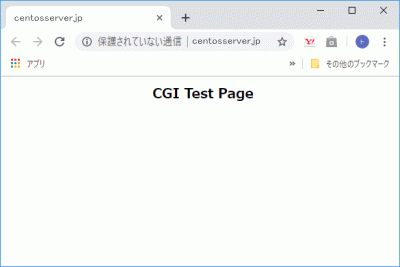
CGIテストページを作成します。
[root@www ~]# vi /var/www/html/index.cgi
#!/usr/bin/perl

print "Content-type: text/html\n\n";
print "<html>\n<body>\n";
print "<div style=\"width: 100%; font-size: 20px; font-weight: bold; text-align: center;\">\n";
print "CGI Test Page";
print "\n</div>\n";
print "</body>\n</html>\n";
パーミッションを設定します。
[root@www ~]# chmod 705 /var/www/html/index.cgi
Webブラウザを起動し、「http://fedoraserver.jp/index.cgi」にアクセスし、動作確認をします。
PHP をインストールします。
[root@www ~]# dnf -y install php php-mbstring php-pear
PHP を設定します。
[root@www ~]# vi /etc/php.ini
923行目:行頭の「;」を削除してコメント解除し、自身のタイムゾーンを追記します。
date.timezone = "Asia/Tokyo"
再起動します。
[root@www ~]# systemctl restart httpd
PHPテストページを作成します。
[root@www ~]# vi /var/www/html/index.php
<html>
<body>
<div style="width: 100%; font-size: 20px; font-weight: bold; text-align: center;">
<?php
print "PHP Test Page";
?>
</div>
</body>
</html>
Webブラウザを起動し、「http://fedoraserver.jp/index.php」にアクセスし、動作確認をします。

Ruby をインストールします。
[root@www ~]# dnf -y install ruby
再起動します。
[root@www ~]# systemctl restart httpd
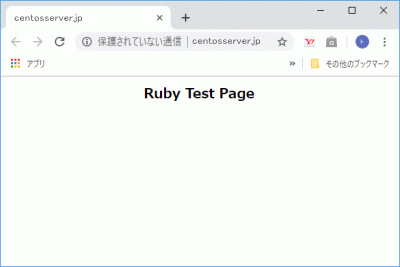
Rubyテストページを作成します。
[root@www ~]# vi /var/www/html/index.rb
#!/usr/bin/ruby

print "Content-type: text/html\n\n";
print "<html>\n<body>\n";
print "<div style=\"width: 100%; font-size: 20px; font-weight: bold; text-align: center;\">\n";
print "Ruby Test Page";
print "\n</div>\n";
print "</body>\n</html>\n";
パーミッションを設定します。
[root@www ~]# chmod 705 /var/www/html/index.rb
Webブラウザを起動し、「http://fedoraserver.jp/index.rb」にアクセスし、動作確認をします。
CPANを起動します。
[root@www ~]# perl -MCPAN -e shell
「y」を入力して「Enter」キー押下します。
Would you like to configure as much as possible automatically? [yes] y
チェックを入れて「OK」をクリックするとインストールログが表示されます。
モジュールをインストールします。
[root@www ~]#
ImageMagickをインストールします。
[root@www ~]# dnf -y install ImageMagick
perl ImageMagickをインストールします。
[root@www ~]# dnf -y install ImageMagick-perl
Certbotをインストールします。
[root@www ~]# dnf -y install certbot
証明書を取得します。
ドキュメントルート:/var/www/html/
メールアドレス:webmaster@fedoraserver.jp
Webサーバー名:fedoraserver.jp
[root@www ~]# certbot certonly --webroot -w /var/www/html/ -m webmaster@fedoraserver.jp -d fedoraserver.jp --agree-tos
証明書自動更新を設定します。
[root@www ~]# vi /etc/cron.d/letsencrypt
下記を追記します。
00 16 * * 2 root /usr/bin/certbot renew --post-hook "service httpd restart"
SSLをインストールして、暗号化通信ができるように設定します。
[root@www ~]# dnf install mod_ssl
SSLを設定します。
[root@www ~]# vi /etc/httpd/conf.d/ssl.conf
59行目:行頭の「#」を削除してコメントを解除します。
DocumentRoot "/var/www/html"
75行目:行頭の「#」を削除してコメントを解除し、変更します。
SSLProtocol -All +TLSv1 +TLSv1.1 +TLSv1.2
101行目:取得した証明書を指定します。
SSLCertificateFile /etc/letsencrypt/live/fedoraserver.jp/cert.pem
109行目:取得した鍵ファイルを指定します。
SSLCertificateKeyFile /etc/letsencrypt/live/fedoraserver.jp/privkey.pem
118行目:行頭の「#」を削除してコメント解除し、取得した中間証明書を指定します。
SSLCertificateChainFile /etc/letsencrypt/live/fedoraserver.jp/chain.pem
再起動します。
[root@www ~]# systemctl restart httpd
Free Monitoring Test Toolsで「https://fedoraserver.jp」の作動確認をします。
MariaDB をインストールします。
[root@www ~]# dnf -y install mariadb-server
MariaDB を設定します。
[root@www ~]# vi /etc/my.cnf.d/mariadb-server.cnf
[mysqld]に追記します。
[mysqld]
character-set-server=utf8
起動します。
[root@www ~]# systemctl start mariadb
自動起動設定します。
[root@www ~]# systemctl enable mariadb
初期設定します。
[root@www ~]# mysql_secure_installation
下記の表示後、「Enter」を押下します。
Enter current password for root (enter for none):
root パスワードを設定します。
Set root password? [Y/n] y
New password:
Re-enter new password:
「y」で応答します。
Remove anonymous users? [Y/n] y
「y」で応答します。
Disallow root login remotely? [Y/n] y
「y」で応答します。
Remove test database and access to it? [Y/n] y
「y」で応答します。
Reload privilege tables now? [Y/n] y
MariaDBにrootユーザーで接続します。
[root@www ~]# mysql -u root -p
Enter password:
ユーザー情報一覧を表示します。
MariaDB [(none)]> select user,host,password from mysql.user;
+------+-----------+-------------------------------------------+
| user | host      | password                                  |
+------+-----------+-------------------------------------------+
| root | localhost | ***************************************** |
| root | 127.0.0.1 | ***************************************** |
| root | ::1       | ***************************************** |
+------+-----------+-------------------------------------------+
3 rows in set (0.00 sec)
データベース一覧を表示します。
MariaDB [(none)]> show databases;
+--------------------+
| Database |
+--------------------+
| information_schema |
| mysql |
| performance_schema |
+--------------------+
3 rows in set (0.00 sec)
終了します。
MariaDB [(none)]> exit
phpMyAdminをダウンロードし、解凍します。
[root@www ~]# dnf -y install phpMyAdmin php-mysqlnd php-mcrypt php-php-gettext
phpMyAdminを設定します。
[root@www ~]# vi /etc/httpd/conf.d/phpMyAdmin.conf
13行目:アクセス許可IPを追記します。
Require ip 127.0.0.1 192.168.1.1/24
19行目:アクセス許可IPを追記します。
Require ip 127.0.0.1 192.168.1.1/24
再起動します。
[root@www ~]# systemctl restart httpd
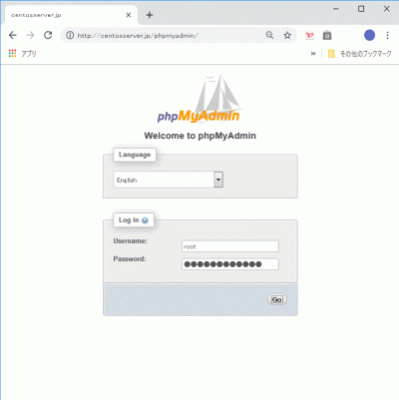
Webブラウザを起動し、「http://fedoraserver.jp/phpmyadmin/」にアクセスし、登録したユーザーで認証してログインします。(管理画面から MariaDB を操作することができます。)
インターフェース名を確認します。
[root@www ~]# nmcli device
DEVICE TYPE STATE CONNECTION
enp2s0 ethernet 接続済み enp2s0
BIND をインストールします。
[root@www ~]# dnf -y install bind bind-utils
BIND を設定します。
[root@www ~]# vi /etc/named.conf

//
// named.conf
//
// Provided by Red Hat bind package to configure the ISC BIND named(8) DNS
// server as a caching only nameserver (as a localhost DNS resolver only).
//
// See /usr/share/doc/bind*/sample/ for example named configuration files.
//
// See the BIND Administrator's Reference Manual (ARM) for details about the
// configuration located in /usr/share/doc/bind-{version}/Bv9ARM.html

options {
        listen-on port 53 { any; }; #変更
        listen-on-v6 port 53 { none; }; #変更
        directory       "/var/named";
        dump-file       "/var/named/data/cache_dump.db";
        statistics-file "/var/named/data/named_stats.txt";
        memstatistics-file "/var/named/data/named_mem_stats.txt";
        recursing-file  "/var/named/data/named.recursing";
        secroots-file   "/var/named/data/named.secroots";
        allow-query     { localhost; 192.168.1.1/24; }; #追記
        allow-transfer      { localhost; 192.168.1.1/24; }; #追記

        /*
         - If you are building an AUTHORITATIVE DNS server, do NOT enable recursion.
         - If you are building a RECURSIVE (caching) DNS server, you need to enable
           recursion.
         - If your recursive DNS server has a public IP address, you MUST enable access
           control to limit queries to your legitimate users. Failing to do so will
           cause your server to become part of large scale DNS amplification
           attacks. Implementing BCP38 within your network would greatly
           reduce such attack surface
        */
        recursion yes;

        dnssec-enable yes;
        dnssec-validation yes;

        /* Path to ISC DLV key */
        bindkeys-file "/etc/named.iscdlv.key";

        managed-keys-directory "/var/named/dynamic";

        pid-file "/run/named/named.pid";
        session-keyfile "/run/named/session.key";
};

logging {
        channel default_debug {
                file "data/named.run";
                severity dynamic;
        };
};

#以下は全て変更します
view "internal" {
        match-clients {
                localhost;
                192.168.1.1/24;
        };
        zone "." IN {
                type hint;
                file "named.ca";
        };
        zone "fedoraserver.jp" IN {
                type master;
                file "fedoraserver.jp.lan";
                allow-update { none; };
        };
        zone "1.168.192.in-addr.arpa" IN {
                type master;
                file "1.168.192.db";
                allow-update { none; };
        };
include "/etc/named.rfc1912.zones";
include "/etc/named.root.key";
};
内部向け正引き情報ファイルを作成します。
[root@www ~]# vi /var/named/fedoraserver.jp.lan

$TTL 86400
@   IN  SOA     fedoraserver.jp. root.fedoraserver.jp. (
        2014071001  ;Serial
        3600        ;Refresh
        1800        ;Retry
        604800      ;Expire
        86400       ;Minimum TTL
)
        IN  NS      fedoraserver.jp.
        IN  MX 10   fedoraserver.jp.
@       IN  A       192.168.1.3
*       IN  A       192.168.1.3
内部向け逆引き情報ファイルを作成します。
[root@www ~]# vi /var/named/1.168.192.db

$TTL 86400
@   IN  SOA     fedoraserver.jp. root.fedoraserver.jp. (
        2014071001  ;Serial
        3600        ;Refresh
        1800        ;Retry
        604800      ;Expire
        86400       ;Minimum TTL
)
        IN  NS      fedoraserver.jp.
        IN  A       255.255.255.0
3       IN  PTR     fedoraserver.jp.
ルーターの設定で、TCP/UDP53番ポートを開放します。(設定方法はご自身の環境に合わせて調べてください。)
こちらのサイトで「ホスト名(fedoraserver.jp)」、「ポート番号(53)」の開放確認をします。
ネットワーク設定を変更します。
[root@www ~]# nmcli connection modify enp2s0 ipv4.dns 192.168.1.3
[root@www ~]# nmcli connection down enp2s0; nmcli connection up enp2s0
自動起動を設定して再起動します。
[root@www ~]# systemctl enable --now named
エラーを確認します。
[root@www ~]# systemctl status named
エラーがある場合は構文の検証を行い、エラーを修正します。
「192.168.1.1/24」にエラーがある場合は「localhost;」に変更してください。
[root@www ~]# sudo named-checkconf
作動を確認します。
[root@www ~]# dig fedoraserver.jp

; <<>> DiG 9.9.4-RedHat-9.9.4-73.el7_6 <<>> fedoraserver.jp
;; global options: +cmd
;; Got answer:
;; ->>HEADER<<- opcode: QUERY, status: NOERROR, id: 15234
;; flags: qr aa rd ra; QUERY: 1, ANSWER: 1, AUTHORITY: 1, ADDITIONAL: 1

;; OPT PSEUDOSECTION:
; EDNS: version: 0, flags:; udp: 4096
;; QUESTION SECTION:
;fedoraserver.jp.                                IN      A

;; ANSWER SECTION:
fedoraserver.jp.                 86400   IN      A       192.168.1.3

;; AUTHORITY SECTION:
fedoraserver.jp.                 86400   IN      NS      fedoraserver.jp.

;; Query time: 18 msec
;; SERVER: 192.168.1.3#53(192.168.1.3)
;; WHEN: 水  7月 03 15:23:54 JST 2019
;; MSG SIZE  rcvd: 65


[root@www ~]# dig -x 192.168.1.3

; <<>> DiG 9.9.4-RedHat-9.9.4-73.el7_6 <<>> -x 192.168.1.3
;; Got answer:
;; ->>HEADER<<- opcode: QUERY, status: NOERROR, id: 54270
;; flags: qr aa rd ra; QUERY: 1, ANSWER: 1, AUTHORITY: 1, ADDITIONAL: 2

;; OPT PSEUDOSECTION:
; EDNS: version: 0, flags:; udp: 4096
;; QUESTION SECTION:
;3.1.168.192.in-addr.arpa.      IN      PTR

;; ANSWER SECTION:
3.1.168.192.in-addr.arpa. 86400 IN      PTR     fedoraserver.jp.

;; AUTHORITY SECTION:
1.168.192.in-addr.arpa. 86400   IN      NS      fedoraserver.jp.

;; ADDITIONAL SECTION:
fedoraserver.jp.                 86400   IN      A       192.168.1.3

;; Query time: 87 msec
;; SERVER: 192.168.1.3#53(192.168.1.3)
;; WHEN: 水  7月 03 16:13:36 JST 2019
;; MSG SIZE  rcvd: 103
chroot 環境に移行します。
[root@www ~]# dnf -y install bind-chroot
[root@www ~]# mkdir /var/named/chroot/usr/lib64/named
[root@www ~]# /usr/libexec/setup-named-chroot.sh /var/named/chroot on
[root@www ~]# systemctl disable --now named
[root@www ~]# systemctl enable --now named-chroot
Created symlink /etc/systemd/system/multi-user.target.wants/named-chroot.service → /usr/lib/systemd/system/named-chroot.service.
[root@www ~]# ll /var/named/chroot/etc
合計 688
-rw-r--r--  2 root root     292  4月  1 21:27 localtime
drwxr-x---  2 root named      6  1月 30 02:23 named
-rw-r-----  1 root named   2340  6月  1 08:23 named.conf
-rw-r--r--  1 root named   3923  1月 30 02:23 named.iscdlv.key
-rw-r-----  1 root named    931  6月 21  2007 named.rfc1912.zones
-rw-r--r--  1 root named   1587  5月 22  2017 named.root.key
drwxr-x---  3 root named     25  6月  1 08:33 pki
-rw-r--r--. 1 root root    6545 10月 31  2018 protocols
-rw-r-----  1 root named    100  6月  1 08:27 rndc.key
-rw-r--r--. 1 root root  670293  6月  7  2013 services
[root@www ~]# ll /var/named/chroot/var/named
合計 24
-rw-r--r-- 1 root  root   288  6月  1 08:27 1.168.192.db
drwxr-x--- 7 root  named   61  6月  1 08:33 chroot
drwxrwx--- 2 named named  127  6月 30 05:51 data
drwxrwx--- 2 named named  166  7月  3 22:32 dynamic
-rw-r----- 1 root  named 2277  6月  1 08:38 named.ca
-rw-r----- 1 root  named  152 12月 15  2009 named.empty
-rw-r----- 1 root  named  152  6月 21  2007 named.localhost
-rw-r----- 1 root  named  168 12月 15  2009 named.loopback
-rw-r--r-- 1 root  root   317  6月  1 08:24 rcg.jp.lan
drwxrwx--- 2 named named    6  1月 30 02:23 slaves
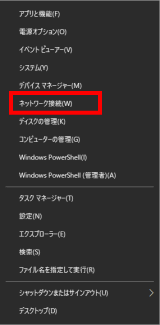
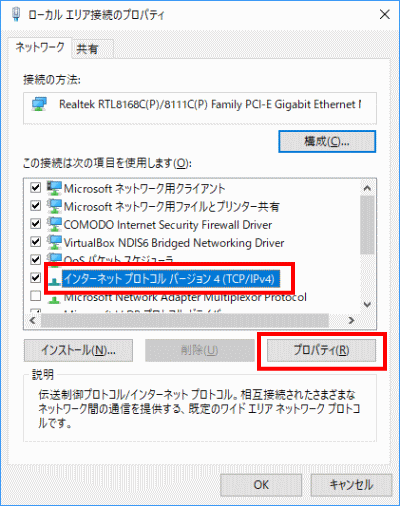
Windows10 スタートメニューを右クリックして「ネットワーク接続」をクリックします。
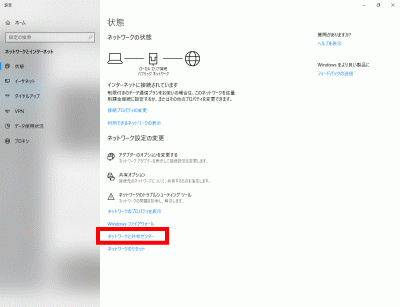
「ネットワークと共有センター」をクリックします。
「ローカルエリア接続」をクリックします。
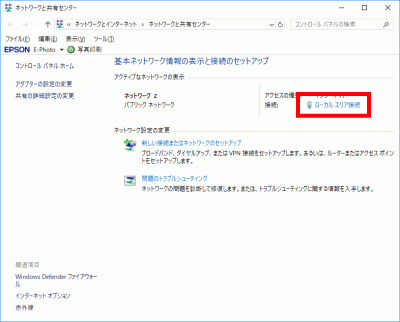
「プロパティ」をクリックします。
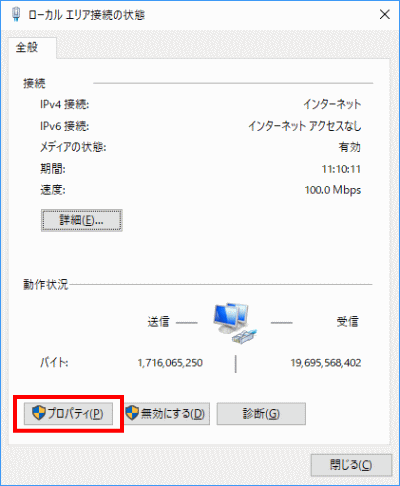
「インターネットプロトコルバージョン4(TCP/IPv4)」を選択して「プロパティ」をクリックします。
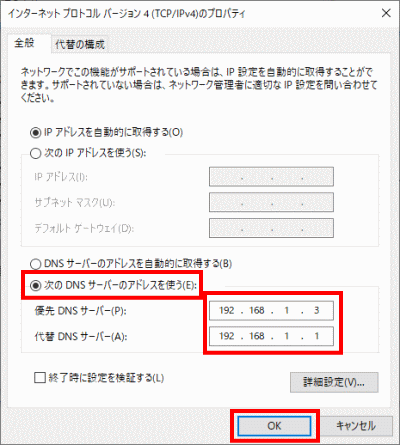
「次のDNSサーバーのアドレスを使う」を選択して「優先DNSサーバー」を「192.168.1.3」、「代替DNSサーバー」を「192.168.1.1」に設定し「OK」をクリックします。
サーバーよりインタネット接続が出来る様にします。
「/etc/resolv.conf」を開きます。
[root@www ~]# vi /etc/resolv.conf
最終行に追記します。
nameserver 192.168.1.1
「/etc/sysconfig/network-scripts/ifcfg-enp2s0」を新規作成します。
[root@www ~]# vi /etc/sysconfig/network-scripts/ifcfg-enp2s0
TYPE=Ethernet
PROXY_METHOD=none
BROWSER_ONLY=no
BOOTPROTO=none
DEFROUTE=yes
IPV4_FAILURE_FATAL=yes
IPV6INIT=yes
IPV6_AUTOCONF=yes
IPV6_DEFROUTE=yes
IPV6_FAILURE_FATAL=no
IPV6_ADDR_GEN_MODE=stable-privacy
NAME=enp2s0
DEVICE=enp2s0
ONBOOT=yes
IPADDR=192.168.1.3
PREFIX=24
GATEWAY=192.168.1.1
DNS1=192.168.1.3
IPV6_PRIVACY=no
DNS2=192.168.1.1
CONNECTION_METERED=yes
再起動します。
[root@www ~]# reboot
wget パッケージと glibc パッケージをインストールします。
[root@www ~]# dnf -y install wget
[root@www ~]# dnf -y install glibc
DiCE をダウンロードし、解凍します。
[root@www ~]# cd /usr/local/bin
[root@www bin]# wget https://rcg.jp/download/DiCE.tar.gz
[root@www bin]# tar xzvf DiCE.tar.gz
[root@www bin]# rm -f DiCE.tar.gz
[root@www bin]# cd
ライブラリをインストールします。
[root@www ~]# dnf install ld-linux.so.2
「y」で応答します。
Is this ok [y/d/N]: y
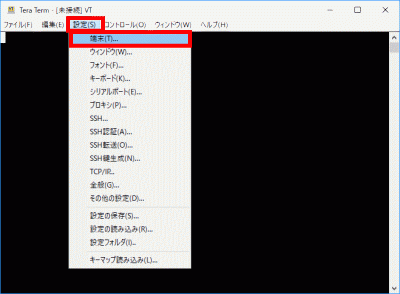
「設定」→「端末」を選択します。
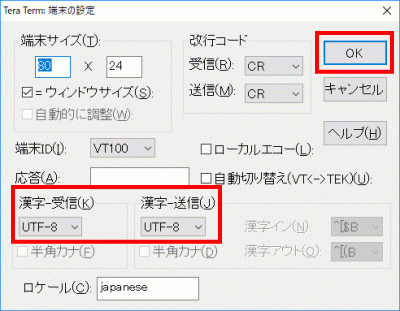
「漢字-受信」、「漢字-送信」をEUCに変更し、「OK」をクリックします。
セットアップします。
[root@www ~]# setarch `uname -m` /usr/local/bin/DiCE/diced
=-=-=- DiCE DynamicDNS Client -=-=-=
Version 0.19 for Japanese
Copyright(c) 2001 sarad

:setup
IPアドレスの検出方法を指定してください
(0) 自動検出
(1) ローカルのネットワークアダプタから検出
(2) 外部のスクリプトから検出
<現在:0>
(N)変更しない  (P)戻る
>2
-------------------------------------------------
スクリプトのURLを入力してください
<現在:>
(N)変更しない (P)戻る
>http://dyn.value-domain.com/cgi-bin/dyn.fcg?
-------------------------------------------------
プライベートIPアドレスも検出対象ですか? (Y/N)
<現在:いいえ>
(P)戻る
>N
-------------------------------------------------
IPアドレスの検出をテストしますか? (Y/N)
(P)戻る
>Y
検出IPアドレス>***.***.***.***
上記の検出IPアドレスが表示しない場合の確認はこちら、IPアドレス確認
-------------------------------------------------
IPアドレスの検出をテストしますか? (Y/N)
(P)戻る
>N
-------------------------------------------------
IPアドレスをチェックする間隔を指定してください(分)
設定可能範囲は5分以上です
<現在:60>
(N)変更しない  (P)戻る
>5
=================================================
DNSサーバーの負荷を軽減するために頻繁なDNS更新を防ぐ必要があります
前回の更新から一定時間DNS更新処理を行わないように保護時間を設定して
ください(分)  設定可能範囲は10分から1440分です
<現在:60>
(N)変更しない  (P)戻る
>10
=================================================
設定を保存しますか? (Y/N)
(P)戻る
>Y
設定を保存しました
=================================================
ドメイン(VALUE DOMAIN)に合わせて設定します。
:add
新しくイベントを追加します

DynamicDNSサービス名を入力してください
"?"で対応しているサービスを一覧表示します
(P)戻る
>?
           ZENNO.COM            livedoor            MyDNS.JP
              pcc.jp              JPN.ch             MyIP.US
              @nifty         StaticCling            MyServer
             ddns.ca                 p2p      did.expoze.com
              Dynamx          WebReactor               unicc
               Earth              DNS2Go              instat
              Now.nu           dynDNS.it          onamae.com
                DION                 ODN         RegisterFly
                 DHS          Netservers                todd
                 USA                 cjb              Dyn.ee
             BIGLOBE                dnip             3domain
             miniDNS           my-domain            ZoneEdit
                ZiVE                  yi                ysdn
              theBBS            SelfHOsT              ddo.jp
               No-IP             nicolas                eNom
           CyberGate            EveryDNS           Microtech
            ieServer          HAMMERNODE             GetmyIP
               Dynup                Dynu                dyns
              DynDSL            DynDNSdk              dyndns
               DtDNS                dnsQ                 dhs
             DDNS.nu            cheapnet            changeIP
            ARTofDNS         VALUEDOMAIN                 ODS
              JSPEED               IPDYN            DnsTokyo
=================================================
新しくイベントを追加します


ホスト名を入力してください
(P)戻る
>VALUEDOMAIN
=================================================
ドメイン名を入力してください
"?"でドメイン一覧を表示します
(P)戻る
>ドメイン名
=================================================
ホスト名を入力してください
(P)戻る
>*
=================================================
ログインユーザ名を入力してください
(P)戻る
>
=================================================
ログインパスワードを入力してください
(P)戻る
>ログインパスワード
=================================================
登録するIPアドレスを入力してください
空白にすると現在のIPアドレスを自動検出します
(P)戻る
>
=================================================
このイベントに題名を付けてください
(P)戻る
>VALUEDOMAIN-ドメイン名

このイベントを実行するスケジュールを設定します
-------------------------------------------------
実行する頻度を指定してください (番号入力)
(0)1回のみ (1)1日1回 (2)1週間に1回 (3)1ヵ月に1回
(4)その他の周期 (5)IPアドレス変化時 (6)起動時
(P)戻る
>4
-------------------------------------------------
実行する周期を指定してください
<現在:9>
(0)3分毎   (1)5分毎   (2)10分毎  (3)30分毎
(4)1時間毎 (5)2時間毎 (6)6時間毎 (7)12時間毎
(8)24時間毎(9)7日毎   (10)14日毎 (11)21日毎
(12)28日毎 (13)35日毎 (14)56日毎 (15)84日毎
(N)変更しない  (P)戻る
>0
=================================================
=================================================
このイベントを有効にしますか? (Y/N)
(イベントの有効/無効は"EN/DIS"コマンドで切替えられます)
>Y
=================================================
イベントを保存しますか? (Y/N)
>Y
イベント"VALUE-DOMAIN-server.jp"を保存しました
=================================================
:
転送を有効化して終了します。
:ex 0
+ 4/8 17:00 にVALUEDOMAIN-server.jpが実行されました
  IPアドレスを更新しました
:quit
「漢字-受信」、「漢字-送信」をUTF-8に変更し、「OK」をクリックします。
IPアドレス更新スクリプトを作成します。
[root@www ~]# vi /usr/local/bin/update_ip_script.sh
#!/bin/bash

# Store your domain, password, hostname, and current IP address in variables
DOMAIN=${1}
PASS=${2}
HOST=${3}

# Store URLs and values in variables
IPINFO_URL="http://ipinfo.io/ip"
VD_UPDATE_BASE_URL="http://dyn.value-domain.com/cgi-bin/dyn.fcg"
NS_SERVER="ns1.value-domain.com"  # Store the DNS server address

DOMAIN_LOG="d"
PASS_LOG="p"
HOST_LOG="h"
CURRENTIP_LOG="i"

if [ "${HOST}" = "" ]; then
    FQDN=${DOMAIN}
else
    FQDN="${HOST}.${DOMAIN}"
fi

# Error Messages
ERROR_MSG_VDIP="Error detecting IP address configured in VALUE-DOMAIN settings"
ERROR_MSG_CURRENTIP="Error detecting current IP address"
UPDATE_SUCCESS_MSG="IP address update successful"
UPDATE_ERROR_MSG="IP address update error"
EMAIL_SUBJECT="IP address update error"

# Obtain IP address configured in VALUE-DOMAIN settings
IPGETLOG=`host ${FQDN} ${NS_SERVER} 2>&1`
VDIP=`echo "${IPGETLOG}" | grep "has address" | awk '{ print $NF }' | egrep ^[0-9]+\.[0-9]+\.[0-9]+\.[0-9]+$`
if [ $? -ne 0 ]; then
    echo "${FQDN} ${ERROR_MSG_VDIP}" | logger -t $(basename $0)
    echo ${IPGETLOG} | logger -t $(basename $0)
    exit
fi

# Obtain current IP address
IPGETLOG=`curl "${IPINFO_URL}" 2>&1`
echo "${IPGETLOG}" | egrep ^[0-9]+\.[0-9]+\.[0-9]+\.[0-9]+$ > /dev/null 2>&1
if [ $? -eq 0 ]; then
    CURRENTIP=`echo "${IPGETLOG}" | tail -n 1 | awk '{ print $NF }'`
else
    echo "${DOMAIN} ${ERROR_MSG_CURRENTIP}" | logger -t $(basename $0)
    echo "${IPGETLOG}" | logger -t $(basename $0)
    exit
fi

# Create URL query parameters
QUERY_PARAMS="${DOMAIN_LOG}=${DOMAIN}&${PASS_LOG}=${PASS}&${HOST_LOG}=${HOST}&${CURRENTIP_LOG}=${CURRENTIP}"

# Combine with the base URL for VALUE-DOMAIN update
VD_UPDATE_URL="${VD_UPDATE_BASE_URL}?${QUERY_PARAMS}"

# Update VALUE-DOMAIN configured IP address
# (Only if VALUE-DOMAIN configured IP address is different from current IP address)
if [ "${VDIP}" != "${CURRENTIP}" ]; then
    IPUPDATE=`wget -q -O - "${VD_UPDATE_URL}"`
    echo ${IPUPDATE} | grep -q OK
    if [ $? -eq 0 ]; then
        echo "${FQDN} ${UPDATE_SUCCESS_MSG} ${VDIP} to ${CURRENTIP}" | logger -t $(basename $0)
    else
        echo "${FQDN} ${UPDATE_ERROR_MSG}" | logger -t $(basename $0)
        echo ${IPUPDATE} | logger -t $(basename $0)
        (
        echo ${UPDATE_ERROR_MSG}
        echo ${IPUPDATE}
        ) | mail -s "${SCRIPT##*/}${EMAIL_SUBJECT}" root
        exit 1
    fi
fi
exit
IPアドレス更新スクリプトへ実行権限付加します。
[root@www ~]# chmod +x /usr/local/bin/update_ip_script.sh
IPアドレス更新スクリプトを実行します。
[root@www ~]# /usr/local/bin/update_ip_script.sh ドメイン パスワード "*"
IPアドレス更新スクリプトを定期自動実行ファイルを作成します。(3分毎に実行します。)
[root@www ~]# vi /etc/cron.d/ddns-update
*/3 * * * * root /usr/local/bin/update_ip_script.sh ドメイン パスワード "*"
Clam AntiVirus をインストールします。
[root@www ~]# dnf -y install clamav clamav-update
Clam AntiVirus を設定します。
[root@www ~]# vi /etc/freshclam.conf
8行目:行頭に「#」を追記してコメント化します。
#Example
パターンファイルを更新します。
[root@www ~]# freshclam
ClamAV update process started at Sun Jun 30 23:51:01 2019
main.cvd is up to date (version: 58, sigs: 4566249, f-level: 60, builder: sigmgr)
daily.cld is up to date (version: 25496, sigs: 1606212, f-level: 63, builder: raynman)
bytecode.cvd is up to date (version: 328, sigs: 94, f-level: 63, builder: neo)
スキャンを実行して動作確認します。
[root@www ~]# clamscan --infected --remove --recursive /home

----------- SCAN SUMMARY -----------
Known viruses: 6163086
Engine version: 0.101.2
Scanned directories: 38
Scanned files: 23
Infected files: 0
Data scanned: 0.00 MB
Data read: 0.00 MB (ratio 0.00:1)
Time: 179.738 sec (2 m 59 s)
テスト用無害ウィルスをダウンロードします。
[root@www ~]# wget http://www.eicar.org/download/eicar.com
スキャンを実行して動作確認します。
[root@www ~]# clamscan --infected --remove --recursive .

----------- SCAN SUMMARY -----------
Known viruses: 6163097
Engine version: 0.101.2
Scanned directories: 3
Scanned files: 10
Infected files: 1
Data scanned: 0.00 MB
Data read: 0.00 MB (ratio 0.00:1)
Time: 179.738 sec (2 m 59 s)
Tripwire をインストールします。
[root@www ~]# dnf -y install tripwire
Tripwire の初期設定をします。
[root@www ~]# tripwire-setup-keyfiles
サイトキーファイルのパスフレーズを設定します。
Enter the site keyfile passphrase: サイトキーファイルのパスフレーズ(英数字)
Verify the site keyfile passphrase: サイトキーファイルのパスフレーズ(英数字)
ローカルキーファイルのパスフレーズを設定します。
Enter the local keyfile passphrase: ローカルキーファイルのパスフレーズ(英数字)
Verify the local keyfile passphrase: ローカルキーファイルのパスフレーズ(英数字)
サイトキーファイルのパスフレーズを入力します。
Please enter your site passphrase: サイトキーファイルのパスフレーズ
サイトキーファイルのパスフレーズを入力します。
Please enter your site passphrase: サイトキーファイルのパスフレーズ
「/etc/tripwire」へディレクトリを移動します。
[root@www ~]# cd /etc/tripwire
初期設定をします。
[root@www tripwire]# vi twcfg.txt
12行目:報告レベルを最大に変更します。
REPORTLEVEL = 4
設定ファイルを生成します。
[root@www tripwire]# twadmin -m F -c tw.cfg -S site.key twcfg.txt
サイトキーファイルのパスフレーズを入力します。
Please enter your site passphrase: サイトキーファイルのパスフレーズ
Wrote configuration file: /etc/tripwire/tw.cfg
ポリシーを最適化します。
[root@www tripwire]# vi twpolmake.pl
行頭に「#」が自動挿入される場合は2回に分けて作成します。
#!/usr/bin/perl
# Tripwire Policy File customize tool
# ----------------------------------------------------------------
# Copyright (C) 2003 Hiroaki Izumi
# This program is free software; you can redistribute it and/or
# modify it under the terms of the GNU General Public License
# as published by the Free Software Foundation; either version 2
# of the License, or (at your option) any later version.
# This program is distributed in the hope that it will be useful,
# but WITHOUT ANY WARRANTY; without even the implied warranty of
# MERCHANTABILITY or FITNESS FOR A PARTICULAR PURPOSE. See the
# GNU General Public License for more details.
# You should have received a copy of the GNU General Public License
# along with this program; if not, write to the Free Software
# Foundation, Inc., 59 Temple Place - Suite 330, Boston, MA 02111-1307, USA.
# ----------------------------------------------------------------
# Usage:
# perl twpolmake.pl {Pol file}
# ----------------------------------------------------------------
#
#ここまでを1回目で作成して行頭に「#」の無い行を作成して、以下をコピペします。
$POLFILE=$ARGV[0];

open(POL,"$POLFILE") or die "open error: $POLFILE" ;
my($myhost,$thost) ;
my($sharp,$tpath,$cond) ;
my($INRULE) = 0 ;

while (<POL>) {
    chomp;
    if (($thost) = /^HOSTNAME\s*=\s*(.*)\s*;/) {
        $myhost = `hostname` ; chomp($myhost) ;
        if ($thost ne $myhost) {
            $_="HOSTNAME=\"$myhost\";" ;
        }
    }
    elsif ( /^{/ ) {
        $INRULE=1 ;
    }
    elsif ( /^}/ ) {
        $INRULE=0 ;
    }
    elsif ($INRULE == 1 and ($sharp,$tpath,$cond) = /^(\s*\#?\s*)(\/\S+)\b(\s+->\s+.+)$/) {
        $ret = ($sharp =~ s/\#//g) ;
        if ($tpath eq '/sbin/e2fsadm' ) {
            $cond =~ s/;\s+(tune2fs.*)$/; \#$1/ ;
        }
        if (! -s $tpath) {
            $_ = "$sharp#$tpath$cond" if ($ret == 0) ;
        }
        else {
            $_ = "$sharp$tpath$cond" ;
        }
    }
    print "$_\n" ;
}
close(POL) ;

[root@www tripwire]# perl twpolmake.pl twpol.txt > twpol.txt.new
[root@www tripwire]# twadmin -m P -c tw.cfg -p tw.pol -S site.key twpol.txt.new
サイトキーファイルのパスフレーズを入力します。
Please enter your site passphrase: サイトキーファイルのパスフレーズ
Wrote configuration file: /etc/tripwire/tw.pol
データベースを作成します。
[root@www tripwire]# tripwire -m i -s -c tw.cfg
ローカルキーファイルのパスフレーズを入力します。
Please enter your local passphrase: ローカルキーファイルのパスフレーズ
ディレクトリを戻ります。
[root@www tripwire]# cd
チェックを実行します。(定期チェックは日次でチェック実行されます。)
[root@www ~]# tripwire -m c -s -c /etc/tripwire/tw.cfg
Open Source Tripwire(R) 2.4.2.2 Integrity Check Report

Report generated by:          root
...
...
...
All rights reserved.
チェック結果を確認します。
[root@www ~]# ll /var/lib/tripwire/report
total 4
-rw-r--r-- 1 root root 1821526 6月 29 07:58 server.jp-20190629-075230.twr
-rw-r--r-- 1 root root 1830182 6月 30 06:09 server.jp-20190630-060029.twr
-rw-r--r-- 1 root root 1829590 7月 1 09:29 server.jp-20190701-092314.twr
-rw-r--r-- 1 root root 1828518 7月 1 17:27 server.jp-20190701-171400.twr
レポートを指定してデータベースを更新します。
[root@www ~]# tripwire -m u -a -s -c /etc/tripwire/tw.cfg -r /var/lib/tripwire/report/server.jp-20190701-171400.twr
ローカルキーファイルのパスフレーズを入力します。
Please enter your local passphrase: ローカルキーファイルのパスフレーズ
RKHunter をインストールします。
[root@www ~]# dnf -y install rkhunter
RKHunter の設定します。
[root@www ~]# vi /etc/sysconfig/rkhunter
レポートを送信する宛先とスキャンモードを設定します。
#レポートを送信する宛先
MAILTO=root@localhost
#スキャンモード
DIAG_SCAN=no
データベースをアップデートします。
[root@www ~]# rkhunter --update
システムのファイル情報をアップデートすます。
[root@www ~]# rkhunter --propupd
チェック実行します。
[root@www ~]# rkhunter --check --sk
[ Rootkit Hunter version 1.4.2 ]

Checking system commands...
...
...
No warnings were found while checking the system.
TeraTermを起動し、ユーザーでログインし公開鍵、秘密鍵を作成します。
[webmaster@www ~]$ ssh-keygen -t ecdsa
「Enter」を押下します。
Generating public/private ecdsa key pair.
Enter file in which to save the key (/home/webmaster/.ssh/id_ecdsa):
「パスフレーズ」を設定します。
Enter passphrase (empty for no passphrase):
Enter same passphrase again:
公開鍵を「.ssh/」へ転送します。
[webmaster@www ~]$ mv ~/.ssh/id_ecdsa.pub ~/.ssh/authorized_keys
ログイン設定を行います。
[webmaster@www ~]$ chmod 700 .ssh/
rootでログインして秘密鍵を「/samba/share」に転送します。
[root@www ~]# mv /home/webmaster/.ssh/id_ecdsa /samba/share
[root@www ~]# chmod 777 /samba/share/id_ecdsa
クライアントPCのSambaショートカットから「id_ecdsa」ファイルを任意の場所(SSH鍵/秘密鍵/)に保存します。
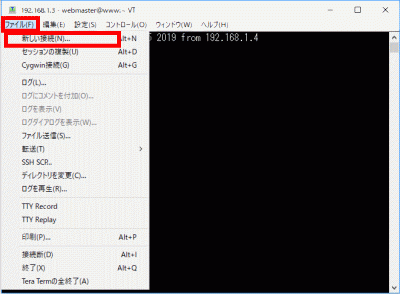
「新しい接続」を選択します。
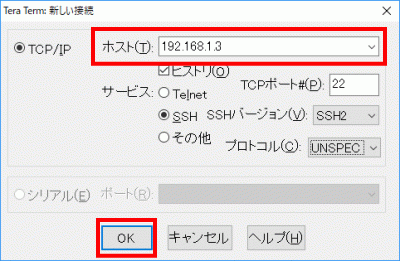
「ホスト」にIPアドレスを入力して、「OK」をクリックします。
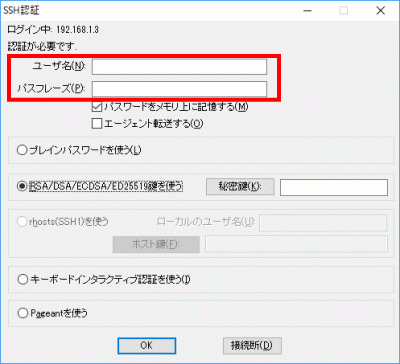
「ユーザー名」、「パスフレーズ(鍵のパスフレーズ)」を入力します。
「RSA/DSA/ECDSA/ED25519鍵を使う」を選択します。
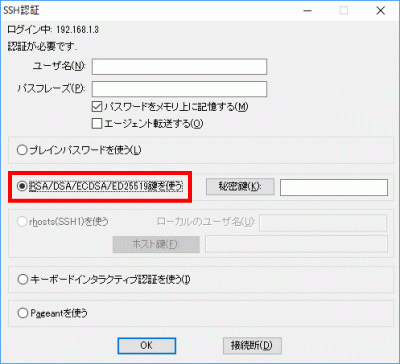
「秘密鍵」をクリックして、保存した「SSH鍵/秘密鍵/id_ecdsa」を選択します。
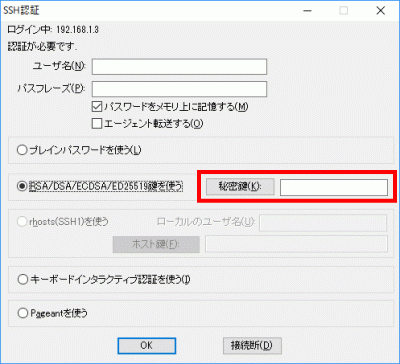
「OK」をクリックして接続を確認します。

rootへログインします。
[webmaster@www ~]$ su -
パスワード:
バックアップを作成します。
[root@www ~]# cp -p /etc/ssh/sshd_config /etc/ssh/sshd_config_bck
編集します。
[root@www ~]# vi /etc/ssh/sshd_config
65行目:「yes」→「no」に変更します。
PasswordAuthentication no
SSHを再起動します。
[root@www ~]# systemctl restart sshd