
s550
動画編集でジェットカットを無料で自動化する方法.
動画編集で無音部分をカット(ジェットカット)することが多いですが作業に時間がかかり大変です。
この作業を「Auto-Editor」を使い無料で自動化することができます。
Auto-Editorをインストール.
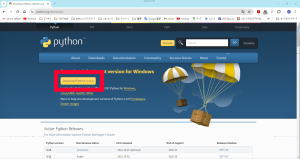
Python 3をインストール.
「Download Python」をクリックしてPython 3をダウンロードします。
https://www.python.org/downloads/
 s560
s560
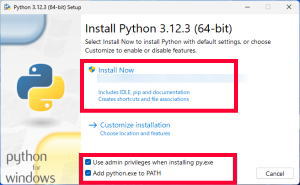
Python 3をインストールします。
 s570
s570
「Use admin privileges when installling py.exe」、「 Add python.exe to PATH」をクリックして選択し「Install Now」をクリックします。
 s580
s580
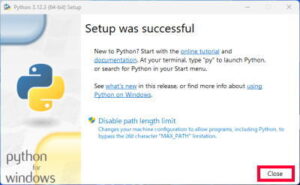
インストールが完了したら「Close」をクリックします。
 s590
s590
Auto-Editorをインストール.
PCの「検索」で「cmd」と入力してコマンドプロンプトを開きます。(「PowerShell」でも実行できます。ピン留めしておくと便利です。)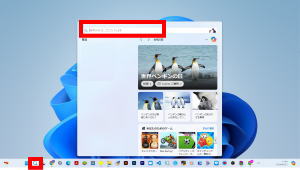 s600
s600
PythonのPATH に pipを追加します。
下記を入力して「Enter」を押下します。(以下同様)
550_1pip install --upgrade pip
s660pip を最新バージョンにアップグレードします。
560_1pip install auto-editor
s670約 3 週間ごとに、更新されますので下記を実行してアップグレードします。
570_1pip install auto-editor --upgrade
s680Auto-Editorのヘルプを確認します。
580_1auto-editor --help
Options:
  Editing Options:
    -m, --margin LENGTH                               Set sections near "loud" as "loud" too if section is less than
                                                      LENGTH away.
    --edit, --edit-based-on METHOD                    Decide which method to use when making edits
    -s, --silent-speed NUM                            Set speed of sections marked "silent" to NUM
    -v, --sounded-speed, --video-speed NUM            Set speed of sections marked "loud" to NUM
    --cut-out [START,STOP ...]                        The range of media that will be removed completely, regardless
                                                      of the value of silent speed
    --add-in [START,STOP ...]                         The range of media that will be added in, opposite of --cut-out
    --set-speed, --set-speed-for-range [SPEED,START,STOP ...]
                                                      Set an arbitrary speed for a given range

  Timeline Options:
    -tb, --time-base, -r, -fps, --frame-rate NUM      Set timeline frame rate
    -ar, --sample-rate NAT                            Set timeline sample rate
    -res, --resolution WIDTH,HEIGHT                   Set timeline width and height
    -b, --background COLOR                            Set the background as a solid RGB color
    --add OBJ:START,DUR,ATTRS?                        Insert an audio/video object to the timeline

  URL Download Options:
    --yt-dlp-location PATH                            Set a custom path to yt-dlp
    --download-format FORMAT                          Set the yt-dlp download format (--format, -f)
    --output-format TEMPLATE                          Set the yt-dlp output file template (--output, -o)
    --yt-dlp-extras CMD                               Add extra options for yt-dlp. Must be in quotes

  Utility Options:
    -ex, --export EXPORT:ATTRS?                       Choose the export mode
    -o, --output, --output-file FILE                  Set the name/path of the new output file.
    -p, --player CMD                                  Set player to open output media files
    --no-open                                         Do not open the output file after editing is done
    --temp-dir PATH                                   Set where the temporary directory is located
    --ffmpeg-location PATH                            Set a custom path to the ffmpeg location
    --my-ffmpeg                                       Use the ffmpeg on your PATH instead of the one packaged

  Display Options:
    --progress PROGRESS                               Set what type of progress bar to use
    --debug                                           Show debugging messages and values
    --show-ffmpeg-commands                            Show ffmpeg commands
    --show-ffmpeg-output                              Show ffmpeg stdout and stderr
    -q, --quiet                                       Display less output
    --stats, --preview                                Show stats on how the input will be cut and halt

  Video Rendering:
    -c:v, -vcodec, --video-codec ENCODER              Set video codec for output media
    -b:v, --video-bitrate BITRATE                     Set the number of bits per second for video
    -q:v, -qscale:v, --video-quality-scale SCALE      Set a value to the ffmpeg option -qscale:v
    --scale NUM                                       Scale the output video's resolution by NUM factor
    --no-seek                                         Disable file seeking when rendering video. Helpful for
                                                      debugging desync issues

  Audio Rendering:
    -c:a, -acodec, --audio-codec ENCODER              Set audio codec for output media
    -b:a, --audio-bitrate BITRATE                     Set the number of bits per second for audio
    --keep-tracks-separate                            Don't mix all audio tracks into one when exporting
    --audio-normalize NORM-TYPE                       Apply audio rendering to all audio tracks. Applied right before
                                                      rendering the output file.

  Miscellaneous:
    -sn                                               Disable the inclusion of subtitle streams in the output file
    --extras CMD                                      Add extra options for ffmpeg. Must be in quotes
    -V, --version                                     Display version and halt
    -h, --help                                        Show info about this program or option then exit
s690動画のジェットカットを行います。
「動画のパス」に動画ファイルをドラッグアンドドロップします。(動画ファイルを右クリックしてパスをコピーして貼り付けでもできます。)
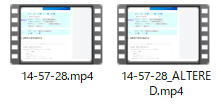
590_1auto-editor 動画のパス
C:UsersUser>auto-editor "C:UsersUserVideos24-57-28.mp4"
 ⏳Creating new video |█████████████████████▋            | 30.9% ETA 08:36 PM
s700動画ファイルと同じフォルダに「_ALTERED」の追加されたファイルができます。
 s710
s710
オプション.
「動画のパス」の後ろに「オプション」を追加して色々な加工ができます。
610_1auto-editor 動画のパス --オプション --オプション
s720
余白.
「動画のパス」の後ろに追加して余白加工ができます。
前後に 0.2 秒の余白を追加します。
620_1auto-editor 動画のパス620_2 --margin 0.2sec
s730前に 0.3 秒、後に 1.5 秒の余白を追加します
630_1auto-editor 動画のパス630_2 --margin 0.3s,1.5sec
s740
自動カットの方法.
音量が 2% 未満のセクションを切り取ります。(デフォルトでは音量0.04未満のすべてを切り取ります。)
640_1auto-editor 動画のパス640_2 --edit motion:threshold=0.02
s750トラックごとに指定できます。
650_1auto-editor 動画のパス650_2 --edit "(or audio:stream=0 audio:threshold=10%,stream=1)"
s760さまざまな編集方法を併用できます。
660_1auto-editor 動画のパス660_2 --edit "(or audio:0.03 motion:0.06)"
s770音量単位である dB 単位を使用することもできます
670_1auto-editor 動画のパス670_2 --edit audio:-19dB
670_3auto-editor 動画のパス670_4 --edit motion:-19dB
s780
ビデオエディター用のエクスポート.
Adobe Premiere Pro にインポートできる XML ファイルを作成します。(XML ファイルのインポート方法はビデオエディターのヘルプを確認ください。)
680_1auto-editor 動画のパス680_2 --export premiere
s790その他のビデオエディター用
DaVinci Resolve with       690_1 --export resolve
Final Cut Pro with        690_2 --export final-cut-pro
ShotCut with           690_3 --export shotcut
Individual media clips with    690_4 --export clip-sequence