s50
- Postfixの設定.
- SMTP認証設定.
- Maildir形式メールボックスの作成.
- TCP25番、TCP587番ポート開放.
- ポート開放テスト.
- メールサーバーのOP25B対策.
- root宛メールを転送(フリーメール使用).
- メールの送信テスト.
- Gmailのメール転送設定.
- root宛メールの受信確認.
- Dovecotのインストール.
- TCP110番またはTCP143番ポート開放.
- メールユーザーの追加.
- sendmailパスの確認.
- メールソフトの登録.
- サーバー証明書の取得.
- SSLの設定.
- TCP465番ポート開放.
- ポート開放テスト.
- TCP587番ポート閉鎖.
- ポート開放テスト.
- TCP995番またはTCP993番ポート開放.
- ポート開放テスト.
- メールソフトの設定変更.
- アンチウィルスソフトの連携(Clamav+Amavisd).
Postfixの設定.
外部からWebアクセスできるようにします。
[root@www ~]# 50_1vi /etc/httpd/conf.d/virtualhost-00-linuxserver.jp.conf
<VirtualHost *:80>
    ServerName linuxserver.jp
    DocumentRoot /var/www/html
    50_2ServerAlias mail.linuxserver.jp
    RewriteEngine On
    RewriteCond %{HTTP_HOST} ^www\.linuxserver\.jp
    RewriteRule ^(.*)$ http://linuxserver.jp/$1 [R=301,L]
</VirtualHost>
s51Postfixをインストールをします。
[root@www ~]# 51_1dnf install postfix
s52Postfixを設定します。
[root@www ~]# 52_1vi /etc/postfix/main.cf
s5396行目:メールサーバードメイン名の指定を追記します。
53_1myhostname = mail.linuxserver.jp
s54103行目:ドメイン名の指定を追記します。
54_1mydomain = linuxserver.jp
s55119行目:送信元メールアドレスにドメイン名の指定を追記します。
55_1myorigin = $mydomain
s56135行目:外部からのメール受信を許可する設定に変更します。
inet_interfaces = 56_1all
s57183行目:ドメインメールを受信する設定に変更します。
mydestination = $myhostname, localhost.$mydomain, localhost57_1, $mydomain
s58439行目:メール格納形式をMaildir形式にする設定を追記します。
58_1home_mailbox = Maildir/
s59593行目:メールサーバーソフト名の隠蔽化する設定を追記します。
59_1smtpd_banner = $myhostname ESMTP unknown
s60SMTP認証の設定を最終行へ追加します。
60_1smtpd_sasl_auth_enable = yes

smtpd_recipient_restrictions =
    permit_mynetworks
    permit_sasl_authenticated
    reject_unauth_destination
s61受信メールサイズを10MB=10*1024*1024に制限する設定を最終行へ追記します。
61_1message_size_limit = 10485760
s62ファイルを設定します。
[root@www ~]# 62_1vi /etc/postfix/master.cf
s6319行目:行頭の「#」を削除してコメント解除します。
submission inet n - n - - smtpd
s6422行目:行頭の「#」を削除してコメント解除します。
-o smtpd_sasl_auth_enable=yes
s65
SMTP認証設定.
cyrus-saslをインストールします。
[root@www ~]# 65_1dnf install cyrus-sasl cyrus-sasl-plain
s66起動します。
[root@www ~]# 66_1systemctl start saslauthd
s67自動起動設定します。
[root@www ~]# 67_1systemctl enable saslauthd
s68
Maildir形式メールボックスの作成.
新規ユーザー追加時に自動でMaildir形式メールボックス作成する設定をします。
[root@www ~]# 68_1mkdir -p /etc/skel/Maildir/{new,cur,tmp}
s69メールボックスパーミッションを設定します。
[root@www ~]# 69_1chmod -R 700 /etc/skel/Maildir/
s70起動します。
[root@www ~]# 70_1systemctl restart postfix
s71現在のユーザーのMaildir形式メールボックス作成する設定をします。
[root@www ~]# 71_1wget https://rcg.jp/perfect_maildir/perfect_maildir.pl -O /usr/local/bin/perfect_maildir.pl
[root@www ~]# 71_2chmod +x /usr/local/bin/perfect_maildir.pl
s72Maildir変換に必要なPerlのTimeDateモジュールをインストールします。
[root@www ~]# 72_1dnf -y install perl-TimeDate
s73Postfixを停止します。
[root@www ~]# 73_1systemctl stop postfix
s74Maildir一括変換スクリプトを作成します。
[root@www ~]# 74_1vi migrate-maildir.sh
74_2#!/bin/bash
#
#Maildir一括変換スクリプト
#
#メールボックス=>Maildir形式変換スクリプト
#http://perfectmaildir.home-dn.net/
FOLDERCONVERT=/usr/local/bin/perfect_maildir.pl
#一般ユーザリスト
USERLIST=`ls /home/`
#ログ
MIGRATELOG=/tmp/migrate-maildir.log
rm -f $MIGRATELOG
#引数(変換元メールボックス形式)チェック
if [ "$1" != "mbox" ] && [ "$1" != "Mailbox" ]; then
echo "Usage: migrate-maildir.sh {mbox|Mailbox}"
exit
fi
#一般ユーザメールボックス移行
for user in $USERLIST;
do
if [ "$1" = "mbox" ]; then
inbox="/var/spool/mail/${user}"
else
inbox="/home/${user}/Mailbox"
fi
if [ -f "${inbox}" ]; then
newdir="/home/${user}/Maildir/"
mkdir -p "$newdir"
mkdir -p "$newdir"/cur
mkdir -p "$newdir"/new
mkdir -p "$newdir"/tmp
chmod -R 700 "${newdir}"
$FOLDERCONVERT "$newdir" < "${inbox}" >> $MIGRATELOG 2>&1
chown -R ${user}. "$newdir"
find "$newdir" -type f -exec chmod 600 {} \;
fi
done
#rootユーザメールボックス移行
user="root"
if [ "$1" = "mbox" ]; then
inbox="/var/spool/mail/${user}"
else
inbox="/${user}/Mailbox"
fi
if [ -f "${inbox}" ]; then
newdir="/${user}/Maildir/"
mkdir -p "$newdir"
mkdir -p "$newdir"/cur
mkdir -p "$newdir"/new
mkdir -p "$newdir"/tmp
chmod -R 700 "${newdir}"
$FOLDERCONVERT "$newdir" < "${inbox}" >> $MIGRATELOG 2>&1
chown -R ${user}. "$newdir"
find "$newdir" -type f -exec chmod 600 {} \;
fi
[ -a $MIGRATELOG ] && cat $MIGRATELOG;rm -f $MIGRATELOG
s75一括変換スクリプトを実行します。
[root@www ~]# 75_1sh migrate-maildir.sh mbox
s76Maildir一括変換スクリプトを削除します。
[root@www ~]# 76_1rm -f migrate-maildir.sh
s77Maildir変換ツールを削除します。
[root@www ~]# 77_1rm -f /usr/local/bin/perfect_maildir.pl
s78起動します。
[root@www ~]# 78_1systemctl restart postfix
s79webmasterユーザーをメール使用する場合は「/etc/aliases」を変更します。
[root@www ~]# 79_1vi /etc/aliases
s80行頭に#を追加して転送を無効にします。
80_1#webmaster: root
s81転送設定を反映します。
[root@www ~]# 81_1newaliases
s82
TCP25番、TCP587番ポート開放.
ルーターの設定で、TCP25番、TCP587番ポートを開放します。(設定方法はご自身の環境に合わせて調べてください。)
ポート開放テスト.
開放確認サイトで「ホスト名(linuxserver.jp)」、「ポート番号(25、587)」の開放確認をします。
開放確認サイト
s83
メールサーバーのOP25B対策.
メールサーバーのOP25B対策として送信メールをGmailを経由して送信するように設定します。
Postfixを設定します。
[root@www ~]# 83_1vi /etc/postfix/main.cf
s84以下を最終行へ追加します。
84_1relayhost = [smtp.gmail.com]:587
smtp_use_tls = yes
smtp_sasl_auth_enable = yes
smtp_sasl_password_maps = hash:/etc/postfix/sasl_passwd
smtp_sasl_tls_security_options = noanonymous
smtp_sasl_mechanism_filter = plain
s85SMTP認証情報を設定します。
[root@www ~]# 85_1echo [smtp.gmail.com]:587 Gmailアドレス:Gmailパスワード > /etc/postfix/sasl_passwd
s86root以外参照できないようにパーミッション変更します。
[root@www ~]# 86_1chmod 640 /etc/postfix/sasl_passwd
s87SMTP認証情報をデータベース化します。
[root@www ~]# 87_1postmap /etc/postfix/sasl_passwd
s88Postfixを再起動します。
[root@www ~]# 88_1systemctl reload postfix
s89
root宛メールを転送(フリーメール使用).
root宛メールを転送します。
[root@www ~]# 89_1vi /etc/aliases
s90最終行に追記します。
# Person who should get root's mail
#root: marc
90_1root: 転送用メールアドレス
s91転送設定を反映します。
[root@www ~]# 91_1newaliases
s92
メールの送信テスト.
テストメールをroot宛に送信します。
[root@www ~]# 92_1echo test|sendmail root
s93
Gmailのメール転送設定.
先にThunderbirdのGmail(送信用メール)設定をします。
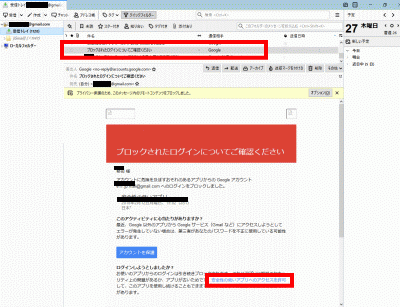
s94Thunderbirdを起動し、送信用メールアドレスで「ブロックされたログインについてご確認ください」を開き、「安全性の低いアプリへのアクセスを許可」をクリックします。
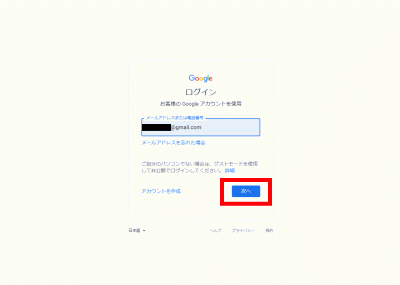
s95ブラウザでGmailにログインします。
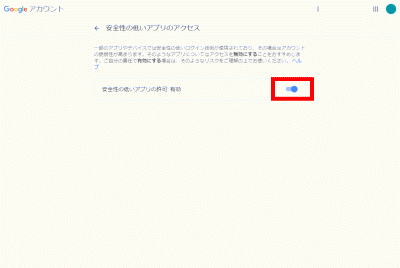
s96右上のユーザーアイコンを右クリック→「Googleアカウントの管理」→「セキュリティ」→「安全性の低いアプリのアクセス」でアクセスを有効にします。
s97
root宛メールの受信確認.
先にThunderbirdのGmail(転送用メール)設定をします。
s98Thunderbird(Gmail)のroot宛の転送用メールアドレスで受信を確認します。
Dovecotのインストール.
Dovecotをインストールします。
[root@www ~]# 98_1dnf -y install dovecot
s99ファイルを設定します。
[root@www ~]# 99_1vi /etc/dovecot/dovecot.conf
s10124行目:行頭「#」を削除してコメント解除します。
protocols = imap pop3 lmtp submission
s10230行目:行頭「#」を削除してコメント解除し、IPv6を無効にする設定に変更します。
listen = *
s103ファイルを設定します。
[root@www ~]# 103_1vi /etc/dovecot/conf.d/10-mail.conf
s10431行目:メール格納形式をMaildir形式にする設定を追記します。
104_1mail_location = maildir:~/Maildir
s105ファイルを設定します。
[root@www ~]# 105_1vi /etc/dovecot/conf.d/10-auth.conf
s10611行目:プレインテキスト認証を許可する設定を追記します。
106_1disable_plaintext_auth = no
s107ファイルを設定します。
[root@www ~]# 107_1vi /etc/dovecot/conf.d/10-ssl.conf
s1088行目:SSL接続を無効にする設定に変更します。
ssl = 108_1no
s109起動します。
[root@www ~]# 109_1systemctl start dovecot
s110自動起動を設定します。
[root@www ~]# 110_1systemctl enable dovecot
s111
TCP110番またはTCP143番ポート開放.
開放確認サイトで「ホスト名(linuxserver.jp)」、「ポート番号(110または143)」の開放確認をします。
開放確認サイト
s112
メールユーザーの追加.
ユーザーを追加します。(ユーザー例:linux)
[root@www ~]# 112_1useradd linux
s113パスワードを設定します。
[root@www ~]# 113_1passwd linux
Changing password for user linux.
New UNIX password:
Retype new UNIX password:
s114
「/etc/ssh/sshd_config」を編集して、秘密鍵での認証接続を無効にします.
sshd_configを編集します。
[root@www ~]# 114_1vi /etc/ssh/sshd_config
s11565行目:「no」→「yes」に変更します。
PasswordAuthentication 116_1yes
s117SSHを再起動します。
[root@www ~]# 117_1systemctl restart sshd
s118TeraTermでlinuxユーザーの接続確認をします。
SSHサーバー公開鍵認証方式接続を設定します。
SSHサーバー公開鍵認証方式接続の設定
s119
sendmailパスの確認.
ファイルを開きます。
[root@www ~]# 119_1vi /etc/postfix/main.cf
s120665行目:sendmailパスの確認します。
sendmail_path = /usr/sbin/sendmail.postfix
s121
メールソフトの登録.
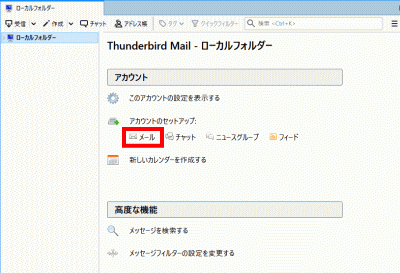
Thunderbirdを起動し、メールをクリックします。
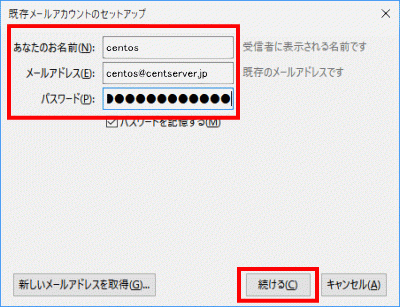
s122あなたのお名前、メールアドレス(linux@linuxserver.jp)、パスワードを入力し、「続ける」をクリックします。
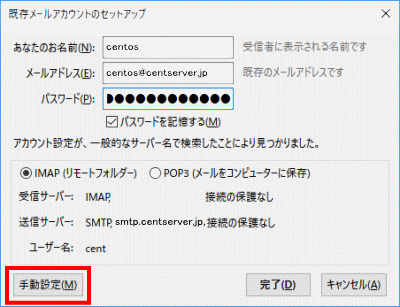
s123「手動設定」をクリックします。
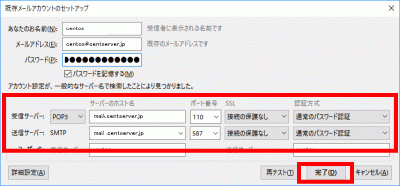
| サーバーのホスト名 | ポート番号 | SSL | 認証方式 | ||
| 受信サーバー | POP3 | mail.linuxserver.jp | 110 | 接続の保護なし | 通常のパスワード認証 |
| 送信サーバー | SMTP | mail.linuxserver.jp | 587 | 接続の保護なし | 通常のパスワード認証 |
s124上の表を参考にして設定し、「完了」をクリックします。
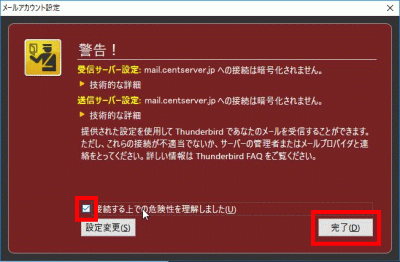
s125「接続する上での危険性を理解しました」を選択して「完了」をクリックします。
s126
サーバー証明書の取得.
Certbotをインストールします。
[root@www ~]# 126_1dnf -y install certbot
s127証明書を取得します。
ドキュメントルート:/var/www/html/
メールアドレス:webmaster@linuxserver.jp
メールサーバー名:mail.linuxserver.jp
[root@www ~]# 127_1certbot certonly --webroot -w /var/www/html/ -m webmaster@linuxserver.jp -d mail.linuxserver.jp --agree-tos
s128証明書自動更新を設定します。
[root@www ~]# 128_1vi /etc/cron.d/letsencrypt
s129下記を追記します。
129_100 16 * * 2 root /usrobin/certbot renew --post-hook "service httpd restart"
s130
SSLの設定.
ファイルを設定します。
[root@www ~]# 130_1vi /etc/postfix/main.cf
s131下記を最終行に追記します。
131_1smtp_tls_security_level = may
smtpd_tls_security_level = may
smtpd_tls_cert_file = /etc/letsencrypt/live/mail.linuxserver.jp/fullchain.pem
smtpd_tls_key_file = /etc/letsencrypt/live/mail.linuxserver.jp/privkey.pem
smtpd_tls_session_cache_database = btree:/var/lib/postfix/smtpd_scache

tls_high_cipherlist = kEECDH:+kEECDH+SHA:kEDH:+kEDH+SHA:+kEDH+CAMELLIA:kECDH:+kECDH+SHA:kRSA:+kRSA+SHA:+kRSA+CAMELLIA:!aNULL:!eNULL:!SSLv2:!RC4:!MD5:!DES:!EXP:!SEED:!IDEA:!3DES
smtp_tls_ciphers = high
smtpd_tls_ciphers = high
smtpd_tls_mandatory_ciphers = high

smtpd_tls_mandatory_protocols=!SSLv2,!SSLv3
smtp_tls_mandatory_protocols=!SSLv2,!SSLv3
smtpd_tls_protocols=!SSLv2,!SSLv3
smtp_tls_protocols=!SSLv2,!SSLv3
s132ファイルを設定します。
[root@www ~]# 132_1vi /etc/postfix/master.cf
s13319行目:行頭に「#」を追加してコメント化し、SUBMISSIONポートを無効化します。
133_1#submission inet n - n - - smtpd
s13422行目:行頭に「#」を追加してコメント化し、SUBMISSIONポートのSMTP認証を無効化します。
134_1# -o smtpd_sasl_auth_enable=yes
s13533行目:行頭の「#」を削除してコメント解除し、SMTPSを有効化します。
smtps inet n - n - - smtpd
s13635行目:行頭の「#」を削除してコメント解除し、SMTPSを有効化します。
-o smtpd_tls_wrappermode=yes
s13736行目:行頭の「#」を削除してコメント解除し、SMTPSを有効化します。
-o smtpd_sasl_auth_enable=yes
s13849行目:行頭の「#」を削除してコメント解除し、SMTPSを有効化します。
tlsmgr unix - - n 300 1 tlsmgr
s139再起動します。
[root@www ~]# 139_1systemctl restart postfix
s140
TCP465番ポート開放.
ルーターの設定で、TCP465番ポートを開放します。(設定方法はご自身の環境に合わせて調べてください。)
ポート開放テスト.
開放確認サイトで「ホスト名(mail.linuxserver.jp)」、「ポート番号(465)」の開放確認をします。
開放確認サイト
s141
TCP587番ポート閉鎖.
ルーターの設定で、TCP587番ポートを閉鎖します。(設定方法はご自身の環境に合わせて調べてください。)
ポート開放テスト.
ファイルを設定します。
[root@www ~]# 141_1vi /etc/dovecot/conf.d/10-ssl.conf
s1428行目:SSL接続を有効にする設定に変更します。
ssl = 142_1yes
s14314行目:サーバー証明書+中間証明書を指定します。
ssl_cert = <143_1/etc/letsencrypt/live/mail.linuxserver.jp/fullchain.pem
s14415行目:秘密鍵を指定します。
ssl_key = <144_1/etc/letsencrypt/live/mail.linuxserver.jp/privkey.pem
s145再起動します。
[root@www ~]# 145_1systemctl restart dovecot
s146
TCP995番またはTCP993番ポート開放.
ルーターの設定で、TCP995番またはTCP993番ポートを開放します。(設定方法はご自身の環境に合わせて調べてください。)
ポート開放テスト.
開放確認サイトで「ホスト名(mail.linuxserver.jp)」、「ポート番号(995または993)」の開放確認をします。
開放確認サイト
s147
メールソフトの設定変更.
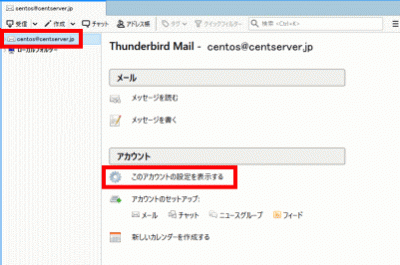
Thunderbirdを起動し、メールアドレスを選択し、「このアカウントの設定を表示する」をクリックします。
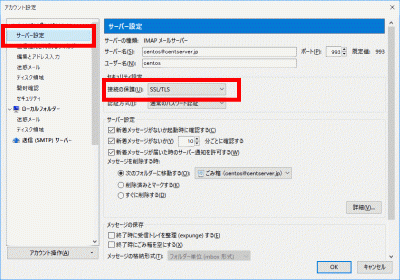
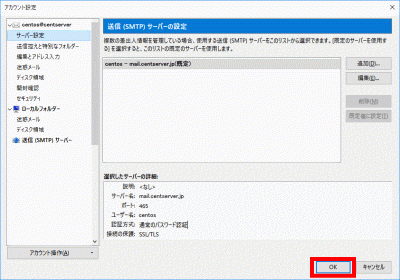
s148「サーバー設定」をクリックし、「接続の保護」で「SSL/TLS」を選択します。
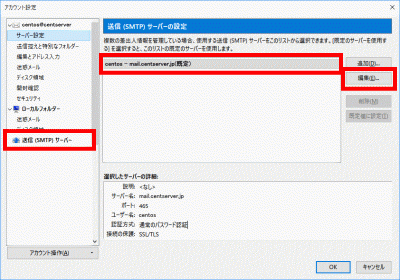
s149「送信(SMTP)サーバー」をクリックし、SMTPサーバーを選択して「編集」をクリックします。
s150「ポート番号」に「465」を入力し、「接続の保護」で「SSL/TLS」を選択して、「OK」をクリックします。
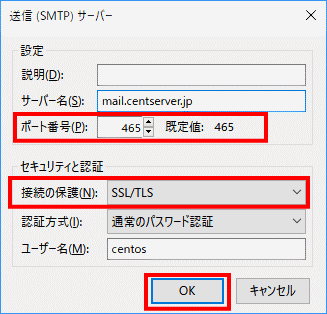
s154「OK」をクリックします。
s155
アンチウィルスソフトの連携(Clamav+Amavisd).
Amavisd および Clamav Server をインストールします。
[root@www ~]# 155_1dnf -y install amavisd-new clamd perl-Digest-SHA1 perl-IO-stringy
s156ファイルを設定します。
[root@www ~]# 156_1vi /etc/amavisd/amavisd.conf
s15723行目:ドメイン名を設定します。
$mydomain = 157_1'linuxserver.jp';
s158158行目:行頭の「#」を削除してコメント解除し、メールサーバーを設定します。
$myhostname = 158_1'mail.linuxserver.jp';
s159163、164行目:行頭の「#」を削除してコメント解除します。
$notify_method = 'smtp:[127.0.0.1]:10025';
$forward_method = 'smtp:[127.0.0.1]:10025';
s160ファイルを設定します。
[root@www ~]# 160_1vi /etc/clamd.d/scan.conf
s1618行目:行頭に「#」を追加してコメント化します。
161_1#Example
s16214行目:行頭の「#」を削除してコメント解除します。
LogFile /var/log/clamd.scan
s16377行目:行頭の「#」を削除してコメント解除します。
PidFile /var/run/clamd.scan/clamd.pid
s16481行目:行頭の「#」を削除してコメント解除します。
TemporaryDirectory /var/tmp
s16596行目:行頭の「を」削除してコメント解除します。
LocalSocket /var/run/clamd.scan/clamd.sock
s166起動します。
[root@www ~]# 166_1touch /var/log/clamd.scan
[root@www ~]# 166_2chown clamscan. /var/log/clamd.scan
s167自動起動を設定します。
[root@www ~]# 167_1systemctl enable --now clamd@scan amavisd
s168ファイルを設定します。
[root@www ~]# 168_1vi /etc/postfix/main.cf
s169最終行に追記します。
169_1content_filter=smtp-amavis:[127.0.0.1]:10024
s170ファイルを設定します。
[root@www ~]# 170_1vi /etc/postfix/master.cf
s171最終行に追記します。
171_1smtp-amavis unix -    -    n    -    2 smtp
    -o smtp_data_done_timeout=1200
    -o smtp_send_xforward_command=yes
    -o disable_dns_lookups=yes
127.0.0.1:10025 inet n    -    n    -    -    smtpd
    -o content_filter=
    -o local_recipient_maps=
    -o relay_recipient_maps=
    -o smtpd_restriction_classes=
    -o smtpd_client_restrictions=
    -o smtpd_helo_restrictions=
    -o smtpd_sender_restrictions=
    -o smtpd_recipient_restrictions=permit_mynetworks,reject
    -o mynetworks=127.0.0.0/8
    -o strict_rfc821_envelopes=yes
    -o smtpd_error_sleep_time=0
    -o smtpd_soft_error_limit=1001
    -o smtpd_hard_error_limit=1000
s172再起動します。
[root@www ~]# 172_1systemctl restart postfix


コメント