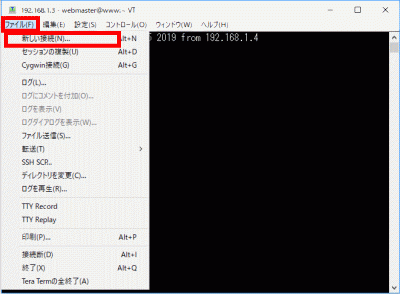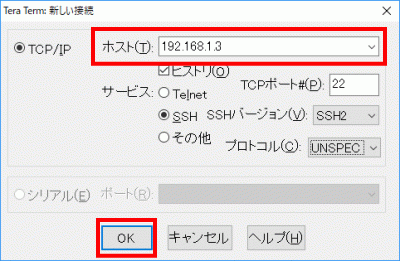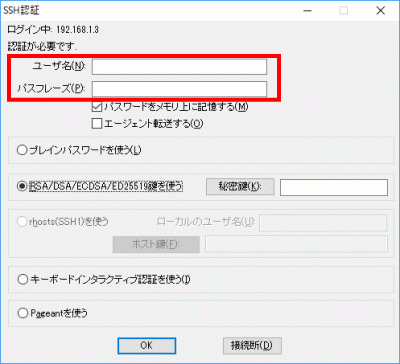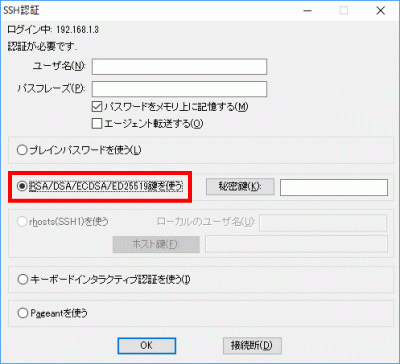
s50
DiCEのインストール.
wget パッケージと glibc パッケージをインストールします。
[root@www ~]# 50_1dnf -y install wget
[root@www ~]# 50_2dnf -y install glibc
s51DiCE をダウンロードし、解凍します。
[root@www ~]# 51_1cd /usr/local/bin
[root@www bin]# 51_2wget https://rcg.jp/download/DiCE.tar.gz
[root@www bin]# 51_3tar xzvf DiCE.tar.gz
[root@www bin]# 51_4rm -f DiCE.tar.gz
[root@www bin]# 51_5cd
s52
DiCE の設定.
ライブラリをインストールします。
[root@www ~]# 52_1dnf install ld-linux.so.2
s53「y」で応答します。
Is this ok [y/d/N]: 53_1y
s54
文字コードを「EUC-JP」に変更.
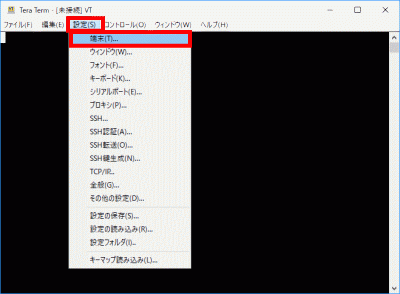
「設定」→「端末」を選択します。
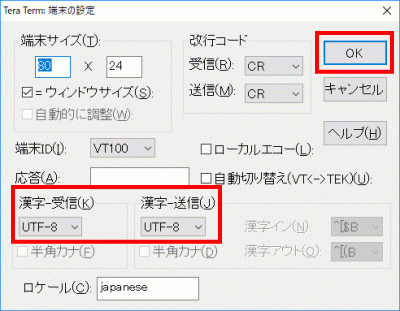
s55「漢字-受信」、「漢字-送信」をEUCに変更し、「OK」をクリックします。
s56セットアップします。
[root@www ~]# 56_1setarch `uname -m` /usr/local/bin/DiCE/diced
=-=-=- DiCE DynamicDNS Client -=-=-=
Version 0.19 for Japanese
Copyright(c) 2001 sarad

:56_2setup
s57IPアドレスの検出方法を指定してください
(0) 自動検出
(1) ローカルのネットワークアダプタから検出
(2) 外部のスクリプトから検出
<現在:0>
(N)変更しない  (P)戻る
>57_12
-------------------------------------------------
s58スクリプトのURLを入力してください
<現在:>
(N)変更しない (P)戻る
>58_1http://dyn.value-domain.com/cgi-bin/dyn.fcg?
-------------------------------------------------
s59プライベートIPアドレスも検出対象ですか? (Y/N)
<現在:いいえ>
(P)戻る
>59_1N
-------------------------------------------------
s60IPアドレスの検出をテストしますか? (Y/N)
(P)戻る
>60_1Y
検出IPアドレス>***.***.***.***
s61上記の検出IPアドレスが表示しない場合の確認はこちら、IPアドレス確認
-------------------------------------------------
s62IPアドレスの検出をテストしますか? (Y/N)
(P)戻る
>62_1N
-------------------------------------------------
s63IPアドレスをチェックする間隔を指定してください(分)
設定可能範囲は5分以上です
<現在:60>
(N)変更しない  (P)戻る
>63_15
=================================================
s64DNSサーバーの負荷を軽減するために頻繁なDNS更新を防ぐ必要があります
前回の更新から一定時間DNS更新処理を行わないように保護時間を設定して
ください(分)  設定可能範囲は10分から1440分です
<現在:60>
(N)変更しない  (P)戻る
>64_110
=================================================
s65設定を保存しますか? (Y/N)
(P)戻る
>65_1Y
s66設定を保存しました
=================================================
s67
DiCEイベントの追加.
ドメイン(VALUE DOMAIN)に合わせて設定します。
:67_1add
s68新しくイベントを追加します

DynamicDNSサービス名を入力してください
"?"で対応しているサービスを一覧表示します
(P)戻る
>?
           ZENNO.COM            livedoor            MyDNS.JP
              pcc.jp              JPN.ch             MyIP.US
              @nifty         StaticCling            MyServer
             ddns.ca                 p2p      did.expoze.com
              Dynamx          WebReactor               unicc
               Earth              DNS2Go              instat
              Now.nu           dynDNS.it          onamae.com
                DION                 ODN         RegisterFly
                 DHS          Netservers                todd
                 USA                 cjb              Dyn.ee
             BIGLOBE                dnip             3domain
             miniDNS           my-domain            ZoneEdit
                ZiVE                  yi                ysdn
              theBBS            SelfHOsT              ddo.jp
               No-IP             nicolas                eNom
           CyberGate            EveryDNS           Microtech
            ieServer          HAMMERNODE             GetmyIP
               Dynup                Dynu                dyns
              DynDSL            DynDNSdk              dyndns
               DtDNS                dnsQ                 dhs
             DDNS.nu            cheapnet            changeIP
            ARTofDNS         68_1VALUEDOMAIN                 ODS
              JSPEED               IPDYN            DnsTokyo
=================================================
s69新しくイベントを追加します


ホスト名を入力してください
(P)戻る
>69_1VALUEDOMAIN
=================================================
s70ドメイン名を入力してください
"?"でドメイン一覧を表示します
(P)戻る
>ドメイン名
=================================================
s71ホスト名を入力してください
(P)戻る
>71_1*
=================================================
s72ログインユーザ名を入力してください
(P)戻る
>
=================================================
s73ログインパスワードを入力してください
(P)戻る
>ログインパスワード
=================================================
s74登録するIPアドレスを入力してください
空白にすると現在のIPアドレスを自動検出します
(P)戻る
>
=================================================
s75このイベントに題名を付けてください
(P)戻る
>75_1VALUEDOMAIN-75_1ドメイン名

s76このイベントを実行するスケジュールを設定します
-------------------------------------------------
実行する頻度を指定してください (番号入力)
(0)1回のみ (1)1日1回 (2)1週間に1回 (3)1ヵ月に1回
(4)その他の周期 (5)IPアドレス変化時 (6)起動時
(P)戻る
>76_14
-------------------------------------------------
s77実行する周期を指定してください
<現在:9>
(0)3分毎   (1)5分毎   (2)10分毎  (3)30分毎
(4)1時間毎 (5)2時間毎 (6)6時間毎 (7)12時間毎
(8)24時間毎(9)7日毎   (10)14日毎 (11)21日毎
(12)28日毎 (13)35日毎 (14)56日毎 (15)84日毎
(N)変更しない  (P)戻る
>77_10
=================================================
=================================================
s78このイベントを有効にしますか? (Y/N)
(イベントの有効/無効は"EN/DIS"コマンドで切替えられます)
>78_1Y
=================================================
s79イベントを保存しますか? (Y/N)
>79_1Y
イベント"VALUE-DOMAIN-server.jp"を保存しました
=================================================
:
s80転送を有効化して終了します。
:80_1ex 0
+ 4/8 17:00 にVALUEDOMAIN-server.jpが実行されました
  IPアドレスを更新しました
:80_2quit
s81「漢字-受信」、「漢字-送信」をUTF-8に変更し、「OK」をクリックします。
その他の方法
IPアドレス更新スクリプトを作成します。
[root@www ~]# vi /usr/local/bin/update_ip_script.sh
#!/bin/bash

# Store your domain, password, hostname, and current IP address in variables
DOMAIN=${1}
PASS=${2}
HOST=${3}

# Store URLs and values in variables
IPINFO_URL="http://ipinfo.io/ip"
VD_UPDATE_BASE_URL="http://dyn.value-domain.com/cgi-bin/dyn.fcg"
NS_SERVER="ns1.value-domain.com"  # Store the DNS server address

DOMAIN_LOG="d"
PASS_LOG="p"
HOST_LOG="h"
CURRENTIP_LOG="i"

if [ "${HOST}" = "" ]; then
    FQDN=${DOMAIN}
else
    FQDN="${HOST}.${DOMAIN}"
fi

# Error Messages
ERROR_MSG_VDIP="Error detecting IP address configured in VALUE-DOMAIN settings"
ERROR_MSG_CURRENTIP="Error detecting current IP address"
UPDATE_SUCCESS_MSG="IP address update successful"
UPDATE_ERROR_MSG="IP address update error"
EMAIL_SUBJECT="IP address update error"

# Obtain IP address configured in VALUE-DOMAIN settings
IPGETLOG=`host ${FQDN} ${NS_SERVER} 2>&1`
VDIP=`echo "${IPGETLOG}" | grep "has address" | awk '{ print $NF }' | egrep ^[0-9]+\.[0-9]+\.[0-9]+\.[0-9]+$`
if [ $? -ne 0 ]; then
    echo "${FQDN} ${ERROR_MSG_VDIP}" | logger -t $(basename $0)
    echo ${IPGETLOG} | logger -t $(basename $0)
    exit
fi

# Obtain current IP address
IPGETLOG=`curl "${IPINFO_URL}" 2>&1`
echo "${IPGETLOG}" | egrep ^[0-9]+\.[0-9]+\.[0-9]+\.[0-9]+$ > /dev/null 2>&1
if [ $? -eq 0 ]; then
    CURRENTIP=`echo "${IPGETLOG}" | tail -n 1 | awk '{ print $NF }'`
else
    echo "${DOMAIN} ${ERROR_MSG_CURRENTIP}" | logger -t $(basename $0)
    echo "${IPGETLOG}" | logger -t $(basename $0)
    exit
fi

# Create URL query parameters
QUERY_PARAMS="${DOMAIN_LOG}=${DOMAIN}&${PASS_LOG}=${PASS}&${HOST_LOG}=${HOST}&${CURRENTIP_LOG}=${CURRENTIP}"

# Combine with the base URL for VALUE-DOMAIN update
VD_UPDATE_URL="${VD_UPDATE_BASE_URL}?${QUERY_PARAMS}"

# Update VALUE-DOMAIN configured IP address
# (Only if VALUE-DOMAIN configured IP address is different from current IP address)
if [ "${VDIP}" != "${CURRENTIP}" ]; then
    IPUPDATE=`wget -q -O - "${VD_UPDATE_URL}"`
    echo ${IPUPDATE} | grep -q OK
    if [ $? -eq 0 ]; then
        echo "${FQDN} ${UPDATE_SUCCESS_MSG} ${VDIP} to ${CURRENTIP}" | logger -t $(basename $0)
    else
        echo "${FQDN} ${UPDATE_ERROR_MSG}" | logger -t $(basename $0)
        echo ${IPUPDATE} | logger -t $(basename $0)
        (
        echo ${UPDATE_ERROR_MSG}
        echo ${IPUPDATE}
        ) | mail -s "${SCRIPT##*/}${EMAIL_SUBJECT}" root
        exit 1
    fi
fi
exit
IPアドレス更新スクリプトへ実行権限付加します。
[root@www ~]# chmod +x /usr/local/bin/update_ip_script.sh
IPアドレス更新スクリプトを実行します。
[root@www ~]# /usr/local/bin/update_ip_script.sh ドメイン パスワード "*"
IPアドレス更新スクリプトを定期自動実行ファイルを作成します。(3分毎に実行します。)
[root@www ~]# vi /etc/cron.d/ddns-update
*/3 * * * * root /usr/local/bin/update_ip_script.sh ドメイン パスワード "*"